
Spectrasonics Software Activation Instructions

How to use this guide
In this guide, we will show you how to install and activate your new Spectrasonics software. That means we’ll show you how to register the serial number and install the software. Follow the sections below to get started.
Getting Started
Congrats on purchasing your new Spectrasonics software! To begin, you’ll first need to create an account and register the serial number with Spectrasonics. If you have already made an account, you don’t need to make another. Just make sure to continue using the same one.
Register the serial number
To get access to your Spectrasonics installers and updates, you first need to create an account and register the serial number. Follow the steps below to get your software registered.
1. Log into your Spectrasonics account. If you don’t have one yet, create an account here.
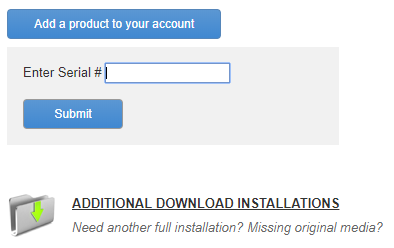
2. In the User Account page, click Add a product to your account.
3. Locate the serial number found on the front page of your product’s printed user guide. Enter the serial number and click Submit.
Install and Authorize
Once you have the serial number registered to your account, the next step is to install it then authorize it.
Install the software
Once you have the serial number registered to your account, the next step is to install it. This is a two-step process as you first need to download the installer files, then run the installation and data update files. We recommend installing them to a dedicated external hard drive and creating a folder with a unique name such as Spectrasonics Library or Spectrasonics Content to install your library to. Follow these steps to get your software installed.
1. Connect the included drive to a USB port, then open the Spectrasonics drive on the computer and double-click the product installation .url file. If your computer doesn’t recognize the disk, flip it the other way.
2. Log into your Spectrasonics account and download the product installer.
3. Open your downloads folder, open the installation folder, then open the Step 1 – Installer folder.
- PC: Right-click the .zip installation folder and select Extract all…. Open the newly extracted folder and double-click the installer .exe file.
- Mac: Double-click the installer .pkg file.
4. Run the installer file and follow the on-screen instructions. During the installation process, you’ll be prompted to select the installation path for your library (STEAM folder).
5. Once the installation is complete, go back to the installation folder within your Downloads.
6. Open the Step 2 – Data Updater folder, then run the Data Updater file within the OS folder.
The installation takes time!
Spectrasonics libraries are large, so it will take a bit of time to complete the installation. Do not unplug the drive from your computer while it’s installing.
Authorizing the libraries
The final step in activating your Spectrasonics library is to authorize it to your computer using the unique response code generated. You will need an internet connection to complete the authorization. Follow the steps below to authorize your library.
1. Launch the standalone application or open your DAW and load your Spectrasonics product on a virtual instrument track.
2. Copy the Challenge Code by clicking the Copy button.
3. Go to the authorization page, then click Authorize product.
4. Paste the challenge code, fill out the required information, then click Submit.
5. Copy the unique Response Code listed, go back to your library, then click the Paste button in the Response Code field.
6. Click Continue, then restart the program to complete authorization.
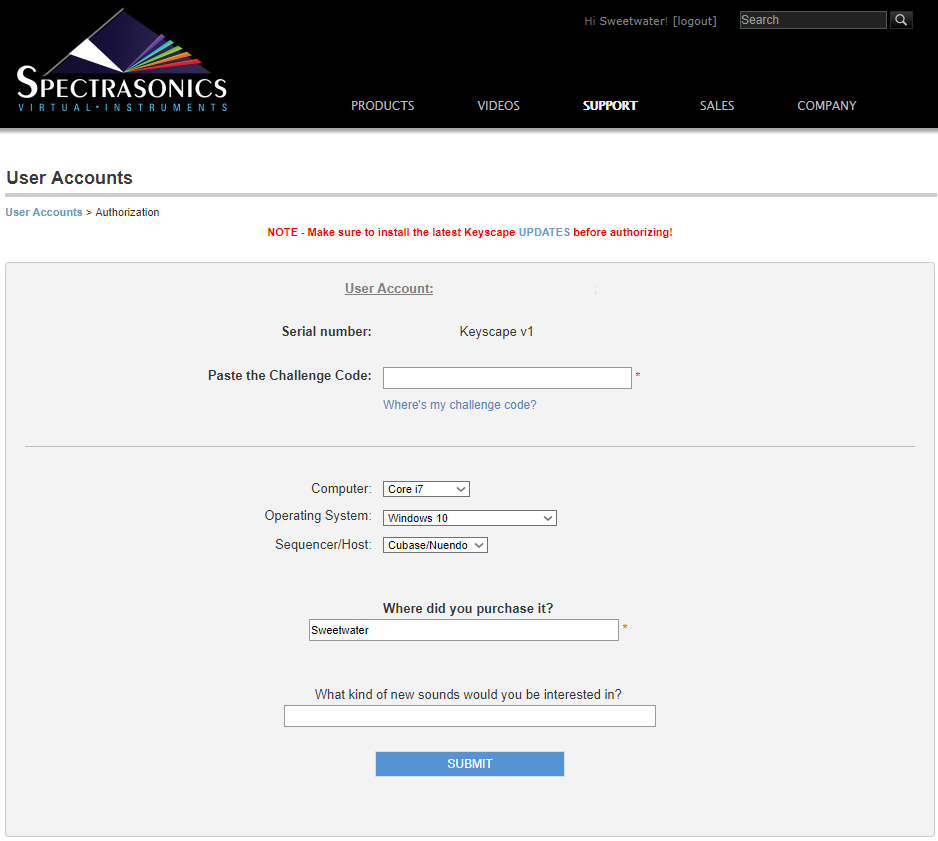
Paste the challenge code on the Authorization page.
Related Content
Omnisphere Memory Management
Stylus RMX Time Designer
Trillian Groove Envelopes
Trillian Latch and Trigger Modes
When you need help, Sweetwater has the answers!
Our knowledge base contains over 28,000 expertly written tech articles that will give you answers and help you get the most out of your gear. Our pro musicians and gear experts update content daily to keep you informed and on your way. Best of all, it’s totally FREE, and it’s just another reason that you get more at Sweetwater.com.


Offer applies only to single-receipt qualifying purchases. Select manufacturers may require that only the manufacturer’s products qualify towards the minimum purchase amount needed to be eligible for promotional financing. Otherwise, an invoice that meets the minimum purchase amount and contains at least one qualifying manufacturer product is eligible for promotional financing. No interest will be charged on promo purchase balance, and equal monthly payments are required on promo purchase until it is paid in full. The payments equal the amount financed divided by the number of months in the promo period, rounded up to the next whole dollar. These payments may be higher than the payments that would be required if this purchase was a non-promo purchase. During the last month(s) of the promo period the required monthly payment may be reduced due to the prior months’ rounding. Regular account terms apply to non-promo purchases. New Accounts as of 07/31/2025: Purchase APR is 34.99%. Penalty APR is 39.99%. Min Interest Charge is $2. Existing cardholders: See your credit card agreement terms. Subject to credit approval.
Offer applies only to single-receipt qualifying purchases. No interest will be charged on the promo balance if you pay it off, in full, within the promo period. If you do not, interest will be charged on the promo balance from the purchase date. The required minimum monthly payments may or may not pay off the promo balance before the end of the promo period, depending on purchase amount, promo length and payment allocation. Regular account terms apply to non-promo purchases and, after promo period ends, to the promo balance. New Accounts as of 07/31/2025: Purchase APR is 34.99%. Penalty APR is 39.99%. Min Interest Charge is $2. Existing cardholders: See your credit card agreement terms. Subject to credit approval.
The estimated required monthly payment shown which excludes taxes and delivery equals the amount financed divided by the number of months in the promo period, rounded up to the next cent. During the last month(s) of the promo period the required monthly payment may be reduced due to this rounding. These payments apply only with the financing offer shown. If you make these payments by the due date each month, you should pay off this amount financed within the promo period, if it is the only balance you are paying off. If you have other balances on your account, this payment will be added to any other minimum monthly payments.
Applies only to select items from this manufacturer. Ask your Sweetwater Sales Engineer for more details.