
Oboe Quickstart Guide
IMPORTANT: In all things regarding your new oboe, ask your private teacher to show you how it’s done. As your teacher shows you how to play the instrument, he or she will be able to answer your questions.
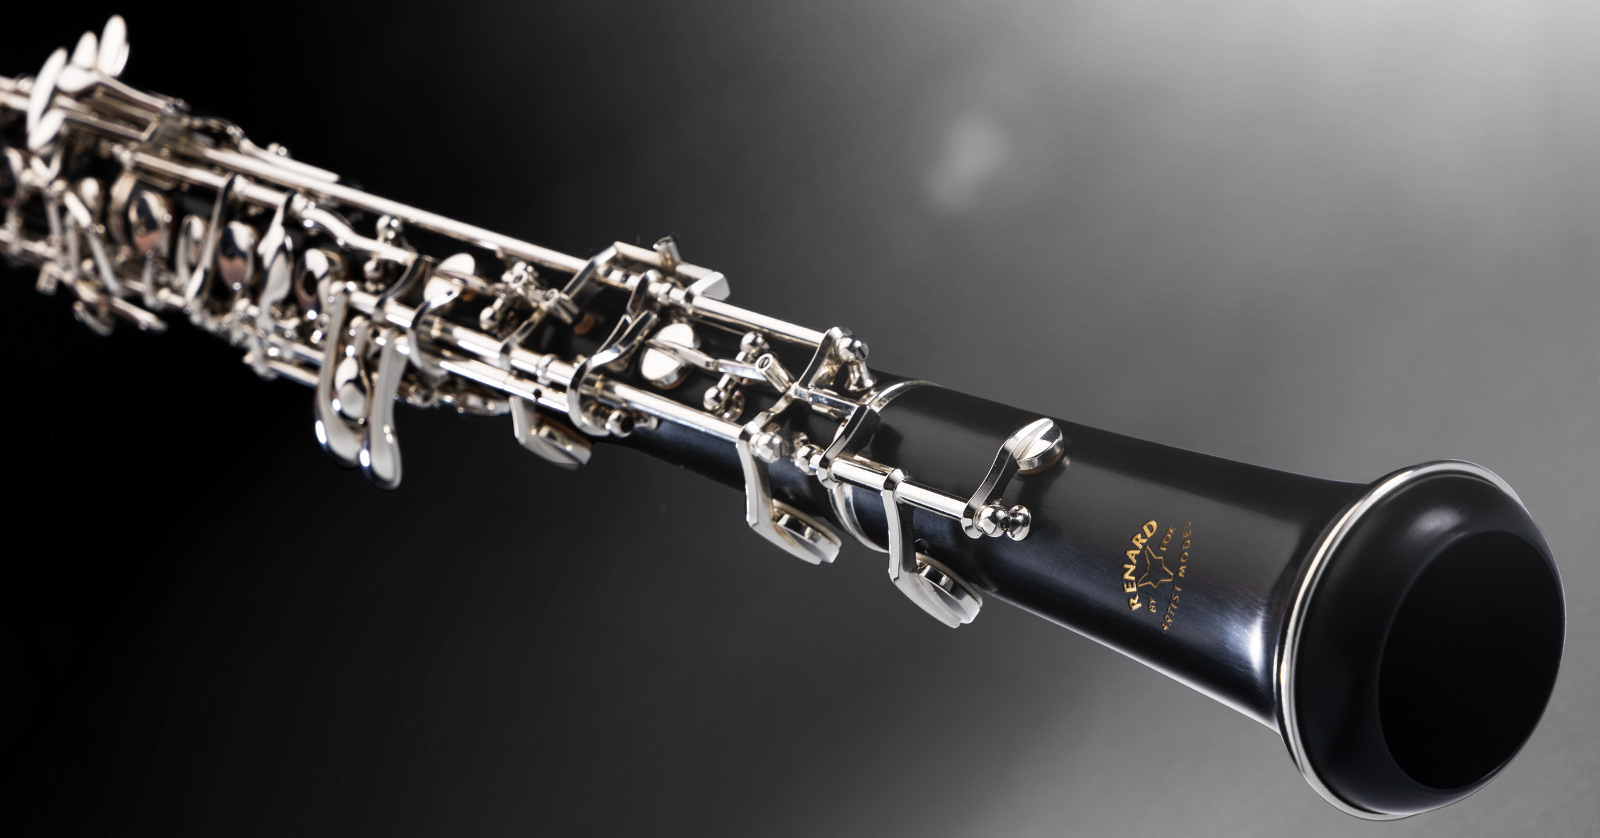
Congratulations on your new oboe from Sweetwater. The oboe has a distinct and beautiful tone that can be found in the soundtracks of some of your favorite movies. We are sure you will enjoy growing and learning more about the oboe for years to come.
- Parts of an Oboe
- If Your Oboe is Made of Wood
- How to Assemble an Oboe
- Proper Playing Technique for Oboe
- Clean Your Oboe and Take It Apart
- Oboe Care and Maintenance
Parts of an Oboe
TIP: Different models of oboe may vary in the number of keys. Don’t worry if your oboe does not look exactly like the diagrams here.
The oboe is a double-reed instrument in the woodwind family. The oboe reed is actually two pieces of cane bound together. When you blow air into the reed, it vibrates to create the sound.
Most student model oboes will be made of a plastic material, but more advanced oboes can be made of a hardwood called grenadilla.
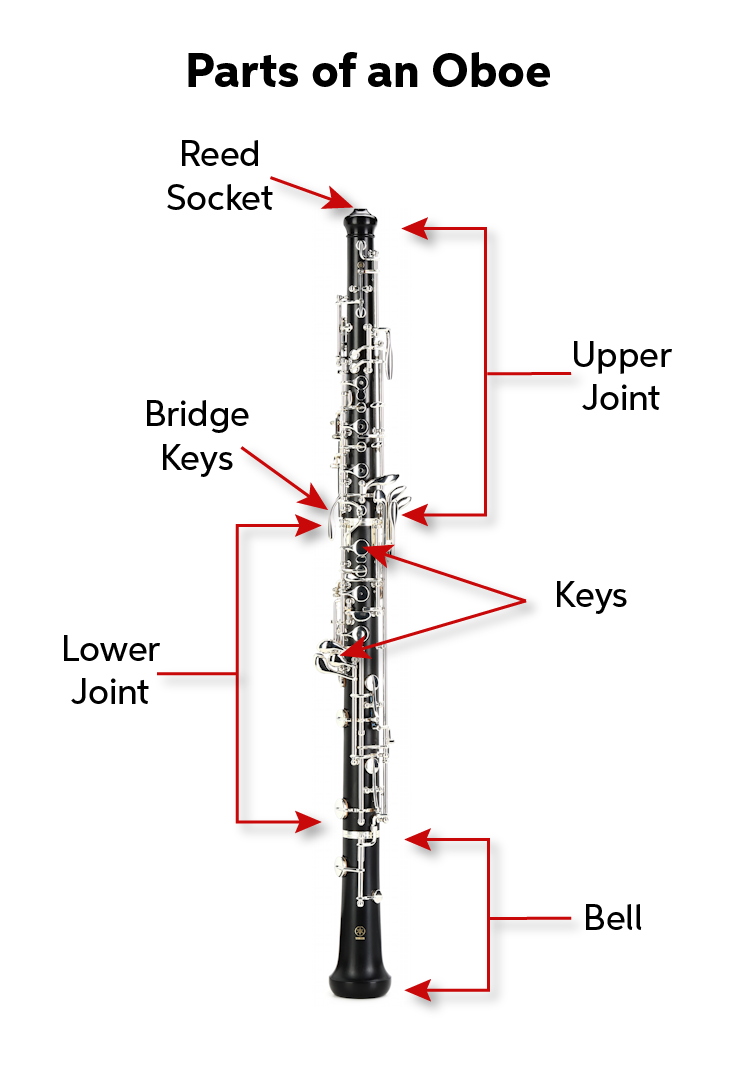
Parts of an Oboe
Reed
TIP: Having a couple of reeds that you switch between can make them last longer. Ask your teacher if you have any questions on the best way to care for these delicate reeds.

An oboe reed
In the oboe reed, two pieces of cane have been carved and shaped and are bound together and mounted into a metal tube wrapped in cork. The reed fits into the socket in the upper joint. The reed must be handled carefully, stored in a reed case, and replaced when it wears out or breaks.
Tone Holes and Keys
The body of the oboe has a number of tone holes that are closed by keys. Opening and closing the keys in different combinations changes the note.
The Body of the Oboe
The oboe’s body is divided into sections which you put together.
Upper Joint
The upper joint holds the keys and levers that you play with your left hand. Certain keys on the upper joint are connected to the lower joint using the bridge key mechanism. Be careful when putting the upper and lower joints together to make sure the bridge keys don’t hit anything.
Lower Joint
The lower joint contains other keys and tone holes which you play with your right-hand fingers. On the back is the thumb rest.
Bell
The bell is the flared piece at the end of the air column. Different oboes may have a bell with one key, or two, or none. Ask your teacher to show you how to attach the bell, depending on its design.
If Your Oboe is Made of Wood
IMPORTANT: If your oboe is made of grenadilla wood, you need to take special care of it and protect it from drastic changes in temperature. Otherwise, the wood can crack.
Never leave your oboe in a cold place.
If you just received a new wooden oboe, bring the box inside and wait a full day to permit your oboe to acclimate to the temperature in your house before you take it out and assemble it.
A new wooden oboe needs to be broken in slowly. Start out playing it for only ten to fifteen minutes a day, swabbing it out thoroughly afterwards.
Ask your teacher about caring for your new wooden oboe.
Learn more in Sweetwater’s Oboe Care and Maintenance Guide.
How to Assemble an Oboe
TIP: If you have questions about putting your oboe together, ask your teacher to show you how.
Put your oboe case on a table. Make sure the brand logo is on top, so you don’t open the case upside-down. Now lift the latches or unzip the case and open the lid.
Soak Your Reed

Soaking the reed in a cup of water
Dip the tip of the reed (the end with the cane) in a cup of water. Let it soak for a couple of minutes, while you put the oboe together.
Cork Grease
The sections of the oboe are fitted together by short tenons which are wrapped in cork. Apply a little cork grease if the sections don’t fit together easily. Ask your teacher when and how to use cork grease.
Assemble the bell and the joints
First, attach the bell to the lower joint. The way you do this depends on whether your bell has one key, two keys or no keys, so ask your teacher to show you the correct way to do this for your oboe.


When you hold the upper joint, don’t put pressure on the keys; grasp it from the top of the upper joint.
Grasp the lower joint with your other hand. Your teacher will show you where to place your thumb on the correct key of the lower joint to raise the bridge key mechanism.

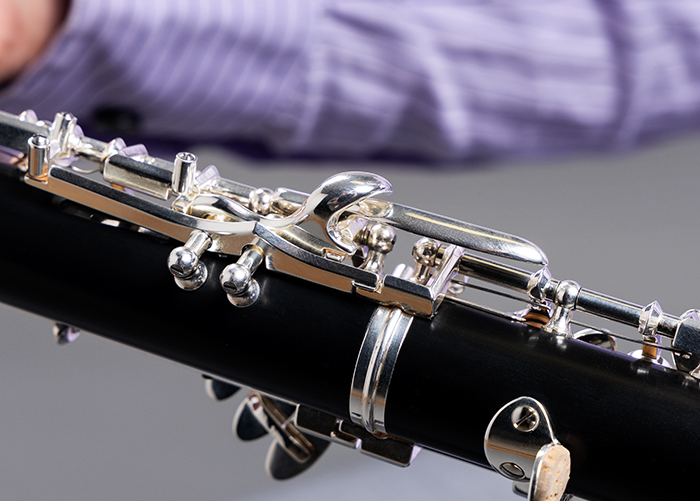
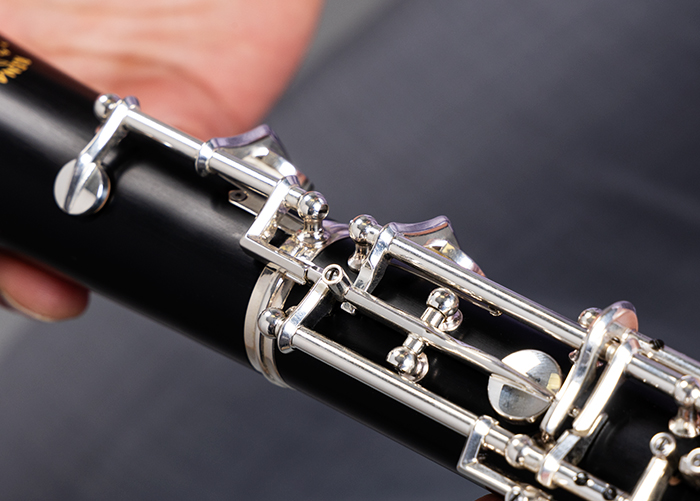
Two views of the proper alignment of the bridge key mechanism between the upper joint and lower joint
When you fit the two joints together, you need to carefully align the parts of the bridge key mechanism. Make sure you don’t hit any of the other keys or posts. Ask your teacher to show you how.

Inserting the reed into the reed socket in the upper joint
Take the soaked reed out of its cup of water. Insert the reed into the top of the upper joint.
Proper Playing Technique for Oboe
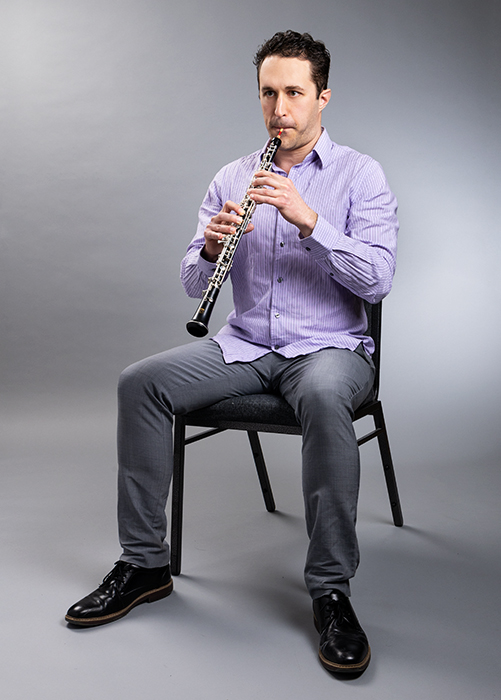
Proper posture and playing position
Playing the oboe requires breath support, which means controlling the way you blow air through an instrument. Your teacher will spend a lot of time working with you on this. In order to have good breath support, you need to sit with good posture.
Get a sturdy chair of the right height so you can sit on the forward part of the chair with both feet flat on the floor. Your upper body and head need to be straight and tall, not leaning forward. Bring the oboe to you; don’t move toward the oboe. Your shoulders should be slightly back, but relaxed, not tensed up.
Your teacher will coach you as you play your first notes. Your teacher will help you form the correct embouchure, which means the way you hold your mouth and your lips with the reed inserted into your mouth.
When you play, hold the oboe at a 45° angle to your body, not pointing outward.
Hold the oboe with your right thumb on the thumbrest. Your teacher will show you how to position each of your fingers to work the keys.
Clean Your Oboe and Take It Apart
Every time you finish playing your oboe, you need to disassemble it and swab it out to remove the moisture, and then put the pieces back into the case.
Swabbing Your Oboe
IMPORTANT: Be careful not to let the swab get stuck in the instrument. If you feel any resistance as you are pulling the swab through, pull it back out the other side. If it gets stuck, consult an instrument repair technician.
Water from your breath, or condensation, works its way through the oboe while you play. The inside of the oboe needs to be dried out every time you finish playing, before you put it away. This is done in stages, using two swabs, one large and one small.
- Remove the reed from the upper joint.
- Separate the upper joint from the lower joint and set the upper joint aside.
- Swab out the bell and lower joint using the larger swab.
- Swab out the upper joint using the smaller swab.
- Remove the bell from the lower joint.
- Put all the parts back in the case.
Here are the steps in detail.
Remove the reed from the upper joint and set it in a reed case.
Separate the upper joint from the lower joint, in the reverse manner that you put it together, taking care with the bridge key mechanism.
The swab for the lower joint has a long string attached, with a small metal weight at the end. Unwrap the swab and lay out the full length of the string. Make sure there are no knots or kinks; otherwise, the swab will get stuck inside the oboe.


Hold your oboe upside-down and insert the weighted end of the swab’s string into the bell.
Let the weight fall through the bell and lower joint. Grab the weight when it emerges below.

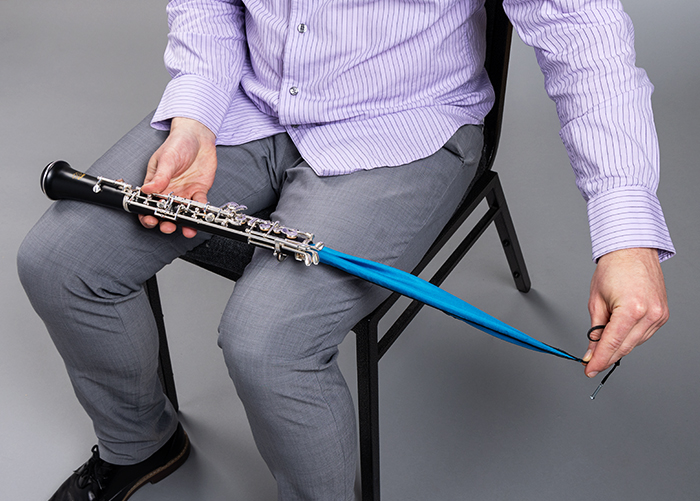
Place the instrument on your lap, and carefully and slowly pull on the string to draw the swab through the body.
Separate the bell from the lower joint, and place both back in the case.
Now it’s time to swab out the upper joint. It’s the same procedure as you used on the lower joint, but you use the smaller swab.


Hold the lower joint upside down and insert the weighted end of the swab’s string into the tenon. Let it fall through the joint.


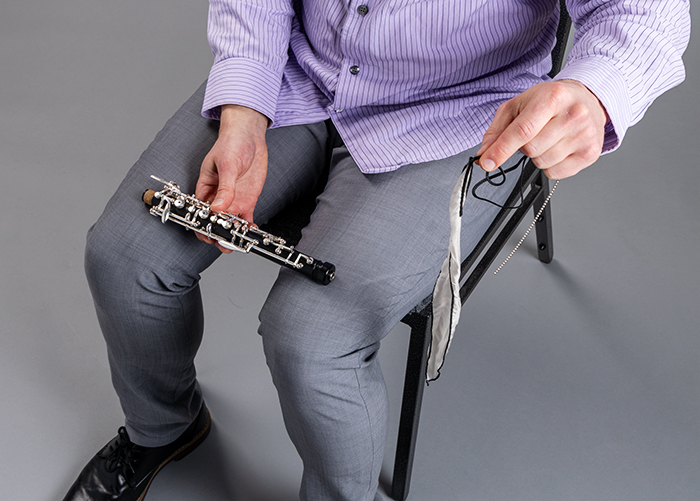
Place the upper joint on your lap, grab the string, and gently pull the swab through the upper joint until it’s free.
Now you can put the upper joint back in the case.
TIP: Pack up your oboe in its case and let the swabs dry out.
Wipe down the keys and metal parts
Take each part of the oboe out of the case for a moment and use a microfiber cloth to gently wipe down the keys and metal parts to protect them from tarnishing. Now place the parts back in the case and close it.
Oboe Care and Maintenance
Now that you know more about your new oboe, learn how to keep it playing smoothly. Read our Oboe Care and Maintenance Guide.
When you need help, Sweetwater has the answers!
Our knowledge base contains over 28,000 expertly written tech articles that will give you answers and help you get the most out of your gear. Our pro musicians and gear experts update content daily to keep you informed and on your way. Best of all, it’s totally FREE, and it’s just another reason that you get more at Sweetwater.com.


Offer applies only to single-receipt qualifying purchases. Select manufacturers may require that only the manufacturer’s products qualify towards the minimum purchase amount needed to be eligible for promotional financing. Otherwise, an invoice that meets the minimum purchase amount and contains at least one qualifying manufacturer product is eligible for promotional financing. No interest will be charged on promo purchase balance, and equal monthly payments are required on promo purchase until it is paid in full. The payments equal the amount financed divided by the number of months in the promo period, rounded up to the next whole dollar. These payments may be higher than the payments that would be required if this purchase was a non-promo purchase. During the last month(s) of the promo period the required monthly payment may be reduced due to the prior months’ rounding. Regular account terms apply to non-promo purchases. New Accounts as of 07/31/2025: Purchase APR is 34.99%. Penalty APR is 39.99%. Min Interest Charge is $2. Existing cardholders: See your credit card agreement terms. Subject to credit approval.
Offer applies only to single-receipt qualifying purchases. No interest will be charged on the promo balance if you pay it off, in full, within the promo period. If you do not, interest will be charged on the promo balance from the purchase date. The required minimum monthly payments may or may not pay off the promo balance before the end of the promo period, depending on purchase amount, promo length and payment allocation. Regular account terms apply to non-promo purchases and, after promo period ends, to the promo balance. New Accounts as of 07/31/2025: Purchase APR is 34.99%. Penalty APR is 39.99%. Min Interest Charge is $2. Existing cardholders: See your credit card agreement terms. Subject to credit approval.
The estimated required monthly payment shown which excludes taxes and delivery equals the amount financed divided by the number of months in the promo period, rounded up to the next cent. During the last month(s) of the promo period the required monthly payment may be reduced due to this rounding. These payments apply only with the financing offer shown. If you make these payments by the due date each month, you should pay off this amount financed within the promo period, if it is the only balance you are paying off. If you have other balances on your account, this payment will be added to any other minimum monthly payments.
Applies only to select items from this manufacturer. Ask your Sweetwater Sales Engineer for more details.