
MXR Bass Synth Pedal Quickstart Guide
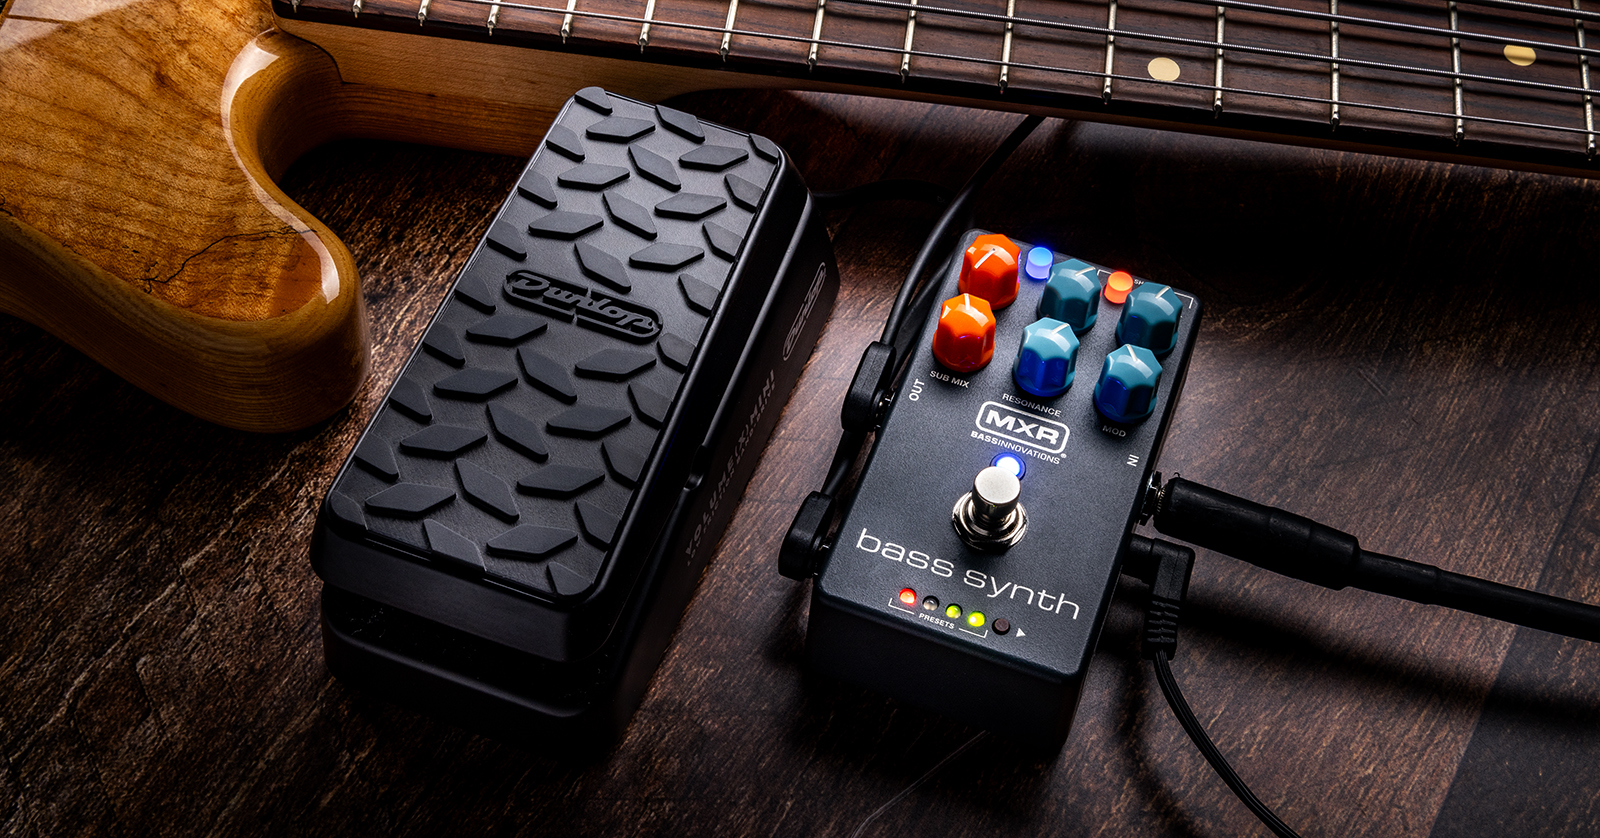
Plug your bass guitar into the MXR Bass Synth pedal, and you’ll have a blast with its eight presets of classic keyboard synth tones ready for the stage. Dig deeper, and you’ll discover that it’s a full-fledged virtual analog synthesizer with extensive sound-shaping parameters. While you create your own tones and presets, you can learn the basics of synthesizer programming. Let’s get started.
- Register Your Purchase
- Download the Owner’s Manual
- Playing with the MXR Bass Synth Presets
- How Does the MXR Bass Synth Work?
- MXR Bass Synth Tutorial Video
- MXR Bass Synth Connections
- MXR Bass Synth Controls
- Saving Presets
- MXR Bass Synth Factory Reset
- MXR Bass Synth Demo Video
- Learn Synthesis with Sweetwater
Register Your Purchase
Take the time to register your Dunlop product to obtain your full warranty coverage.
Download the Owner’s Manual
We’ve made a lot of practical notes for you in this guide, but you’ll want the owner’s manual for reference.
On Dunlop’s MXR Bass Synth product page, click on “Product Manual” to download the owner’s manual.
Playing with the MXR Bass Synth Presets
Pro Tips: Connect the output from your bass guitar directly to the In jack on the MXR Bass Synth. Don’t go through any effects beforehand. This ensures that the Bass Synth can accurately track the notes you play on your instrument.
The MXR Bass Synth tracks very well; but as you play, pay attention to muting the open strings. Sympathetic vibrations from adjacent strings may trigger unexpected notes or glitches from the synthesizer.
With the power disconnected, connect the output from your bass guitar to the In jack on the MXR Bass Synth. Use the Out jack to connect to other effects and your amp.
Power the MXR Bass Synth by connecting the included Dunlop ECB003 9-volt adapter.
Try each of the presets by tapping the red Presets button at the bottom of the front panel. Each tap of the Presets button advances to the next preset. There are two banks, each with four presets.
Here are the presets and the classic sounds that inspired each one.
Green Bank
- Thrillenganes: The ARP 2600 on Michael Jackson’s “Thriller” (1982) played by Greg Phillinganes.
- Wonderful: Stevie Wonder’s tones from his early 1970s albums with the TONTO instrument, from Music of My Mind forward.
- Lizard Synth: Herbie Hancock’s ARP Odyssey on “Chameleon” (1973).
- Synthadelic: Bernie Worrell’s Minimoog on “Flash Light” by Parliament-Funkadelic (1977).
Red Bank
- Sledge: This one is not a keyboard synth sound. It’s based on Tony Levin’s fretless bass guitar through an octave pedal on Peter Gabriel’s “Sledgehammer” (1986).
- Army of Synth: Bjork’s sound on “Army of Me” (1995).
- Nine Inch Synth: Trent Reznor’s sound on Nine Inch Nails’ “Head Like a Hole” (1989).
- Synthmau5: The sounds of producer deadmau5 (Joel Zimmerman) in the 2000s.
Live Mode
After you tap through the last preset, none of the four LEDs are lit. You are now in Live mode, and the synth sound is determined by the current position of each knob. This is where you can construct a patch from scratch and save it to one of the preset slots. Tapping the Presets button again will take you back through the eight presets.
How Does the MXR Bass Synth Work?
The MXR Bass Synth takes the audio input from your bass guitar, senses each note you play, and generates a synthesizer voice. (Most of the presets output just the “wet” synthesizer voice, but you can blend in the “dry” sound of your bass guitar on each preset by turning the Mix knob.)
The MXR Bass Synth is a digital device that emulates the sound of a classic monophonic analog subtractive synthesizer.
When you program a sound, you use the same building blocks and signal path found in an analog synth.
- Starting with the main oscillator, you can select its waveform then blend in additional oscillators above and below.
- These are sent to the filter section, with controls for cutoff and resonance.
- Next come the envelopes, which act as a voltage-controlled filter (VCF) and a voltage-controlled amplifier (VCA) with control over attack and decay. (The sustain of each synth note corresponds to the sustain of the note you play on your bass guitar.)
- There’s also a modulation section with chorus and low-frequency oscillator (LFO).
You can set up an external expression pedal to modulate one or more parameters of the sound, just like using the mod wheel on a keyboard synthesizer.
MXR Bass Synth Tutorial Video
Take the time to watch this 30-minute video from MXR. The video explains the different ways to connect, configure, and control the unit. The video shows you all of its tone-shaping and synth-programming features with musical examples.
MXR Bass Synth Video Manual
MXR Bass Synth Connections
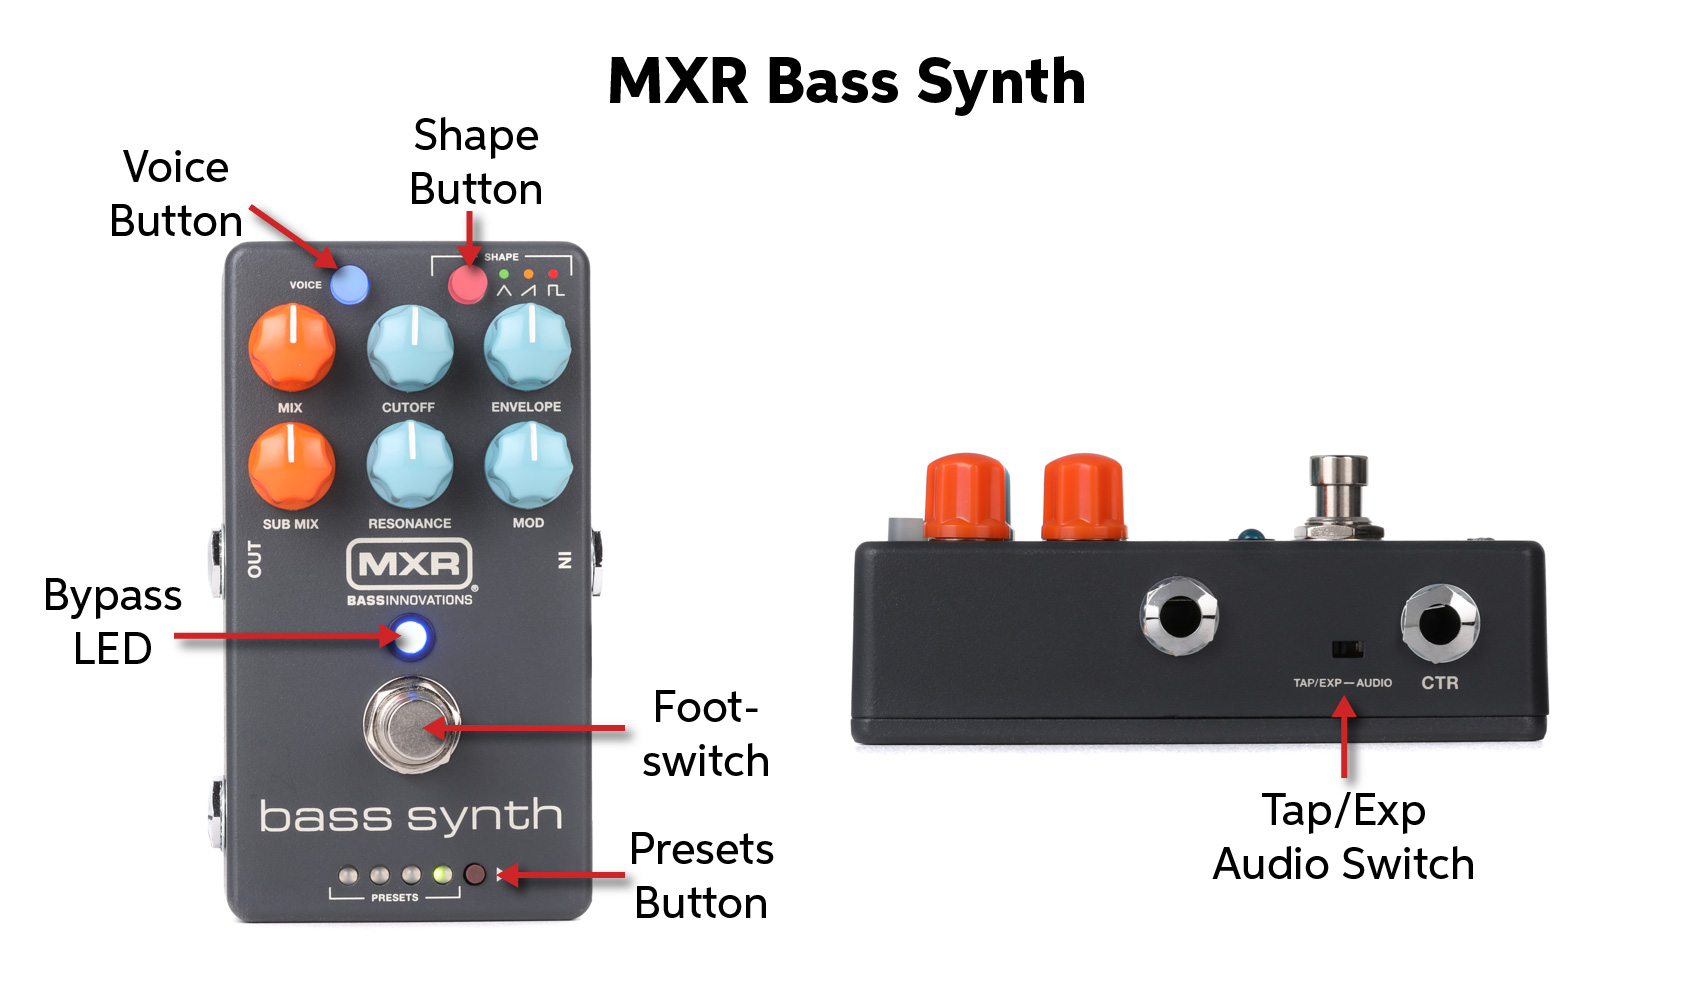
MXR Bass Synth controls and connections
With the unit powered off, you can make these connections.
In
Connect your bass guitar using a TS instrument cable.
Out
The pedal can be configured for mono output from this 1/4-inch jack, using a TS cable, or for stereo output, using a TRS cable going to a splitter box (sold separately) such as the MXR TRS Split + Tap.
CTR
The CTR jack can be configured to provide different functions:
Audio Output Mode
When the recessed Tap/Exp – Audio switch is set to Audio, obtain stereo output by using a TS connection in the Out jack for the left channel, and a second TS connection in the CTR jack for the right channel.
In addition to mono output with one TS cable, you can configure the pedal for two stereo modes:
- Stereo: The pedal creates a stereo field effect with panned oscillators, stereo filters, and chorusing.
- Wet/Dry: The synth signal is on the left output, and the bass guitar signal is on the right output.
There’s another parameter setting you can use with either stereo or mono output: Dry Thru FX. By default, your “dry” bass guitar signal goes through the same effects as the synthesizer sound in the preset — that is, the filter, chorus, compression, and noise gate without the synthesizer sound. You can turn this off so that your bass guitar’s signal is passed through with no effects.
We explain how to make these settings in the following section.
Tap/Expression Mode
When the Tap/Exp – Audio switch is set to the left position, the CTR jack does not send audio. Rather, it’s used to receive control data from an external device for one of two functions:
- Change presets with an external footswitch (sold separately). The MXR TRS Split + Tap can also be used for this purpose. The footswitch connection is made with a TS cable.
- Modulate parameters in real time using an expression pedal. Connect one such as the Dunlop DVP4 Volume (X) Mini pedal (sold separately) with a TRS cable.
For each preset, you can program the expression pedal to modulate several synth parameters simultaneously while you play.
Power
Power and turn on the pedal by connecting the included Dunlop ECB003 adapter or any 9-volt (330mA) center-negative power supply.
MXR Bass Synth Controls
Here’s an overview. Learn more in the MXR Bass Synth product manual.
Presets Button
Tap this button to scroll through the Presets and Live Mode.
Voice Button
Engage to add additional oscillators to the main oscillator at the octave and fifth.
When held down, this button enables a second menu of functions for the control knobs, used to program the synth sounds. These settings can be saved to individual presets.
Shape Button
Tap to select the waveform for the synthesizer’s main oscillator: Triangle, Sawtooth, or Square.
When held down, this button enables a third menu of functions for the control knobs, used to change global system settings and to configure audio routing options.
Footswitch
Engage or bypass the pedal by tapping the footswitch. Hold the footswitch down to scroll through presets, and then you can tap to advance through them.
You can configure the footswitch for the Freeze function. In Freeze mode, hold the footswitch down to sustain the synthesizer note you are playing for as long as you continue to depress the footswitch. Over this drone, you can play another musical part using your bass guitar’s sound.
Bypass LED
Lights blue to indicate that the effect is bypassed.
Mix
Mix between your “dry” bass guitar sound and the “wet” synth sound.
Second: Oscillator Mix between the main and secondary oscillators.
Third: Compression and velocity sensitivity of the synth sound.
Sub Mix
Sub Mix between the main oscillator and sub-oscillator, one octave down.
Second: Noise Generator.
Third: Output Gain controlling the overall volume of the unit.
Cutoff
Cutoff frequency for the synth’s 4-pole resonant lowpass filter.
Second: Filter Envelope.
Third: Gate sensitivity. Can be adjusted to improve tracking for your playing style.
Resonance
Resonance boosts the gain at the cutoff frequency.
Second: Glide (portamento) time.
Third: Tracking. Set the unit for the most accurate note tracking for your instrument. Make this setting while holding down the Voice button.
- 5-String Bass: Default. Turn the knob fully counterclockwise.
- 4-String Bass: Turn the knob to 12 o’clock.
- Guitar: Turn the knob fully clockwise. This is for a six-string guitar in standard tuning.
Envelope
Filter Envelope. Controls the attack and decay time together.
Second: Amplitude Envelope.
Third: Dry Thru FX. Hold down the Voice button.
- On: Default. Turn the knob fully clockwise. The “dry” bass guitar signal and the “wet” synth sound are both sent through the pedal’s effects.
- Off: Turn the knob fully counterclockwise. The “dry” bass guitar signal is passed through without effects.
In conjunction with the Output Mode setting, you can route your bass guitar signal to the right output while the synth goes through the left output.
Mod
Modulation. Adjust the intensity of chorus and low-frequency oscillator (LFO).
Second: Mod Blend, the mix of chorus and LFO.
Third: Output Mode. Set up signal routing. Make this setting while holding down the Voice button.
- Mono: Default. Turn the knob fully counterclockwise.
- Wet/Dry: Turn the knob to 12 o’clock. “Wet” synth sound is on the left output, and “dry” bass guitar is on the right output.
- Stereo: Turn the knob fully clockwise. The pedal pans the voice oscillators across the stereo field, with stereo filter and chorus.
Saving Presets
When you have set up a sound with the knobs, here’s how to save it as a preset.
- Hold down the red Presets button for 2 seconds. Release it. You are now in selection mode.
- Tap the Presets button to scroll to the slot where you wish to save your new preset.
- Press and hold the Presets button again for 2 seconds. The Presets LEDs will stop flashing to indicate that you have saved your preset to the current slot, overwriting the previous preset.
MXR Bass Synth Factory Reset
You can restore an individual preset to the original that came from the factory. You can also completely reset the entire unit.
Restoring a Single Preset
- Select the preset you wish to restore.
- Hold the Footswitch and Presets buttons simultaneously for 5 seconds.
- The LED for the selected Preset will flash to indicate that just that one preset has been restored.
Full Factory Reset
Note that this will not only restore the 8 factory presets but will also erase any custom presets you have saved. It will also erase any global configurations that you have set up.
- With the power off, hold down both the Voice and Shape buttons. Plug in the power.
- Keep holding the buttons down for 5 seconds. The blue bypass LED will flash quickly to indicate the unit is reset.
MXR Bass Synth Demo Video
The MXR Bass Synth | Featuring Ian Martin Allison
Learn Synthesis with Sweetwater
If you want to learn more about synthesizers, then we’ve got you covered with our synthesizer fundamentals articles and our Synth Clips video series. Check them out!

Sweetwater Synth Clips by Daniel Fisher Playlist
inSync: How Synthesizers Work
inSync: Synthesizer Basics Explained
Related Articles
When you need help, Sweetwater has the answers!
Our knowledge base contains over 28,000 expertly written tech articles that will give you answers and help you get the most out of your gear. Our pro musicians and gear experts update content daily to keep you informed and on your way. Best of all, it’s totally FREE, and it’s just another reason that you get more at Sweetwater.com.

