
macOS Audio Optimization Guide
The Apple Mac is a popular platform for music, audio, video, and content creation. As the Mac is a general-purpose device, it needs some optimization to give the best performance.
This guide was written for macOS Sequoia (macOS 15), released on September 16, 2024. However, this guide incorporates best practices from across the industry that are relevant to all the versions of macOS from recent years, including both Intel-based Mac and Mac with Apple silicon computers.
Getting the best performance from your Mac depends on your use case and workflow; we hope you will find helpful tips here.
- Mac with Apple silicon vs. Intel-based Mac
- Turn off Time Machine, iCloud Drive, Cloud-based Storage, and Backup Apps
- Quit Unneeded Apps and Restart Your Mac
- Connect Your Audio Interface Directly to Your Mac
- Using a MacBook? Plug It In
- Bluetooth
- Network and Internet Connections
- Optimizing to Reduce Network Activity
- System Settings
- Get to Know Activity Monitor
- macOS Support Resources
Mac with Apple silicon vs. Intel-based Mac
In 2020, Apple introduced the first Mac with Apple silicon computer and began to phase out the older, Intel-based Mac platform. The last Intel-based Mac was discontinued in 2023. So far, Apple has released new Mac models with the M1, M2, and M3 series of chips.
If you have a Mac with Apple silicon, you will see much better performance if you update to third-party apps and plug-ins that are Apple silicon native rather than using the older apps with Intel-based code running in the Rosetta emulation mode. We explain this in our SweetCare guide Mac with Apple Silicon vs. Intel-based Mac: What You Need to Know.
You will want to check with the developers of each piece of software you use to see about updating and installing the newest versions that are Apple silicon native. Sweetwater provides up-to-date information on compatibility from 180 manufacturers and developers, with links to the support website for each, at our SweetCare macOS Sequoia Compatibility Guide.
Turn off Time Machine, iCloud Drive, Cloud-based Storage, and Backup Apps
Backup apps, whether local or cloud based, are essential to protecting your work. However, when backup apps are running, they can cause glitches in recording, editing, and rendering audio and video. These apps constantly search your hard drive for new data, which they then read off the hard drive to make backups. If you are tracking or rendering audio or video, you are writing large amounts of data to your drive continuously; a backup app will interfere, and that’s where glitches arise.
Before you begin each session, turn off all backup apps. When your session is finished, remember to turn the backup apps back on.
Turn off Time Machine
At Sweetwater, we recommend that you use Apple’s Time Machine to keep a local backup of your Mac to a connected external hard drive. However, you must turn it off during your sessions.
- Go to System Settings > General > Time Machine.
- Select your Time Machine backup disk. Click Options….
- Under Backup frequency, pull down the menu and select Manually. This will interrupt the regular backup process.
When your session is done, go back to the settings. Change Backup frequency to Automatically Every Hour so it can resume incremental backups.
For more information, check out ourSweetCare macOS Time Machine Backup Guide.
Turn off iCloud Drive
When you set up a new Mac, you are prompted to enable Apple’s iCloud Drive to back up your Documents folder and other locations on your Mac to the cloud. However, like Time Machine, iCloud Drive will interfere with recording and editing audio and video. If you decide to use iCloud Drive, you must turn it off before every recording session.
- Go to System Settings. Click the icon next to your Apple ID.
- In the pane on the right, click on iCloud.
- You will see the various settings for iCloud Drive and other apps that share data through iCloud.
- Click on iCloud Drive. Click Turn Off.
Consult Apple’s support pages. This Apple Support article explains how to disable iCloud Drive and get your Desktop and Documents folders back to your startup disk.
Turn off Dropbox, Microsoft OneDrive, Google Drive, or Splice
If you use one of these file-syncing services, you must turn it off during a session. Consult the service’s instructions.
More importantly, you should never save your working audio and video project files in one of these service’s folders.
Turn off Cloud-based Backup Services
If you use a third-party cloud-based backup service such as Carbonite, IDrive, or Backblaze, you must turn it off during a session. Consult the service’s instructions. Turn it back on when your session is done.
Quit Unneeded Apps and Restart Your Mac
The most important thing you can do to maximize your computer’s resources while working with your DAW is to quit all the apps you are not using. Apps you leave running take up space in memory and take away from your system’s computing power. They may also run background processes that interfere with recording and rendering audio and video.
TIP: Before each session, restart your Mac. When you give the Restart command, you’ll see a dialog box that asks: “Are you sure you want to restart your computer now?” Uncheck the box next to Reopen windows when logging back in, then click Restart.
Connect Your Audio Interface Directly to Your Mac
You should always plug an audio interface directly into your Mac, not through a USB hub or a Thunderbolt dock. Audio interfaces require the greatest bandwidth, so they function best when connected directly. You can connect your other peripherals through a powered hub.
Using a MacBook? Plug It In
MacBooks are configured to reduce computing power when run from the battery. When you are running a session, plug in the power supply.
Bluetooth
If you don’t use Bluetooth devices while working in your DAW, turn Bluetooth off. It constantly sends signals that take up a small part of your Mac’s processor overhead.
- Go to System Settings > Bluetooth.
- Click the button to turn it off.
Network and Internet Connections
If you don’t actually need to have your Mac connected to the Internet when using your DAW, you will get higher performance by disconnecting altogether. However, many users need to remain connected for software authentication (for example, products that use iLok Cloud).
Learn more at iLok Support: FAQ – iLok Cloud.
Many apps and background processes constantly create network traffic. We will discuss tips for reducing this.
Use Ethernet Rather Than Wi-Fi
Regardless, you will get better performance if you use an Ethernet cable connection to your Mac and turn Wi-Fi off. Wi-Fi generates additional network traffic that may interfere with recording and playback.
If possible, position your Mac in your home or studio so that you can run an Ethernet cable between your Mac and your router.
Recent Macs don’t have Ethernet ports, but you can connect an Ethernet to USB-C adapter dongle, an Ethernet to Thunderbolt adapter dongle, or a USB dock or Thunderbolt dock that has an Ethernet port built in.
To turn off your Mac’s Wi-Fi:
- Go to System Settings > Wi-Fi.
- Click the button to turn it off.
Optimizing to Reduce Network Activity
Quit Web Browsers
Leaving your web browser open, with multiple tabs or windows, takes up memory and processing power. Open web pages may constantly fetch data from the Internet, creating more network traffic.
Quit Email
Quit the Mail app or any other email app you use. They continuously check for new emails and download them, creating more network traffic.
Quit Widgets
Quit all music streaming apps and widgets like News or Weather. They create network traffic, too.
System Settings
There are a number of settings you can change in System Settings (or System Preferences in macOS 12 Monterey and earlier versions).
Some of these settings are suggestions you may wish to try if you encounter problems. Others offer specific benefits. Please check them out.
- On older, Intel-based Mac computers, some of these settings can make a difference in performance.
- On newer Mac with Apple silicon computers, some of these will only result in slight gains.
macOS Automatic Updates
macOS will update itself by default. Updating to newer point releases, such as from macOS Sonoma 14.0 to 14.1, is generally a good idea. However, these updates sometimes introduce incompatibilities with your DAW or other software. If you disable automatic updates, you can check with your DAW developer’s support before you decide if you should update.
Sometimes macOS automatically installs minor security patches in the background without notice. It’s possible that these updates could cause glitches if you are recording audio at the same time your system is installing a patch.
To disable automatic updates:
- Go to System Settings > General > Software Update.
- If Automatic Updates are On, you can click on the Information icon, and a dialog box will open.
- Click the buttons to disable each option, then click Done.
You can go back to Software Update at any time and click on it. System Settings will then check to see if updates are available. You can decide whether and when to install each update.
Disable Unused Network Adapters
Your Mac may be configured with software network interfaces that you don’t use. They may interfere with data on the USB or the Thunderbolt bus, so it’s best to disable them.
Go to System Settings > Network.
Don’t disable the interfaces that pertain to Ethernet and Wi-Fi.
- Click on a network interface you don’t use (for example, Thunderbolt Bridge).
- In the next pane, click Make Inactive.You can also click on Delete Service.
- Repeat this for any additional interfaces that appear.
Firewall
IMPORTANT: You may decide to disable the Firewall when you are on your home network behind your router, but for security reasons, you should enable the Firewall when you travel with your Mac and connect to other networks.
Some audio interface manufacturers recommend that you disable your Mac’s Firewall because it can create network activity that may cause dropouts in audio recording and playback. However, the Firewall serves an important purpose: protecting your system from network intrusion. If you encounter audio dropouts, disabling your Firewall is one troubleshooting step you can try to see if it fixes the problem.
- Go to System Settings > Network > Firewall.
- Click the button to turn it on or off.
- If it is on, you can click the Options button and select additional settings.
Learn more at Apple Support: Block connections to your Mac with a firewall.
Location Services
Certain apps continuously broadcast your location to services on the Internet. You can turn this feature off when you use your DAW.
- Go to System Settings > Privacy & Security > Location Services.
- Across from Location Services, turn off the button in the upper-right corner to disable Location Services for all listed apps at once.
System Services,at the bottom of the Location Services pane, has a separate set of controls.
- Across from System Services, click on Details.
- The System Services Can Access Your Location For dialog box will open.
- Turn off each of the settings individually. Click Done.
Note that one item you turn off removes your Mac from appearing in the Find My app. For more information, see Apple Support: Set up the Find My app to locate a missing Mac, device, or item.
Background Processes
There are some background processes you may be able to turn off.
Go to System Settings > General > Login Items & Extensions.
Open at Login shows any apps or services that automatically launch. Remove anything you do not need to have running. You can launch those apps manually from the Applications folder.
Allow in the Background shows a list of background processes you can turn off individually. Apple’s description is apt:
“Applications add background items to perform tasks when the applications aren’t open, such as checking for software updates or syncing data. Turning off a background item may prevent these tasks from being completed.”
You might want to turn these processes back on after your session.
Analytics & Improvements
Apple collects diagnostic and usage data while you use your Mac and can send crash reports and usage data to third-party developers. As this creates network traffic, you can turn off each option.
- Go to System Settings > Privacy & Security > Analytics & Improvements.
- Turn off the individual options.
System Sounds and Sound Notifications
While this has little to do with increasing performance, you don’t want to be distracted by the Mac’s alert sounds blasting through your speakers while working in your DAW.
System Sounds
- Go to System Settings > Sound.
- Turn off Play user interface sound effects and Play feedback when volume is changed.
Individual Application Notifications
Go to System Settings > Notifications > Application Notifications.
You’ll see a list of Apple apps and third-party apps that use notifications. Click on each app and turn all notifications on or off with the Allow Notifications button.
Get to Know Activity Monitor
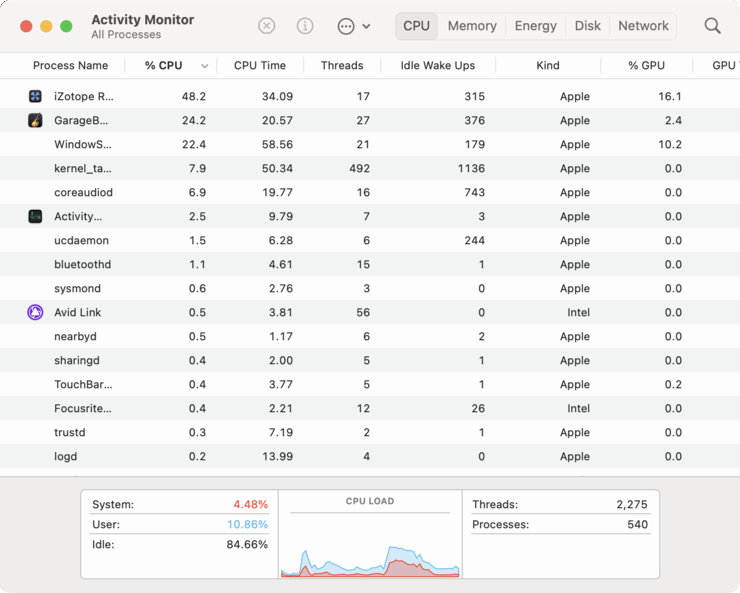

The macOS 13 Ventura Activity Monitor with views of the CPU Load and Memory Pressure meters
Most DAWs have a “performance monitor” or “CPU overload indicator” to alert you when your session overwhelms your hardware, causing hang-ups, glitches, and noise. However, this only reports on resources within your DAW.
Apple provides the Activity Monitor app, which gives a real-time display of all running apps and processes on your entire Mac. For each process, Activity Monitor displays how much of your computer’s resources are being used according to five categories: CPU, Memory, Energy, Disk,and Network.
While running your DAW, spot-checking Activity Monitor is useful to find out if your workflow is overwhelming your CPU or exceeding the amount of RAM you have. You can use this information to identify apps and processes that are taking up resources so that you can quit or disable them.
Go to Applications > Utilities > Activity Monitor.
Under the CPU tab, click on the % CPU column. The list will sort according to the processes using the most CPU power. At the bottom, the CPU Load graph indicates the total amount of CPU resources being used.
TIP: The CPU display shows total percentages of each core; your Mac has multiple cores, so you may see numbers larger than 100% displayed.
Under the Memory tab, click on the Memory column to sort by processes that use the most memory. At the bottom, the Memory Pressure graph indicates how much memory is in use. If the apps you are running at the moment exceed the amount of RAM you have, then there is a value in the Swap Used field, indicating that your system must write data to and from the startup disk to make up for the shortfall in RAM. This indicates that your system is overburdened at that moment.
Learn more at Apple Support’s Activity Monitor User Guide.
macOS Support Resources
Sweetwater maintains a comprehensive series of support articles for macOS and for Windows, too. Check out these resources.
Related Articles
When you need help, Sweetwater has the answers!
Our knowledge base contains over 28,000 expertly written tech articles that will give you answers and help you get the most out of your gear. Our pro musicians and gear experts update content daily to keep you informed and on your way. Best of all, it’s totally FREE, and it’s just another reason that you get more at Sweetwater.com.


Offer applies only to single-receipt qualifying purchases. Select manufacturers may require that only the manufacturer’s products qualify towards the minimum purchase amount needed to be eligible for promotional financing. Otherwise, an invoice that meets the minimum purchase amount and contains at least one qualifying manufacturer product is eligible for promotional financing. No interest will be charged on promo purchase balance, and equal monthly payments are required on promo purchase until it is paid in full. The payments equal the amount financed divided by the number of months in the promo period, rounded up to the next whole dollar. These payments may be higher than the payments that would be required if this purchase was a non-promo purchase. During the last month(s) of the promo period the required monthly payment may be reduced due to the prior months’ rounding. Regular account terms apply to non-promo purchases. New Accounts as of 07/31/2025: Purchase APR is 34.99%. Penalty APR is 39.99%. Min Interest Charge is $2. Existing cardholders: See your credit card agreement terms. Subject to credit approval.
Offer applies only to single-receipt qualifying purchases. No interest will be charged on the promo balance if you pay it off, in full, within the promo period. If you do not, interest will be charged on the promo balance from the purchase date. The required minimum monthly payments may or may not pay off the promo balance before the end of the promo period, depending on purchase amount, promo length and payment allocation. Regular account terms apply to non-promo purchases and, after promo period ends, to the promo balance. New Accounts as of 07/31/2025: Purchase APR is 34.99%. Penalty APR is 39.99%. Min Interest Charge is $2. Existing cardholders: See your credit card agreement terms. Subject to credit approval.
The estimated required monthly payment shown which excludes taxes and delivery equals the amount financed divided by the number of months in the promo period, rounded up to the next cent. During the last month(s) of the promo period the required monthly payment may be reduced due to this rounding. These payments apply only with the financing offer shown. If you make these payments by the due date each month, you should pay off this amount financed within the promo period, if it is the only balance you are paying off. If you have other balances on your account, this payment will be added to any other minimum monthly payments.
Applies only to select items from this manufacturer. Ask your Sweetwater Sales Engineer for more details.