
Line 6 DL4 MkII – Sounds and Presets
Line 6 DL4 MkII Effects and Presets
MkII Delays List
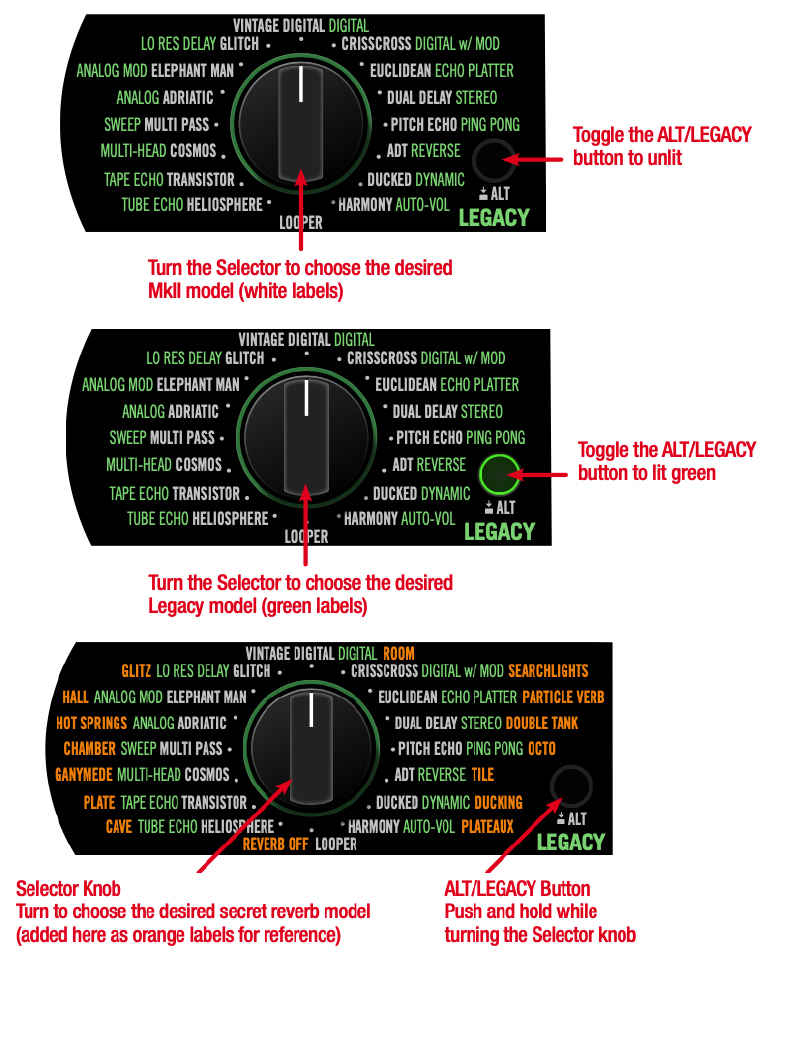
To choose one of the MkII delays as your active delay model, toggle the ALT/LEGACY button so that it is not lit, then turn the Selector knob to any of the delay model names that appear in white text.
Legacy Delays List
To choose one of the Legacy delays as your active delay model, toggle the ALT/LEGACY button so that it is lit green, then turn the Selector knob to the desired delay model name that appears in green text.
Secret Reverbs List and Controls
New to the DL4 lMkII, you can now use any reverb along with your currently active MkII or Legacy delay model. To select a reverb, press and hold the ALT/LEGACY button while turning the Selector knob to the position that corresponds to the desired model. To access the reverbs’ parameters, just press and hold the ALT/LEGACY button while turning the knobs.
Line 6 DL4 MkII MIDI Settings
Connect the MIDI output of your external MIDI controller device to the DL4 MkII MIDI IN, and DL4 MkII will respond to MIDI Program Change (PC), Note On, MIDI CC, and MIDI Clock messages, as covered within this chapter.
When connected to your computer, DL4 MkII also receives and transmits the same MIDI messages via USB (with the exception of MIDI Clock messages, which can only be received for sync and routed to MIDI THRU).
Connect DL4 MkII’s MIDI OUT/THRU to your other MIDI gear (or connect USB to your computer) to optionally pass any incoming MIDI messages “THRU” to another device or computer app.
IMPORTANT! DL4 MkII MIDI Transmissions
DL4 MkII does not transmit MIDI messages for any of its own actions, but will pass incoming MIDI out via its MIDI OUT/THRU and USB MIDI ports. All MIDI control is global, meaning, all commands listed in this chapter will control their respective DL4 MkII functions regardless of the currently loaded preset.
Using MIDI Clock for Tempo Sync
DL4 MkII can receive MIDI Clock via its MIDI IN, as well as via USB MIDI, to allow you to sync the tempo from other effects devices. Once DL4 MkII receives the MIDI Clock “start” command, you’ll see DL4 MkII’s TAP switch LED change to flashing blue to indicate it is actively following the received MIDI Clock tempo rate. Use the Global Settings to modify either “Receive MIDI Clock” or “MIDI THRU” settings.
- Off – DL4 MkII ignores MIDI Clock messages received.* The tempo can be set manually by tapping on the TAP footswitch.
- On – DL4 MkII syncs to incoming MIDI Clock messages. While set to On, presses
of the TAP footswitch are ignored. - Auto – DL4 MkII syncs to incoming MIDI Clock messages. The TAP switch’s LED flashes blue once MIDI Clock sync is established. While set to Auto, tempo can optionally be set manually by tapping on the TAP footswitch.
Accessing all 128 Presets
Use MIDI Program Change (PC) messages to access any of the 128 preset locations on demand. Configure your MIDI controller to send PC messages as shown in the following table.
| Message | Function |
|---|---|
| PC 000 | Preset A |
| PC 001 | Preset B |
| PC 002 | Preset C |
| PC 003 | Preset D |
| PC 004 | Preset E |
| PC 005 | Preset F |
| PC 006 ~ 127 | Presets 7 ~128 |
| IMPORTANT! Presets 7 through 128 are not accessible on the DL4 MkII device itself—only via MIDI! |
Related Articles
When you need help, Sweetwater has the answers!
Our knowledge base contains over 28,000 expertly written tech articles that will give you answers and help you get the most out of your gear. Our pro musicians and gear experts update content daily to keep you informed and on your way. Best of all, it’s totally FREE, and it’s just another reason that you get more at Sweetwater.com.

