
Evans Sensory Percussion Setup Guide
The Evans Sensory Percussion triggering system is a game-changing drum trigger solution that will spark creativity for any drummer. In this guide, we will show you how to register, set up, and use the triggering system for the first time. Follow the sections below to get started. This article only scratches the surface, so check out the User Guide for more information!
Register the Software
You must first register the necessary software with Sensory Percussion. Upon registration, you will gain access to both the software and sound packs included with your triggering system.
- Go to the Sensory Percussion registration page and log into your account. If you don’t have an account, you can create one here. When you first create an account, Sunhouse will send you a link for account verification.
- Alternatively, scan the QR Code located inside the box.
- Once logged in, click Register a license, then enter the software activation code on the ‘Start Here’ card.
- Once registered, download and install the necessary software.
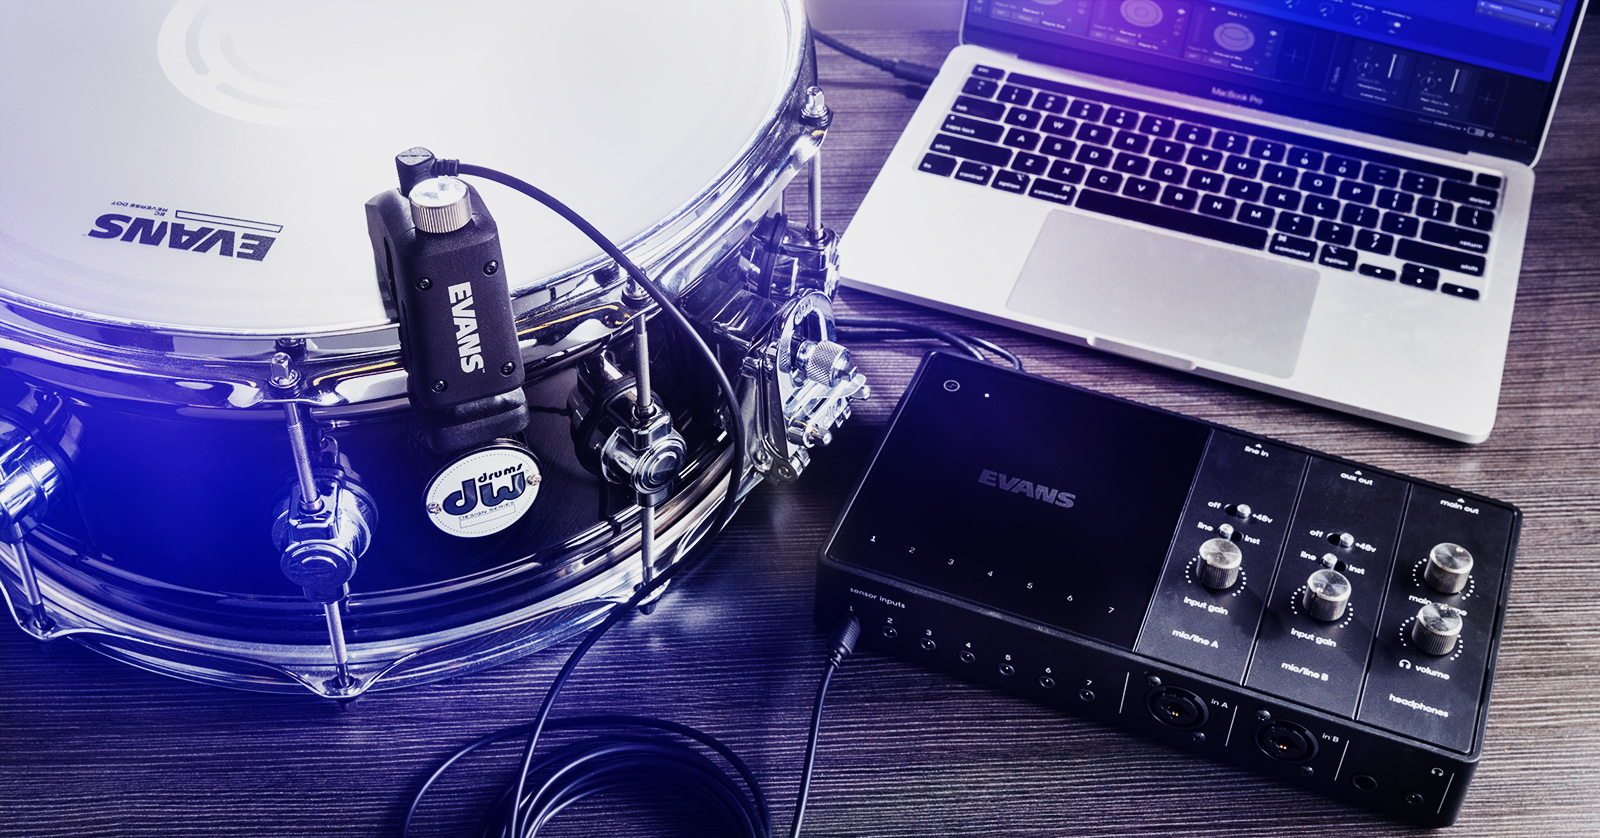
Setup and Connections
IMPORTANT: If connecting a condenser microphone to the Portal interface, turn on Phantom Power (+48v) after connecting the microphone. If you don’t, you will cause severe damage that will void your warranty!
After you have installed the Sensory Percussion software, it’s time to connect the triggers and interface.
Triggers
The Sensory Percussion triggers aren’t like others, as they utilize a pickup element instead of a standard piezo pickup. This means you can’t just attach the trigger and go. Before moving forward, here are a few tips for trigger element placement.
- While the trigger element can be placed anywhere around the drum, it must be placed between two lugs.
- Practice placing the trigger element on the drum before peeling the paper strip off to ensure you place the trigger in the most appropriate location for your setup.
- If a trigger element gets dirty, replace it with one of the included spares, as it’s difficult to clean, and you’ll have issues reattaching it.
With those tips in mind, follow these steps to connect the trigger element and trigger to your drum.
- Peel the strip off the trigger elements to expose it and place it on the drum, ensuring the removable legs align with the drum’s rim.
- Apply pressure to the trigger element and lift its legs to remove them.
- Once the legs are removed, keep the pressure on for another 10 seconds.
- It will take about 24 hours for the trigger element to adhere to the drumhead fully, but it’s okay for you to start playing immediately.
- Loosen the thumbscrew to a point where it will fit your drum.
- Attach the trigger to your drum, ensuring the trigger’s LED is shining behind the trigger element, then tighten it securely using the thumbscrew.
- When attaching a trigger to your bass drum, attach the included drum adapter to the trigger beforehand.
- Double-check and make sure the trigger is perfectly parallel to your drum.

Audio Interface
IMPORTANT: If you’re connecting a condenser microphone to the Portal interface, turn on Phantom Power (+48v) after connecting the microphone. If you don’t, you will cause severe damage that will void your warranty!
Once the trigger elements are attached, it’s time to get everything connected. The interface is class-compliant, meaning no additional software is necessary. Do not connect the Portal audio interface to a USB hub, as there won’t be enough power to transfer data to and from your computer.
- Connect the included 1/8-inch TRS cables from the triggers to the sensor inputs. Secure the cable by pressing it into the clip on the trigger’s side.
- Use the two 1/4-inch combi jacks if you are using a microphone, guitars, or other external gear.
- Once connected, use the line/inst switch to switch to the correct signal.
- This only applies to gear that uses 1/4-inch cables.
- Connect the interface to your computer, and you’re all set!
How to Use the Sensory Percussion Software
Now that everything is set up and connected, it’s time to start using the software! We’ll break it down into three sections: the initial setup, training of your drums, and navigation of the software itself.
Initial Setup
- Launch the Sensory Percussion app and enter your account credentials when prompted.
- Once logged in, you will be prompted to update the audio settings.
- On the next page, update the hardware settings. This is where you will assign your drums to the trigger inputs.
- Update the drum settings, including the drum type, size, drumhead material, and name.
- We recommend using a conventional naming scheme. This is particularly useful if you plan on using multiple drums! For example, using a DW snare, use *drum size* DW *xxxx series* Snare Drum.
- After you have set that up, it’s time to train the drums.
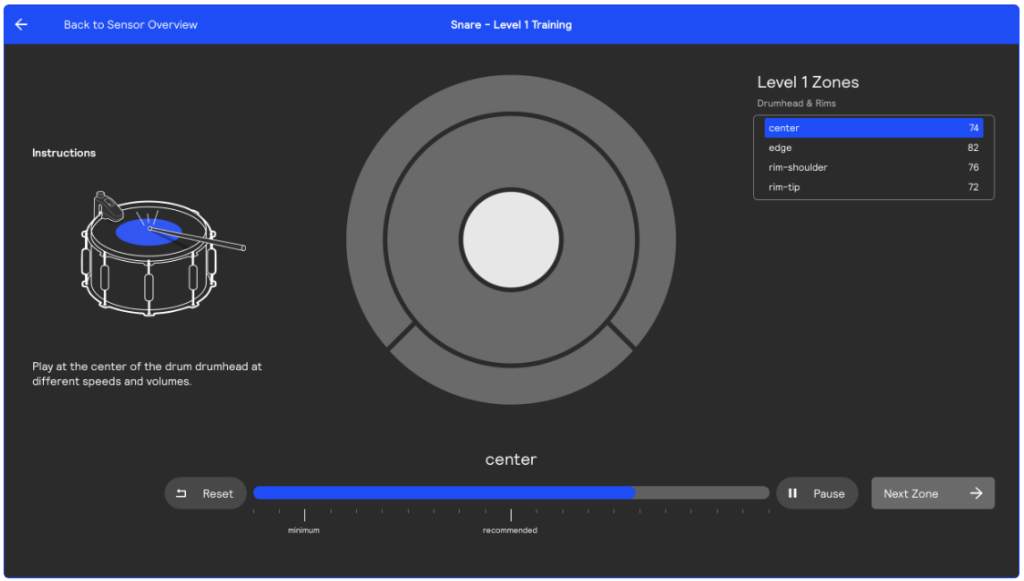
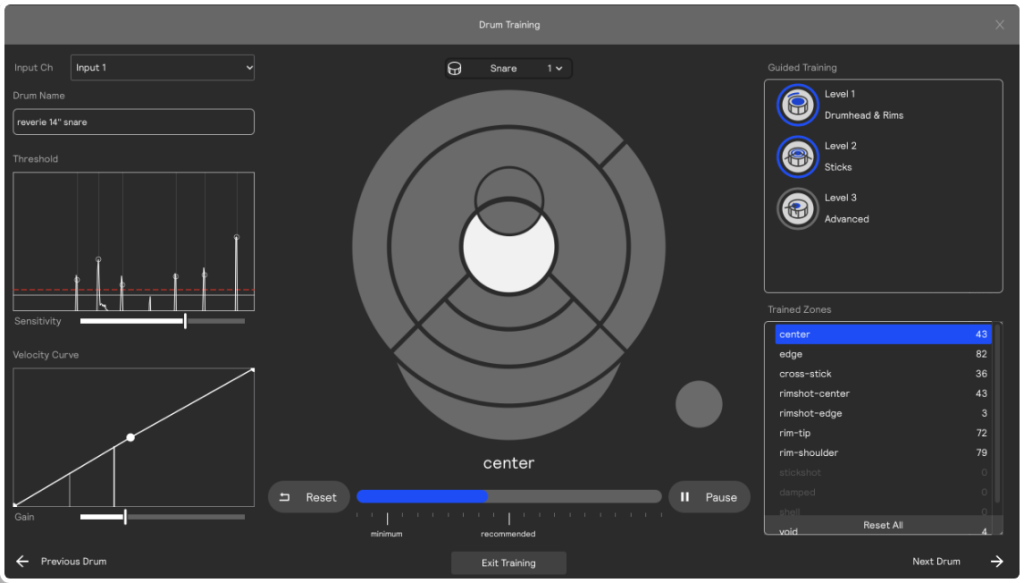
How to Train Your Drums
Training your drums ensures you get the most accurate and consistent results possible. Although you can train your drums any time, it’s much easier to do it during the initial setup.
There are two training methods: Guided and Manual. If this is your first time using Sensory Percussion products, or you just want to get up and running, going through the Guided method is recommended. The Manual process is more advanced, so check out the Drum Training chapter of the User Guide for more information!
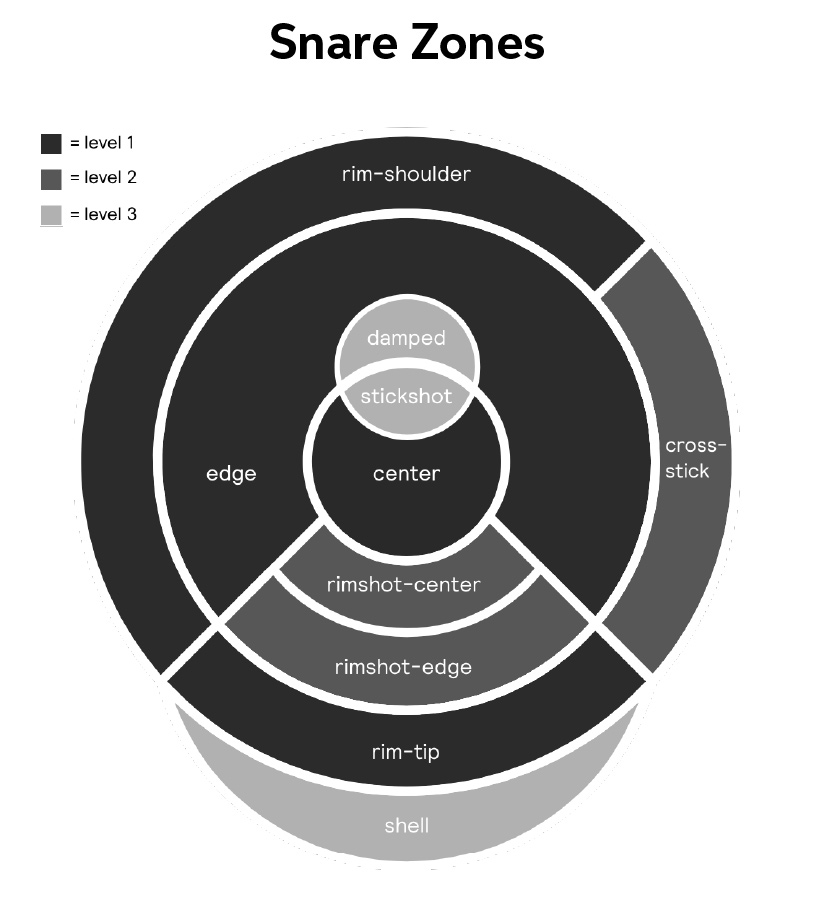
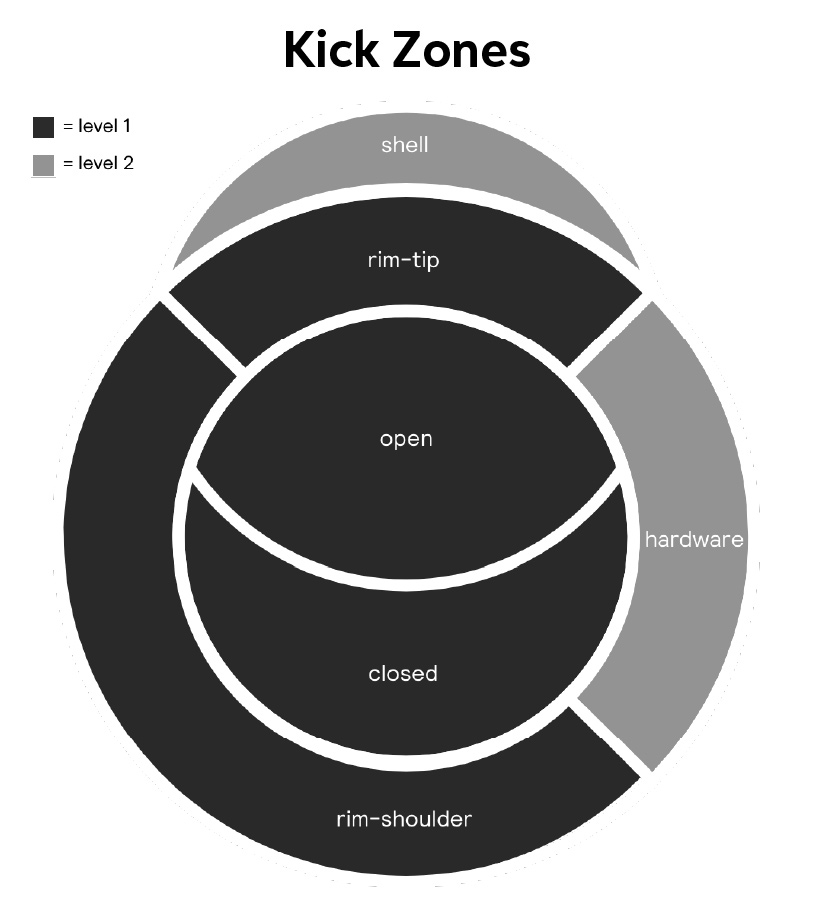
What Are Zones and Levels?
You can break drums down into two components: Zones and Levels. A Zone is a particular drum part, like the center or edge. A Level is a specific part of the Zone. For example, there is also the Rimshot Center and Rimshot Edge within the Edge zone. These two are considered Levels.
Create a New Kit
After all the initial setup and training is complete, you will be taken to a demo session to help you learn the ropes of the software. Sensory Percussion already includes some amazing preset kits, but you can easily create one from scratch.
- On the top right of the software, click Add New. There should now be a blank template with drum pad Modules for each hardware input you set during the initial setup outlined above.
- Navigate to the Library section (left side of the screen), select Loops, Sample Packs, or Field Recordings, then look for the sample you wish to load.
- Alternatively, click + next to Folders to open your computer’s File Explorer.
- Drag and drop it onto the drum pad.
- To add another drum pad, click the + box on the bottom left side of the app.
When you need help, Sweetwater has the answers!
Our knowledge base contains over 28,000 expertly written tech articles that will give you answers and help you get the most out of your gear. Our pro musicians and gear experts update content daily to keep you informed and on your way. Best of all, it’s totally FREE, and it’s just another reason that you get more at Sweetwater.com.


Offer applies only to single-receipt qualifying purchases. Select manufacturers may require that only the manufacturer’s products qualify towards the minimum purchase amount needed to be eligible for promotional financing. Otherwise, an invoice that meets the minimum purchase amount and contains at least one qualifying manufacturer product is eligible for promotional financing. No interest will be charged on promo purchase balance, and equal monthly payments are required on promo purchase until it is paid in full. The payments equal the amount financed divided by the number of months in the promo period, rounded up to the next whole dollar. These payments may be higher than the payments that would be required if this purchase was a non-promo purchase. During the last month(s) of the promo period the required monthly payment may be reduced due to the prior months’ rounding. Regular account terms apply to non-promo purchases. New Accounts as of 07/31/2025: Purchase APR is 34.99%. Penalty APR is 39.99%. Min Interest Charge is $2. Existing cardholders: See your credit card agreement terms. Subject to credit approval.
Offer applies only to single-receipt qualifying purchases. No interest will be charged on the promo balance if you pay it off, in full, within the promo period. If you do not, interest will be charged on the promo balance from the purchase date. The required minimum monthly payments may or may not pay off the promo balance before the end of the promo period, depending on purchase amount, promo length and payment allocation. Regular account terms apply to non-promo purchases and, after promo period ends, to the promo balance. New Accounts as of 07/31/2025: Purchase APR is 34.99%. Penalty APR is 39.99%. Min Interest Charge is $2. Existing cardholders: See your credit card agreement terms. Subject to credit approval.
The estimated required monthly payment shown which excludes taxes and delivery equals the amount financed divided by the number of months in the promo period, rounded up to the next cent. During the last month(s) of the promo period the required monthly payment may be reduced due to this rounding. These payments apply only with the financing offer shown. If you make these payments by the due date each month, you should pay off this amount financed within the promo period, if it is the only balance you are paying off. If you have other balances on your account, this payment will be added to any other minimum monthly payments.
Applies only to select items from this manufacturer. Ask your Sweetwater Sales Engineer for more details.