In the ancient Monozoic era, audio devices and systems had only a single output. But, when scientists discovered that humans had two ears, the Stereozoic era was born. Although Stereozoic creatures were slow to evolve, they came into their modern form in the 1930s. They not only survived the onslaught of Surroundosaurus Rex in the ’70s but thrived — and have been the dominant sonic species ever since.
Yet, there remain many survivors from the Monozoic era, including guitars, microphones, vintage keyboards, and more. So, let’s look at several ways to convert mono into stereo to bring these prehistoric creatures into the present.
The embedded audio examples use guitar, but these mono-to-stereo techniques apply to anything with a mono output. To demonstrate how the conversions collapse back to mono, each audio example starts with the converted stereo version then plays the identical riff collapsed to mono. (It’s important that the converted version collapses back to mono properly in case it plays back over a system with poor stereo separation.)
Please note that the audio examples are single “snapshots” of the various settings. Although representative of their corresponding processes, playing around with the parameters can change the sound further.
Let’s listen to the original mono guitar recording for comparison with subsequent examples.
There are two main ways to convert to stereo: EQ-based and delay-based. The EQ-based options collapse best to mono.
Graphic Equalizer
This is one of my favorite options (fig. 1). The stereo effect has character, it’s easy to set up and tweak, it inserts into one channel, and it collapses perfectly to mono without “phasiness” or artifacts. The more bands the better; I favor the Waves GEQ.
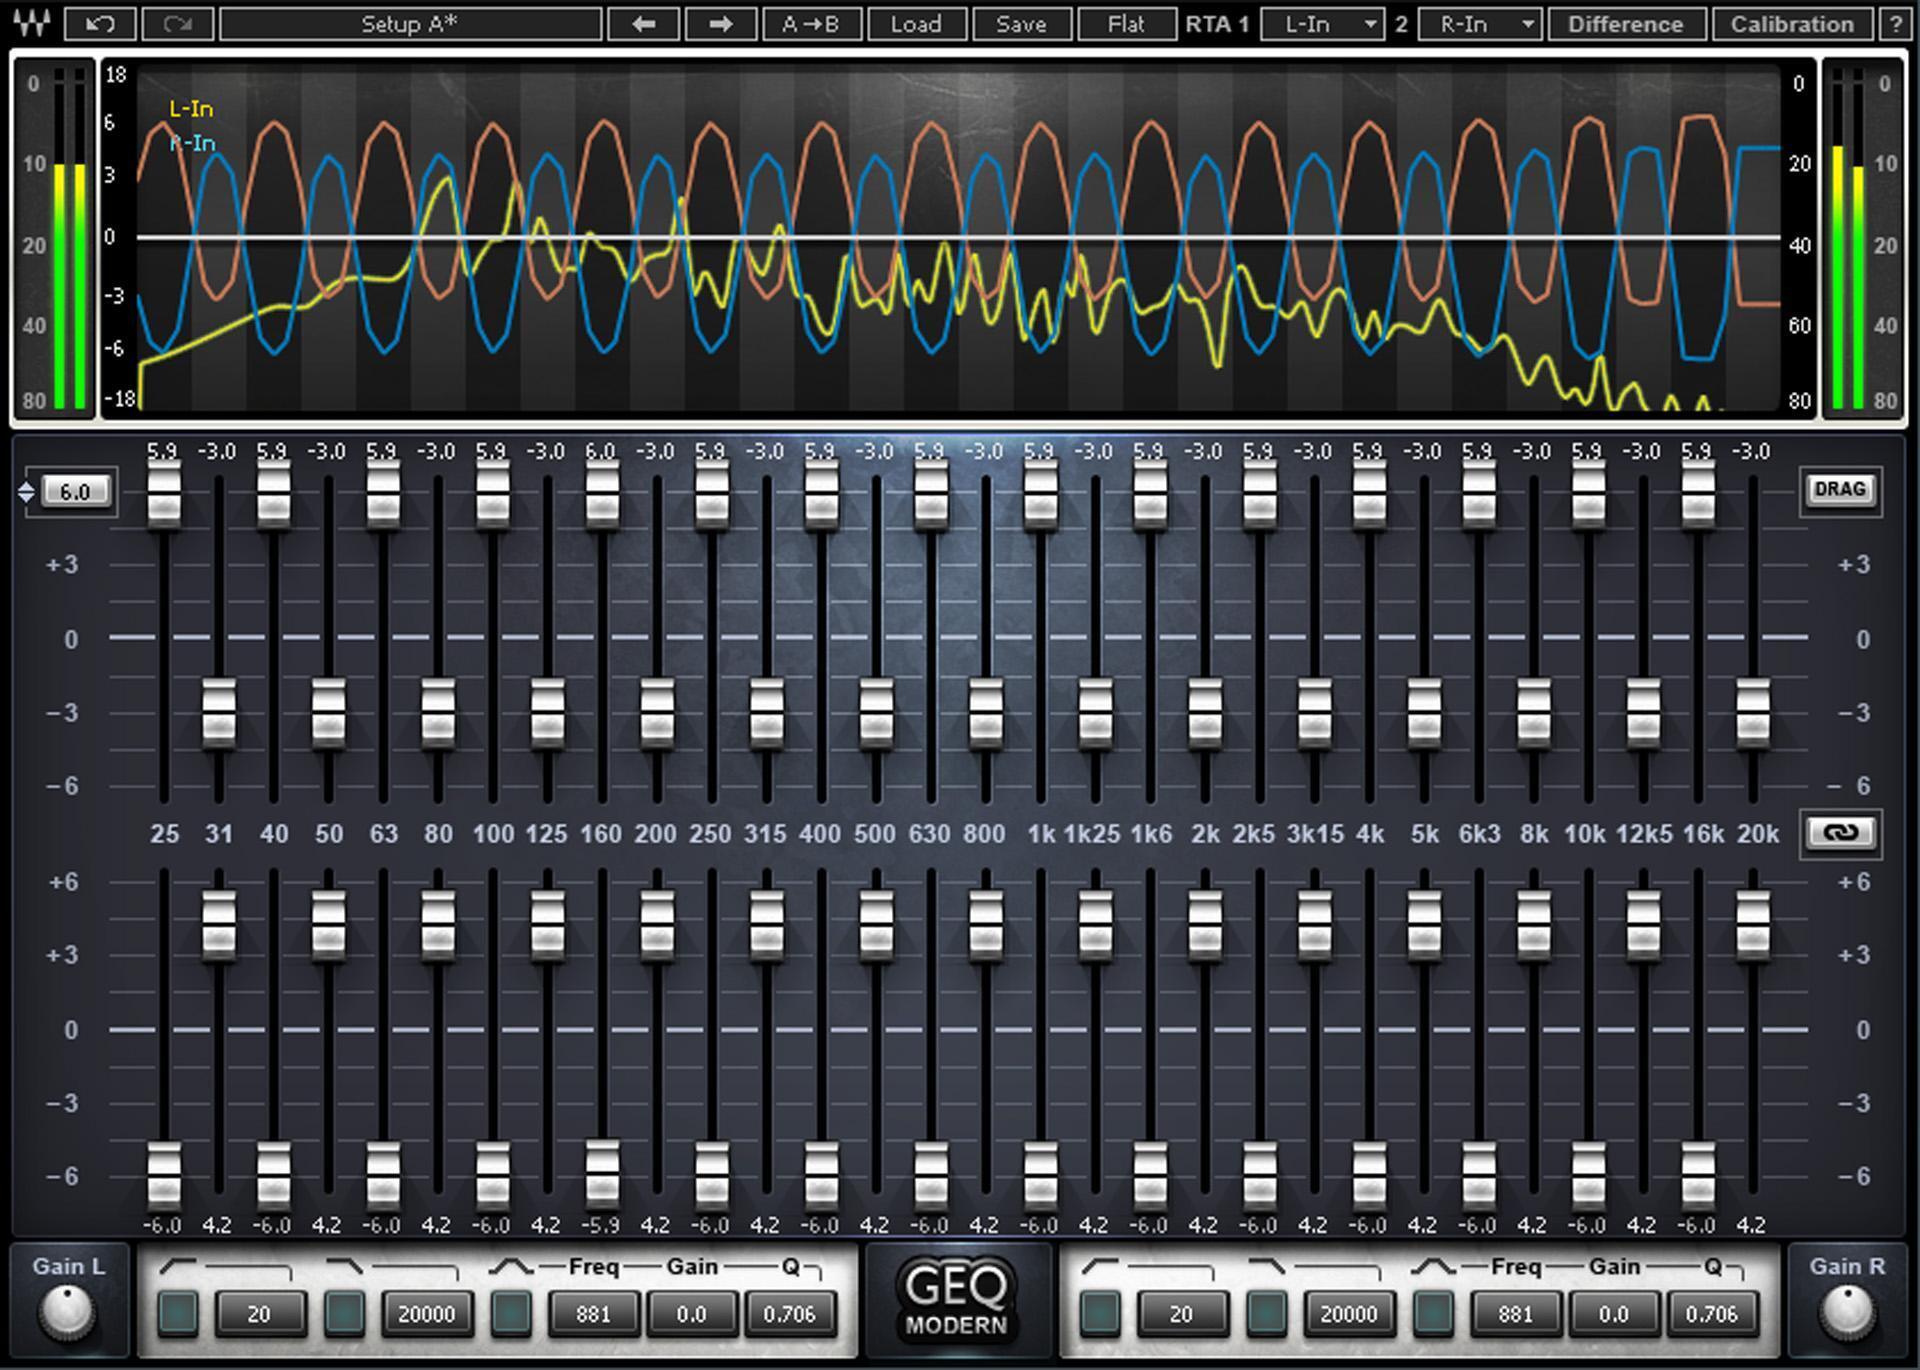
Set alternate bands in one channel to maximum boost (the top row of sliders), and, in the other channel, set the same bands to maximum cut (the bottom row of sliders). Vary the remaining sliders to alter the character of the stereo spread. As you move them from full cut (second row from the top) or full boost (third row from the top) and closer to center, the sound becomes a little more centered. You can “weight” the sound toward one channel or the other by how you move these sliders.
Multiband Compressor
This requires copying the audio to two channels or sending your track to two effects channels (or buses, if your DAW can insert effects in buses). For a more compact solution, some options allow splitting the signal within a single channel’s effects insert, such as Studio One‘s Splitter module, Ableton Live‘s Effects Rack, or a third-party plug-in solution like Blue Cat Audio’s PatchWork. As with using a graphic EQ, the more bands, the better — but you need at least four, like the multiband compressor bundled with Cubase (fig. 2).
Insert a multiband compressor into one channel, and set the compressor ratio for all bands to 1:1.0. This defeats the compression, so the “compressor” is now a multiband crossover. Adjust the three crossover frequencies so there’s a significant amount of signal in each of the four bands. For guitar, try 500Hz, 1.9kHz, and 3.5kHz.
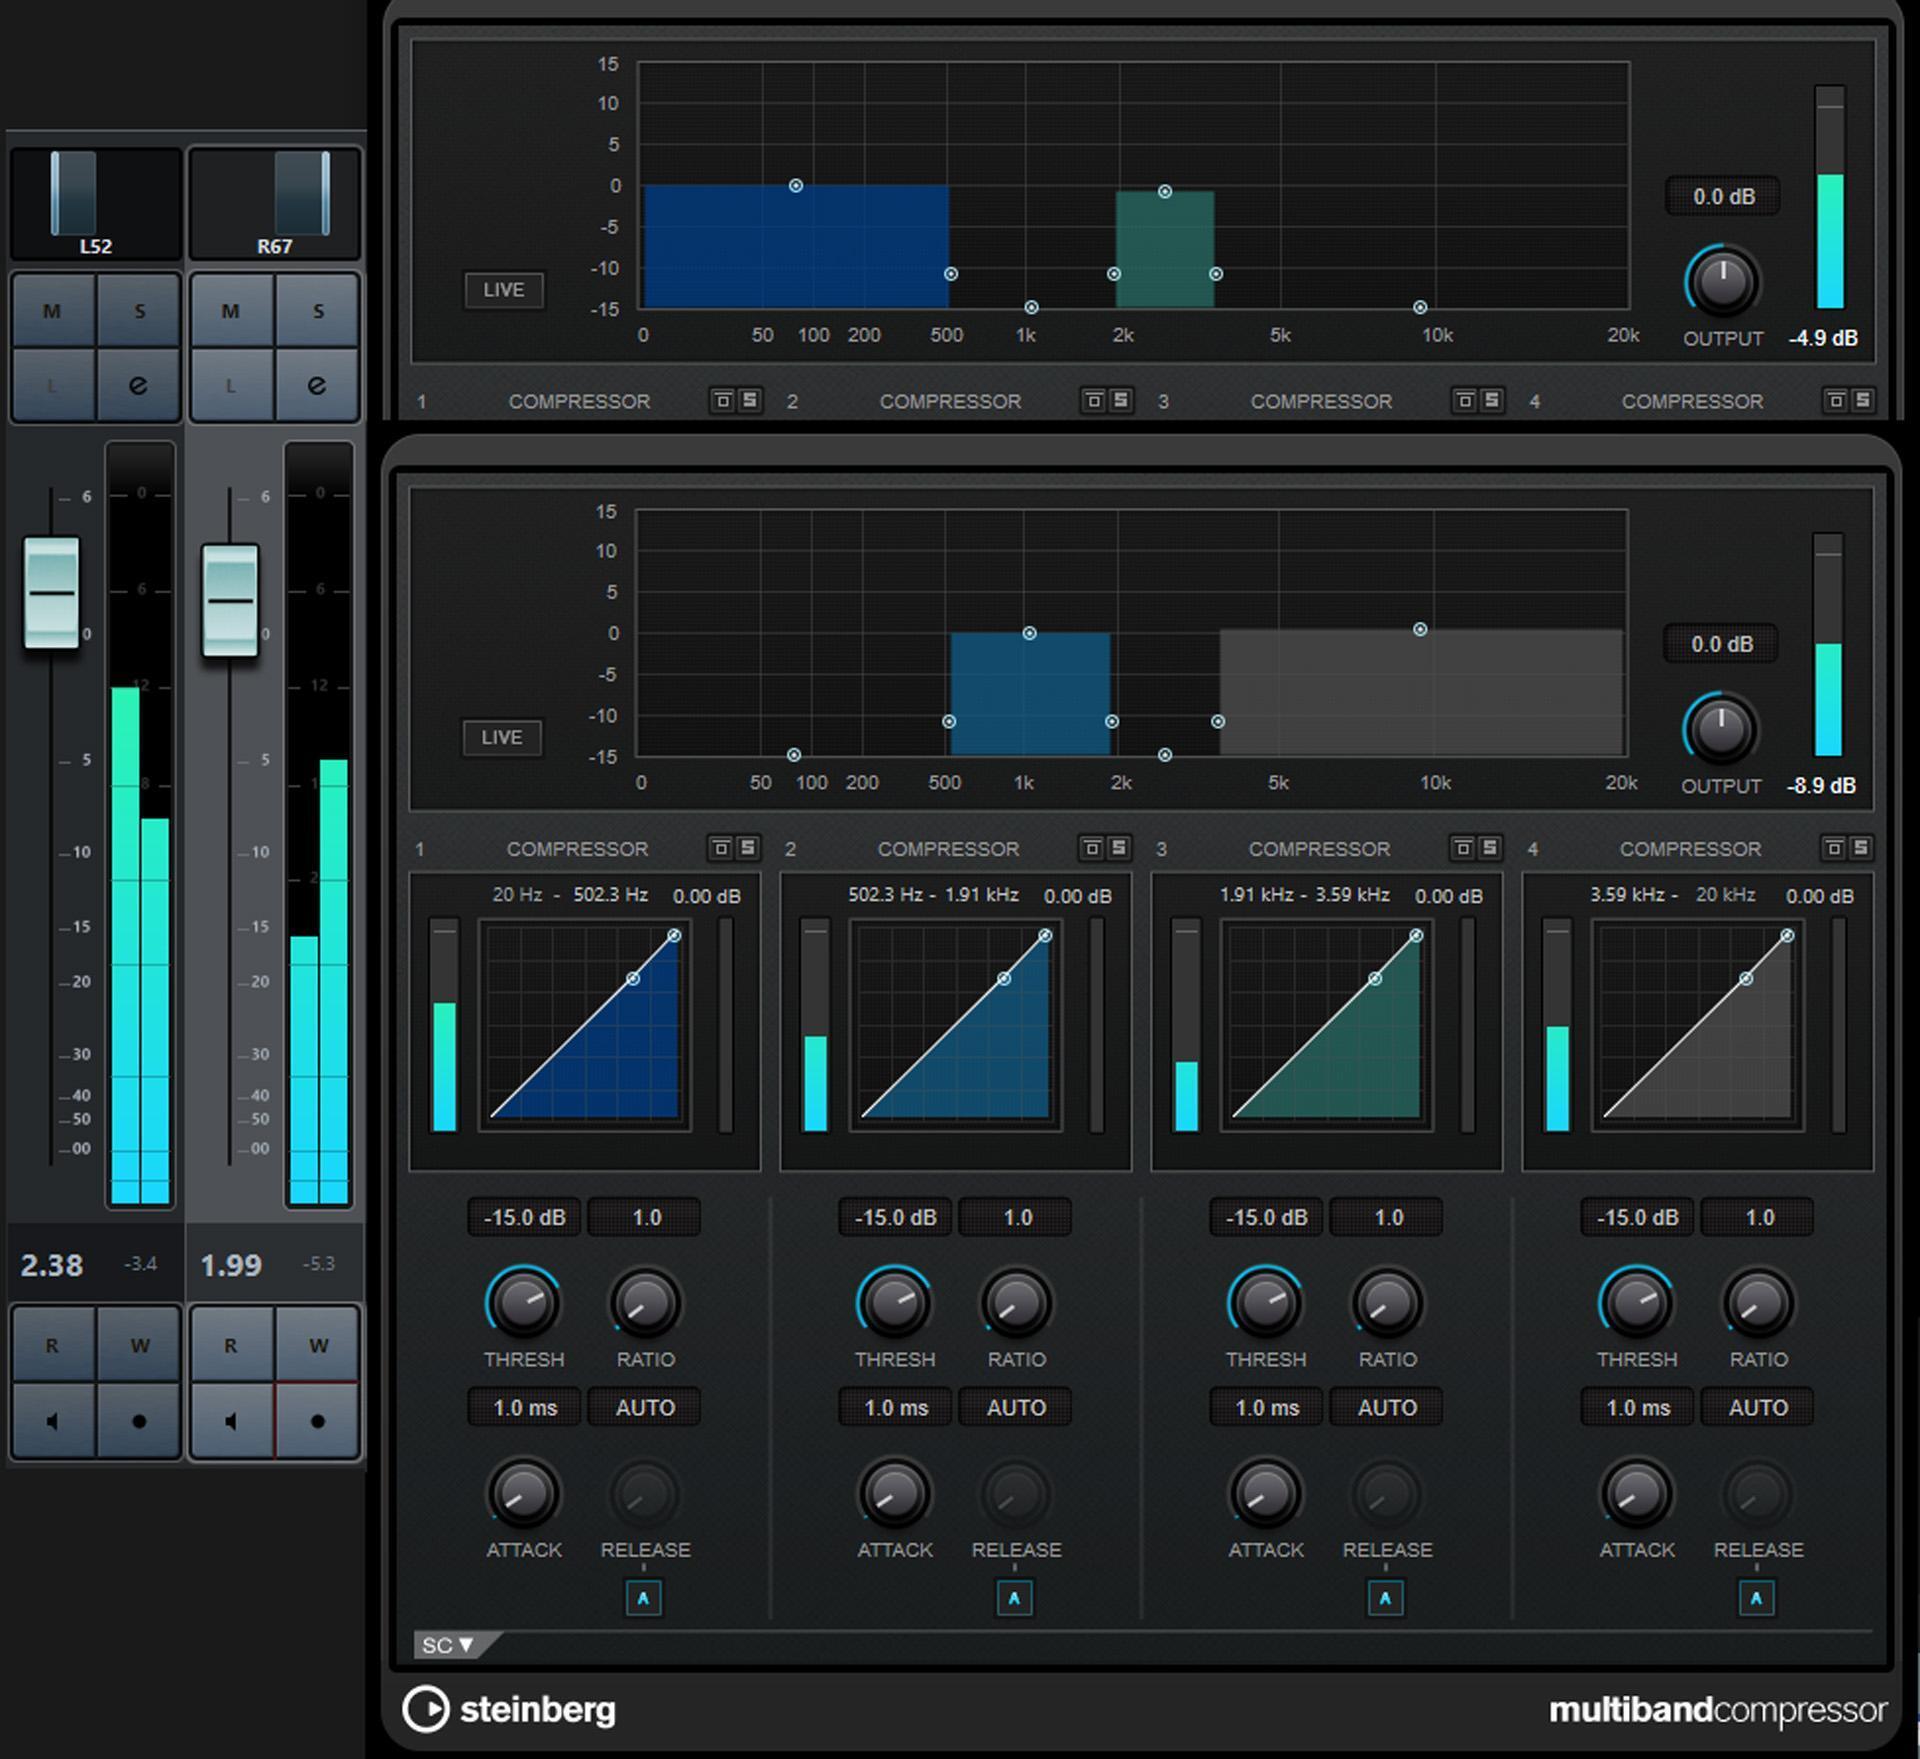
Next, insert a multiband compressor with the same settings into the other channel. On one compressor, reduce the levels of the low and upper-mid bands. On the other, reduce the levels of the lower-mid and high bands. Pan the channels with the compressors oppositely. If your multiband compressor can mute or solo more than one band, then that will usually be more effective than lowering levels, which may be restricted to a particular range.
The stereo effect’s character is different from the graphic equalizer, as you’ll hear in the audio example. Don’t overlook tweaking the channel pan and level controls to obtain the best results with various audio sources.
Frequency Split Stereo
Studio One’s FX Chains (the equivalent of Ableton Live’s Effects Racks) include a splitter that can divide audio into up to five bands based on frequency (fig. 3). This FX Chain follows all the splits with a dual pan pot (except the lowest frequency split, which should be centered anyway). So, each split can pan anywhere in the stereo field.
It’s possible to go crazy with this, but I tried to be somewhat conservative with the audio example.
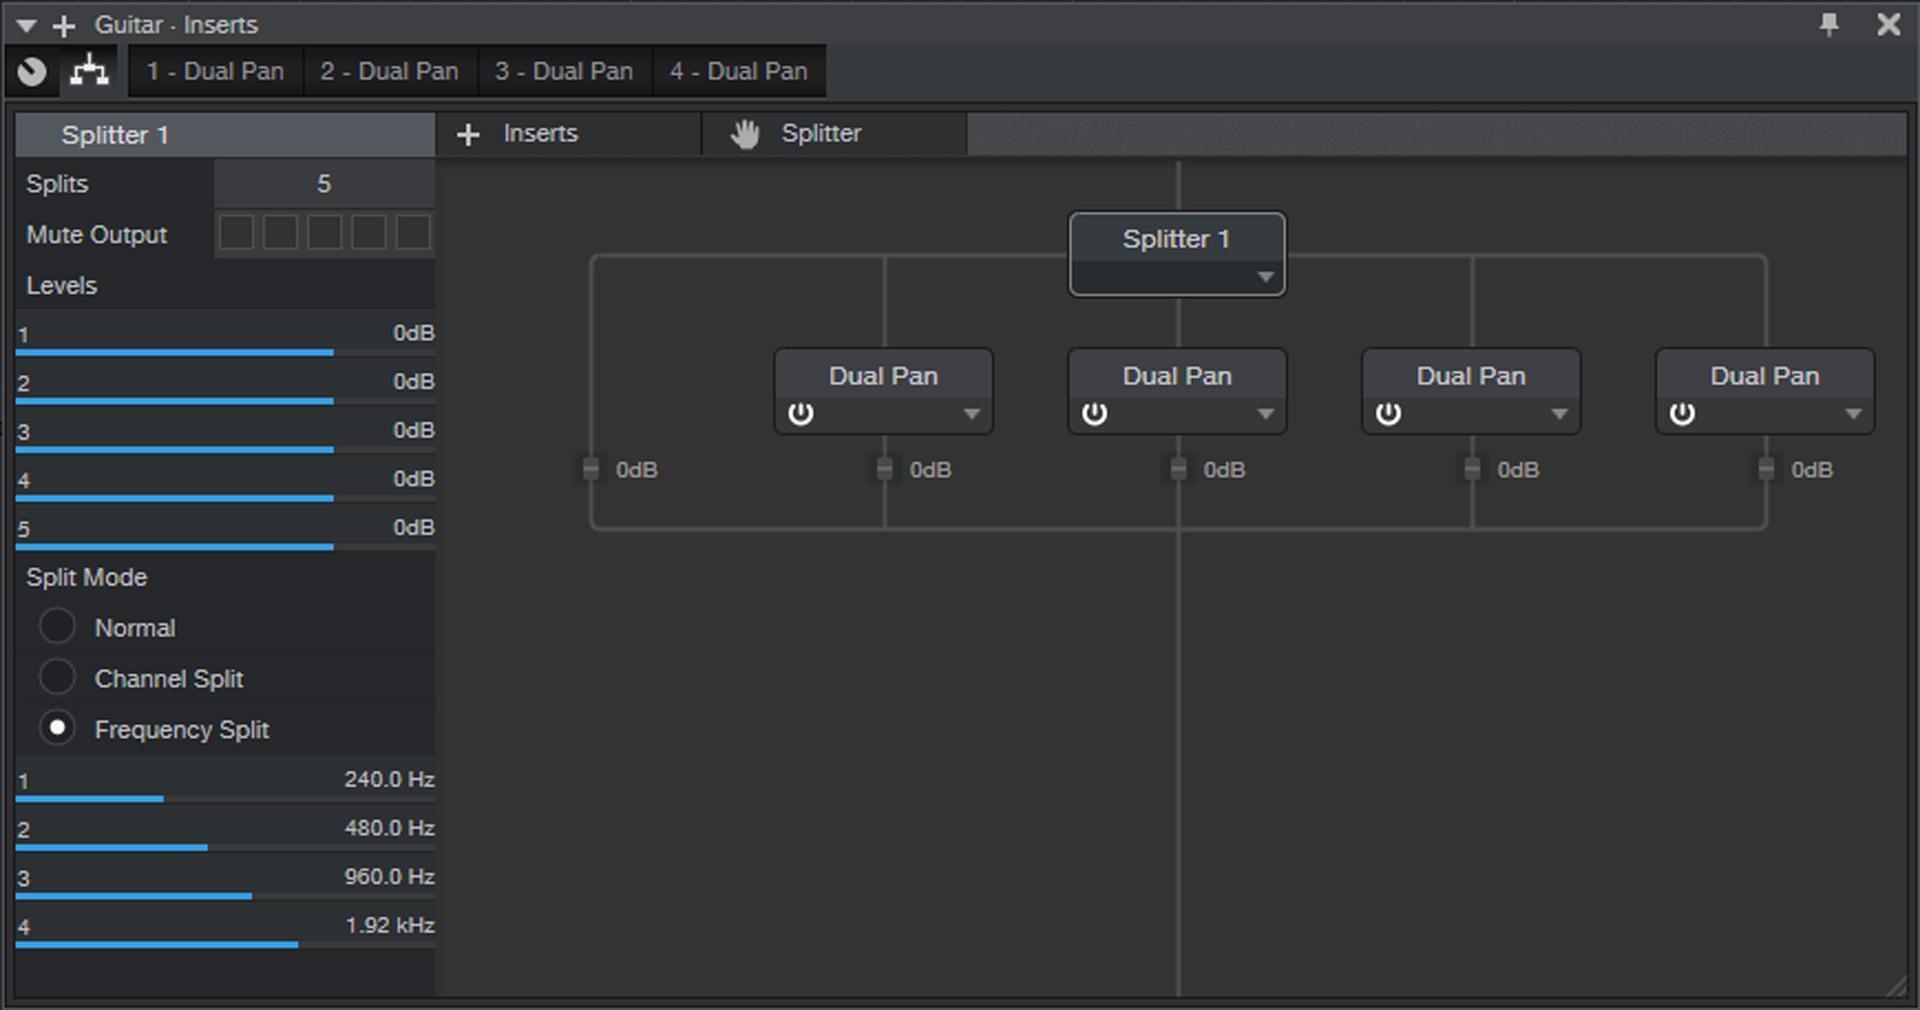
The pan pots spread the frequency bands as desired in stereo, yet the sound still collapses well into mono. Also, the FX Chain fits into a single channel insert, and you can create a control panel for it (fig. 4).
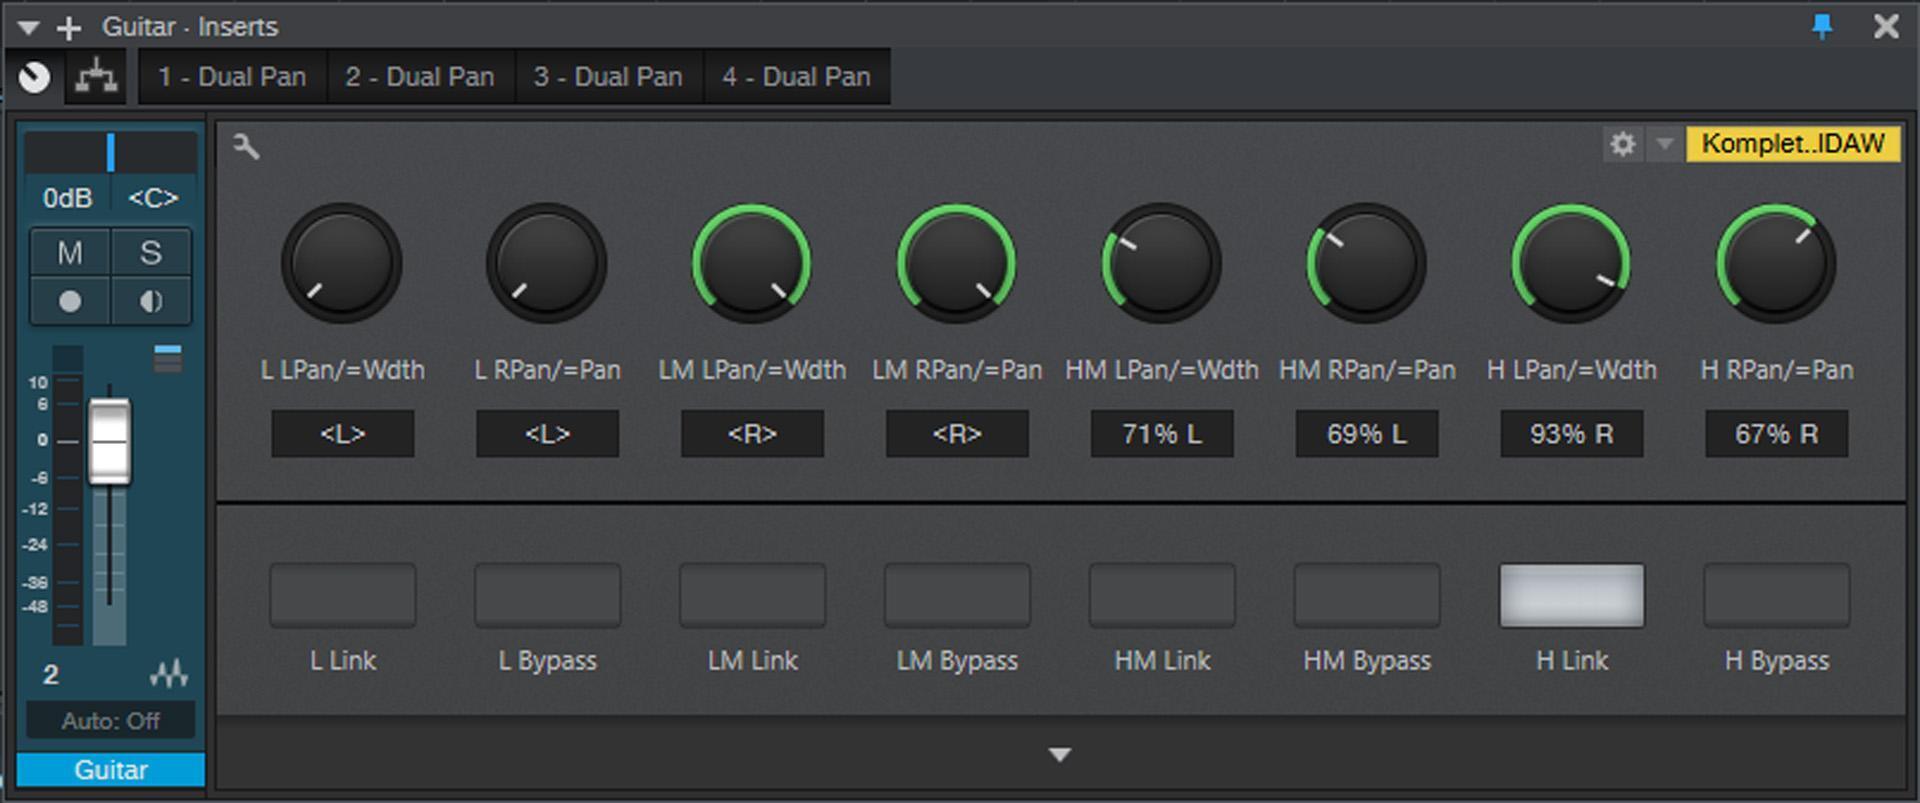
The Dual Pan modules can also serve as width controls. In the control panel, each band has two controls and a link button. When unlinked, the controls pan the left and right channels individually. When linked, one control is for master pan, and the other for width (this makes the image wider than just a single point in the stereo field).
Bi-amp Crossover
This technique works well for processing high and low frequencies separately, but it can also split the highs to one channel and the lows to the other for stereo. (Fun fact: Some ancient mono recordings used this technique so they could claim they used that new-fangled stereo fad.) Figure 5 shows how to implement bi-amping in Pro Tools. The separation isn’t as dramatic as the previous effects, but it can give a subtle weighting to the side with the highs, as shown by the audio example.
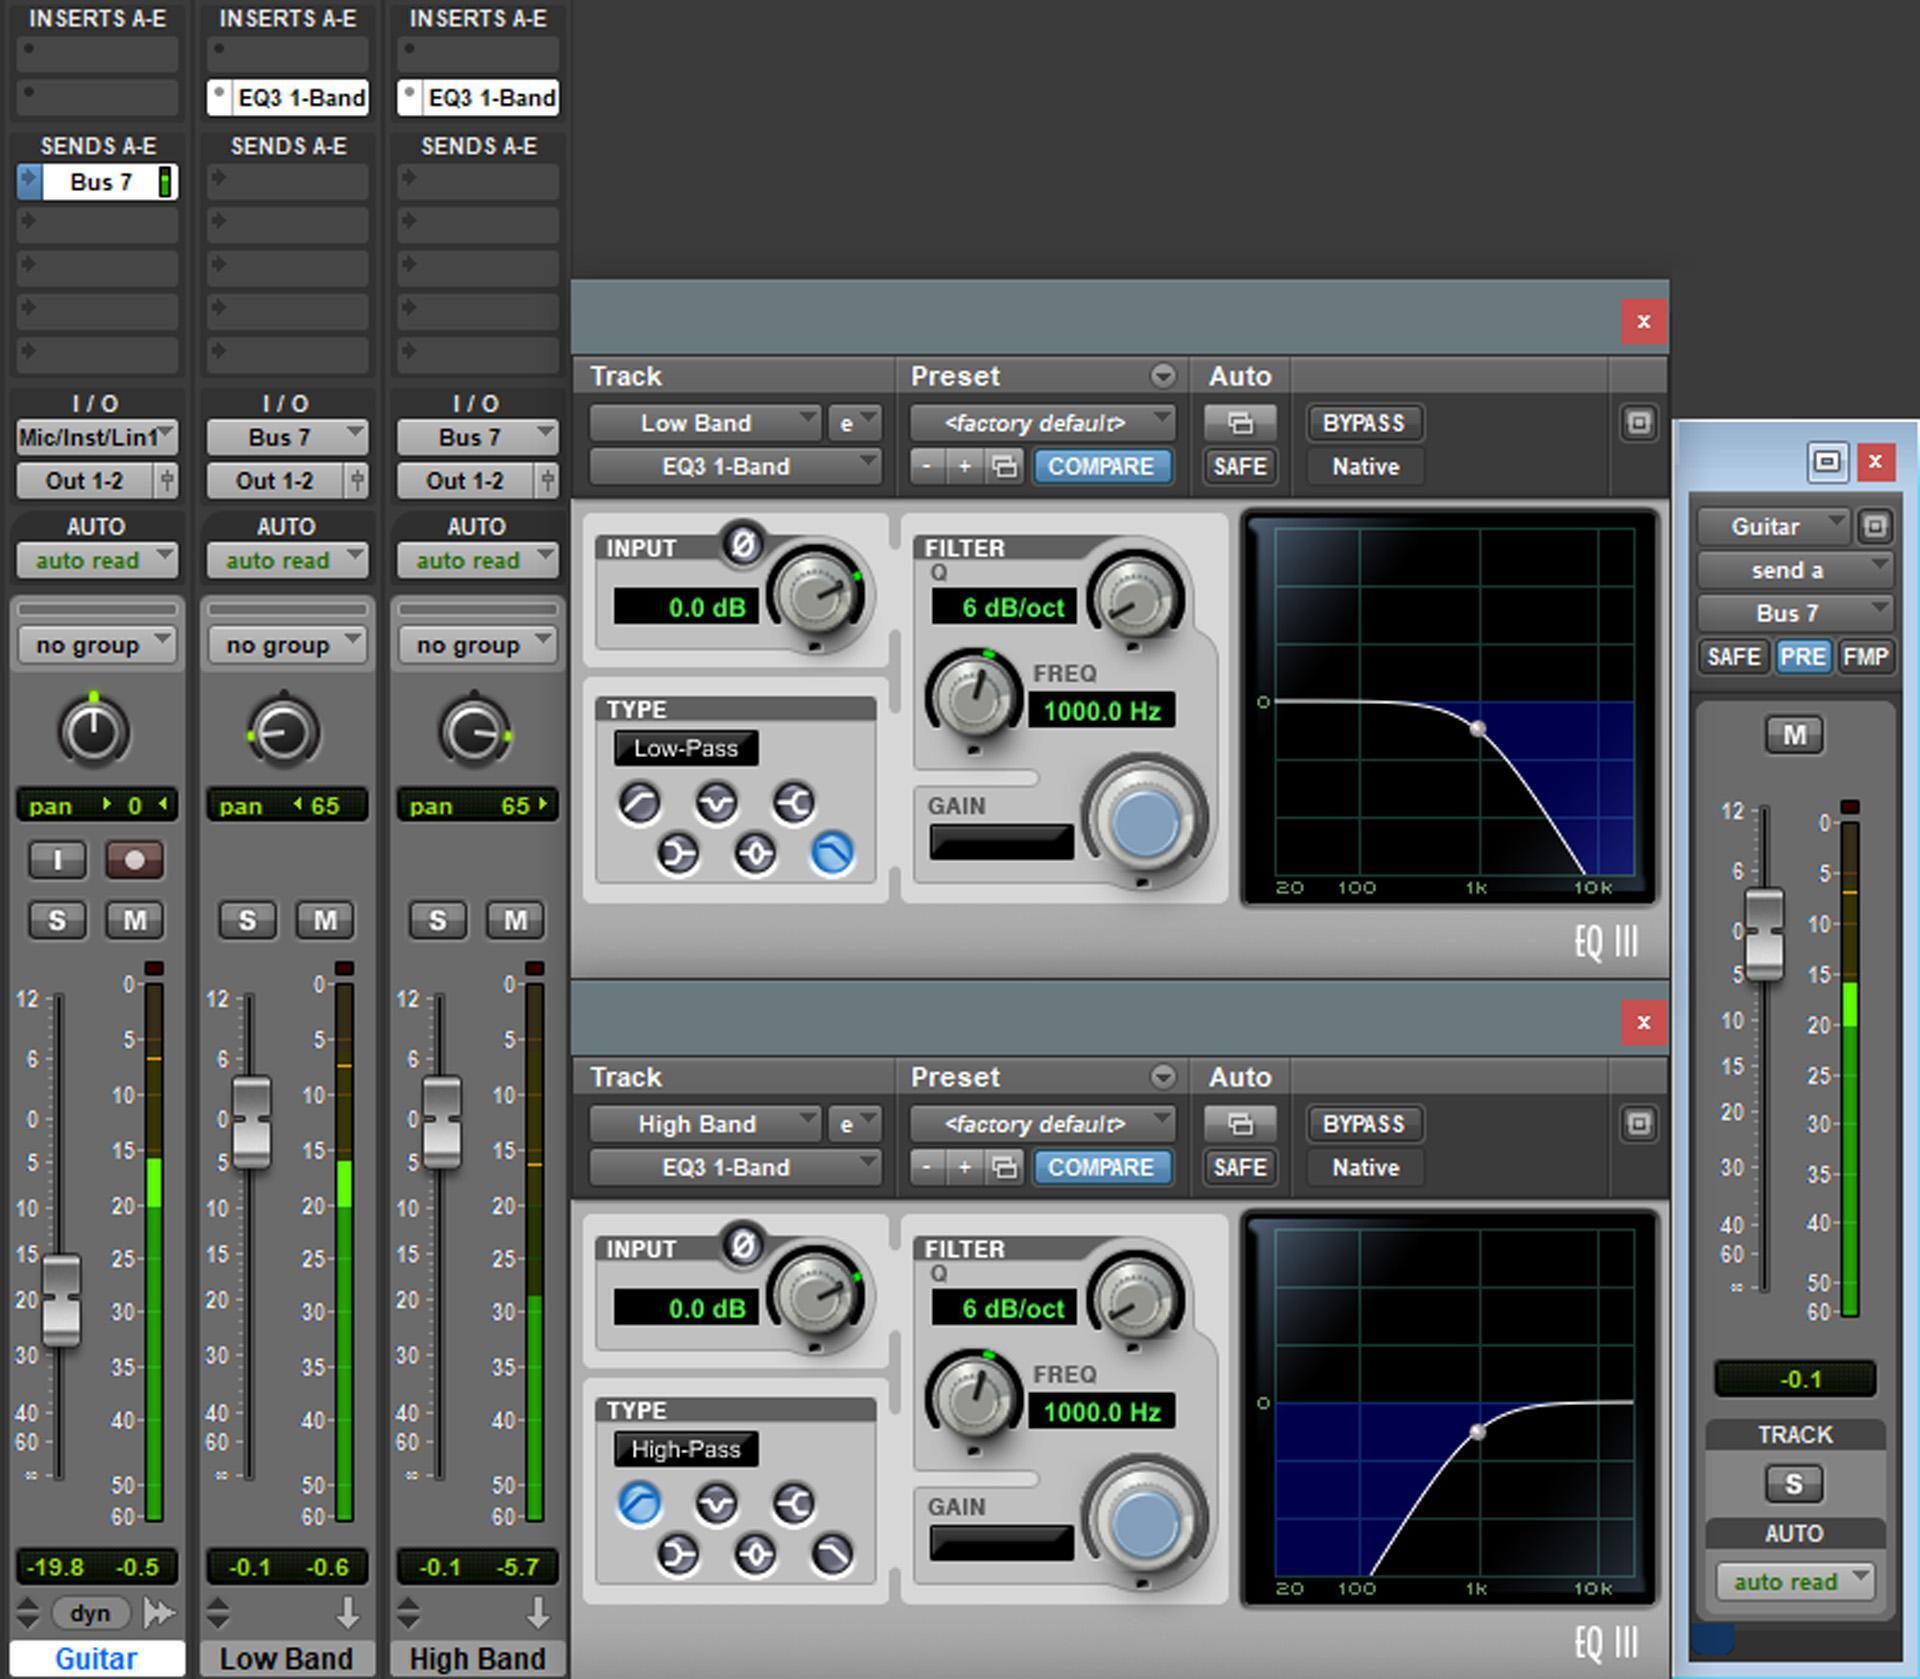
The main guitar track has a pre-fader send to a bus, which goes to two aux tracks panned oppositely. One has a 6dB/octave lowpass filter, and the other a 6dB/octave highpass filter. Set both filters to the same frequency (in this case, 1kHz).
The reason for the pre-fader send is that bringing up the unprocessed guitar track can fill out the sound of the highs and lows. I’ve sometimes used this technique with acoustic guitar to allow using a single mic to minimize phasing while still having a stereo image. If you pan the highs to the right and the lows to the left, then it sounds like you’re facing a guitar player — the finger squeaks are toward the right, while the body’s “boom” is toward the left.
Next, let’s consider some delay-based options.
Copy and Offset Track
This old-school approach copies a track and delays it slightly compared to the original track. When you pan them oppositely, there’s a dramatic, highly separated stereo effect due to the timing difference.
However, the tradeoff is inconsistent collapsing to mono. At shorter delays, you’ll likely hear a thin or phasey sound due to comb filtering; and, at longer delays, a slapback echo effect. It’s possible to adjust the delay for a compromise setting that’s acceptable in mono, but, unless you’re looking for a super-separated stereo sound, there are better options (and the best option is probably just to play the part again onto a different track).
Chorus/Doubling Plug-ins
These can also give a dramatic stereo effect, but they collapse to mono with the same problems as the “copy and offset track” technique — comb filtering with short delays and potential echo effects at longer delays. Nonetheless, if you’re planning on staying in a stereo context, then this is a simple and fast option.
Short Delays + Dry Signal
This delay-based stereo emulator avoids the issues of the previous two by trading off a slightly less dramatic stereo image for an excellent collapse into mono. Although this technique lends itself well to Ableton Live’s Effects Racks (fig. 6) or Studio One’s FX Chains, the basic principle works with any DAW.
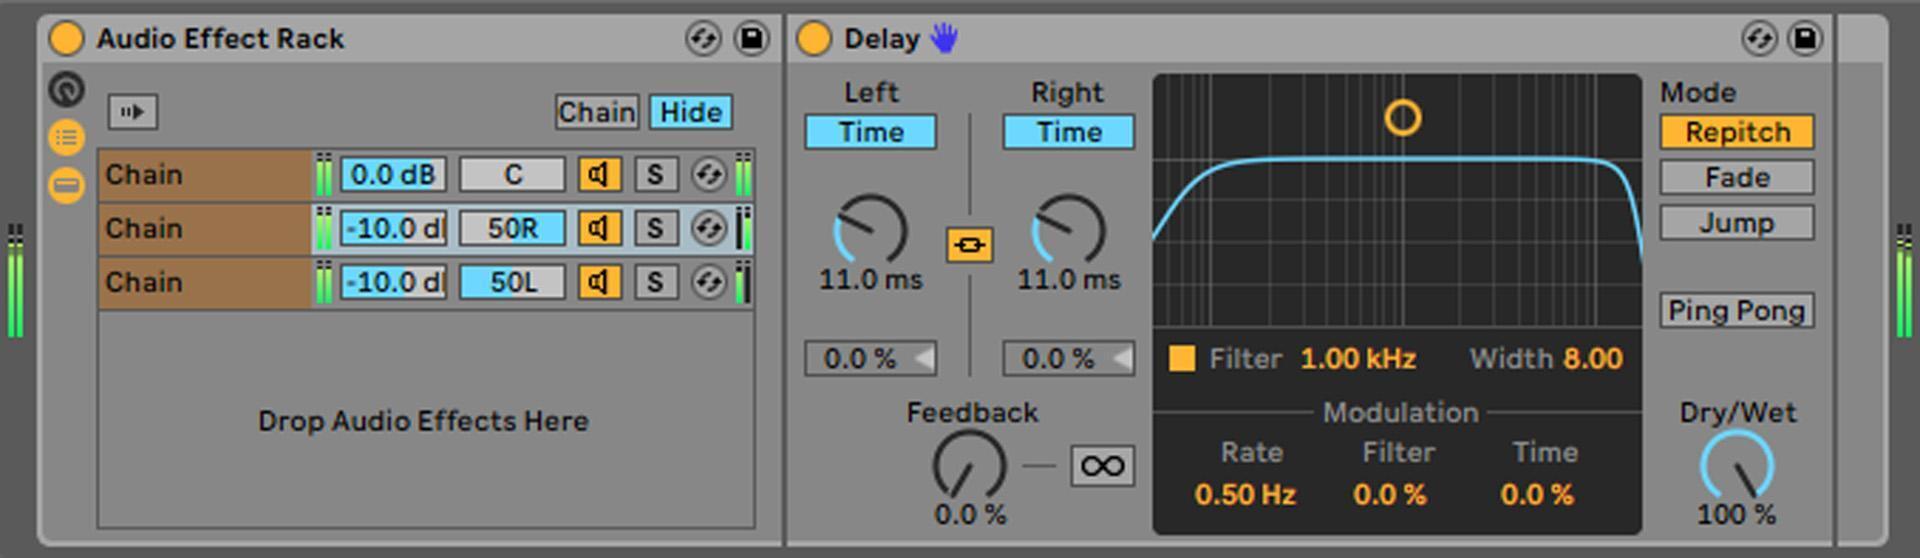
Pan your main guitar track to center and send it to two buses or effects channels. Insert a delay in each channel with the mix set for delayed sound only, no feedback, and no modulation — we want straight, plain, vanilla delay. With the Live Effects Rack in figure 6, the top chain is the dry signal, while the two lower chains each include a delay.
Try a delay time of 11ms for one delay and 13ms for the other. Longer delays give a more obvious separation effect; I recommend prime-number delays, like 3, 5, 7, 11, 13, 17, 19, 23, 29, 31, 37, and 41 milliseconds. However, there’s the risk of hearing a discrete echo with longer delays rather than a smooth stereo image.
Pan the delayed channels oppositely. Start with the dry, centered channel set to a nominal 0 level and the delay channels set to minimum. If being able to collapse to mono is important, then monitor in mono and start bringing up the levels of the delayed channels. You probably won’t notice any comb filtering if the delayed channels are set to -10dB, or even to -6dB. But, when you switch back to stereo, you’ll hear a solid stereo image.
The reason why you hear virtually no difference between the mono signal and the emulated stereo one is because the guitar is in the center, so, when collapsed to mono, there’s some center-channel buildup. This raises the main guitar’s level above the delayed sounds, which reduces the chance of any audible cancellation and balances the level better between the stereo and mono modes.
So, there you have it: Seven ways for your Monozoic devices to evolve into stereo. They say two heads are better than one . . . but, often, two channels are better, as well.