

Feedback in a worship service or concert is one of the most overt, embarrassing moments for a sound engineer who is trying to mostly be invisible behind the scenes. Besides being a blatant interruption, there’s precious little you can do about it after the event has started — oh, and by the way, the whole room is now staring at you. It’s a hot seat nobody wants to be in. So what can you do about it? Be prepared. Here are some pointers on how to avoid feedback!
What Causes Feedback?
What is feedback? Feedback happens when the output of a sound system is “fed back” into the input of the sound system. It’s sometimes called “howl,” because in live sound that’s what the problem sounds like. What’s happening is that your microphones are hearing the output of a speaker. The mic then loops the sound back into the system and amplifies it again, and again, and again until certain frequencies are accentuated in an exponential fashion, and that’s the screech/squeal/howl that ultimately makes your life difficult. The objective, then, is to break (or ideally to AVOID) the loop!
Know Your Mics
The best solution for feedback is a physical one. If you have a mic that is too close to, or maybe even pointing at, a speaker, don’t EQ to avoid feedback. MOVE THE MIC! A sound engineer trying to fight physics with EQ is like David versus Goliath without a sling; give yourself a fighting chance!
The best way to do this is to know where the blind spots (rejection) on your mics are. Each mic has a pickup pattern. Cardioid mics excel at rejecting sound from the rear, but supercardioid and hypercardioid are better at rejecting sound from the sides. If you have a singing pianist, maybe a hypercardioid mic is a great choice, because you can put a stage monitor to his or her side. Conversely, if the stage monitor is facing the singer, meaning it’s right behind the singer’s mic, a cardioid microphone would perform much better.
If you really can’t maneuver your way to success (which happens sometimes), you can eliminate the feedback sources by eliminating the stage monitors, which can be done by using in-ear monitoring.
Live Sound Microphone Buying Guide
Wireless In-ear Monitor Primer
Notch Out Those Problem Frequencies with EQ
If you’re using stage wedges, this process is the show prep you need. It will improve your quality of life as a technician. It’s a method of applying specific EQ cuts to the most problematic frequencies to stabilize your system and prevent feedback. These steps should be done before rehearsal, or soundcheck even, when no one else is in the venue. The whole process is best done BEFORE you’ve sound checked anything, because your channel EQ will mislead you. If you’re having feedback problems, resetting the board and starting with this technique may be a good idea anyway.
Let’s start with the routing. For every mix that you’re sending out to a speaker, insert a graphic equalizer (usually 31-band) in between the console and the amplifier (including the mains and the monitors). On a digital mixing console, an EQ is very likely included in the console itself, but you might have to make a digital patch to include it in the signal chain. On an analog board, you’ll use a hardware EQ that you’ll probably keep in a rack next to the board. Make sure all your monitor mixes are PRE-fader, not post-fader. This will keep the adjustments you make to the main mix separate from what your performers are hearing.
You’ll need a Real-Time Analyzer (RTA) of some sort. These are available for smartphones and tablets and most digital consoles have them built in. An RTA displays how much energy there is at specific frequencies, so you can see what frequencies are popping up (louder). It’s easier to play “sonic whack-a-mole” when you know where the moles are, so unless your ears are so well trained that you know exactly what 325Hz sounds like, it’s a must-have.
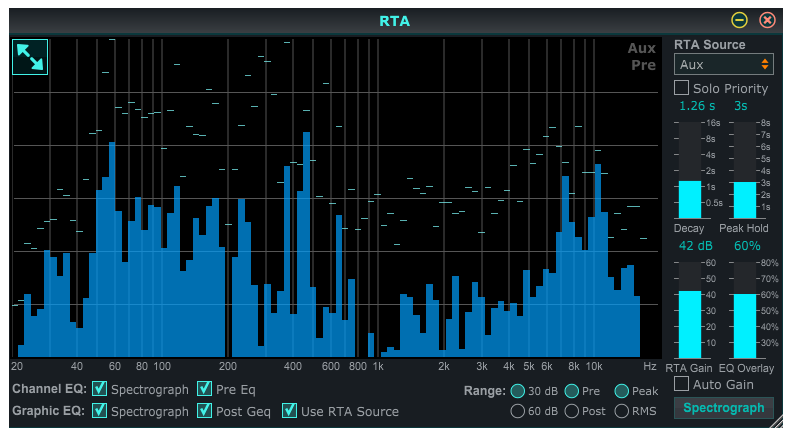
Next, take each mix, one at a time, and mute every other output. For example, let’s use the worship leader’s monitor mix. Bring the master output of that mix all the way down. Take some notes on where the levels in the mix are before proceeding. Then bring every input channel up to unity (0 on the fader) in that mix. So if his or her mix is on Aux A, you should now have whatever is in his mix at unity for that mix, but there still is no output because the master is all the way down.
Turn up the master SLOWLY until feedback occurs. Turn it down quickly because feedback can damage your system. As the feedback happens, look at the RTA to see what frequency just popped up the highest. Go to your EQ, and cut that frequency by 3dB. Push the system up again until feedback. Rinse and repeat. You’ll do this until either A) your system is bulletproof; you can push it higher than you would ever need in a performance situation, or B) you’ve cut one frequency by 12dB. If that’s the case, you may need to re-evaluate. The leading suspect here is a physical problem somewhere, usually a mic pointing at a speaker, or a serious acoustic issue that should be addressed with treatment. Now that you’ve found and suppressed the problem frequencies, reset the levels in your mix as they were.
Repeat the whole process for each different mix. You should now have a VERY stable system.
Take Out the Low-frequency Trash
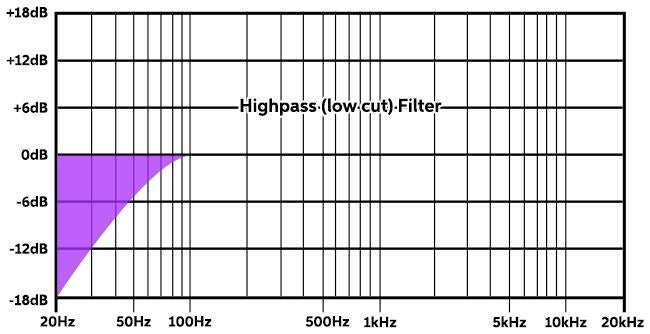
A great practice to establish is using your highpass filter (HPF) as much as you can. A highpass filter cuts low frequencies and allows the high frequencies to pass. On an analog board, it’s usually a button near the preamp gain (if it’s fixed frequency) that you can engage, and it ranges from 75Hz–100Hz, which means everything below that frequency is cut out. Some consoles (and most digital boards) will allow you to vary the highpass frequency. This is a HUGE tool for mixing defensively.

Feedback starts in the lows. You probably have some low-end sources in your mix like bass and kick drum, and you don’t need to cut lows out of those, but your lead vocal doesn’t really need to be in your subwoofer. Engaging the HPF on those channels removes unnecessary frequencies that are below the vocal range from your mix. If you’re on a digital mixing console, do the following in soundcheck: start with the HPF at 20Hz and increase the frequency until you start to hear it cutting into your source in a noticeable way. Next, roll the frequency back down a bit. Every frequency you dumped just cleaned up your mix and bought you more gain before feedback. You also just gained some power in your PA system that you can use for sub-bass that you want your audience to hear.
Repeat this for every channel on a digital board. Leave the frequency really low on a bass sound source, such as 40Hz for a bass guitar, for example. On an analog board, do this on every channel that isn’t a big low-end contributor (bass, kick, maybe a floor tom or a keyboard). This way, none of the frequencies you’ve cut can be used against you by feedback!
Read more about highpass filters
Defensive Panning and EQing
If you’ve done all your prep work and your vocalist still insists on holding a mic facing right into a speaker, there are a few last-ditch tricks you can try to get you through the service until you can teach how and where to hold a mic. Lapel mics are often the worst offenders.
Muting or pulling back volume can help, but it can also lead to more problems, not the least of which is that your audience is no longer hearing the vocalist. A better idea is to use panning, if the situation allows. NOTE: This trick will only work for sound systems that are running in stereo. This option is especially great for lapel microphones.
For instance, say the pastor is hammering home the point of the sermon. His volume is a bit higher than it was in soundcheck. (But you anticipated that and left him some room before clipping, right?) As the pastor walks to the edge of the stage, he gets closer to the speaker, and you hear it start to ring. Instead of bringing down his level or muting him, pan him to the other speaker. The volume difference to the audience isn’t huge, and most people won’t even notice.
One other tricky situation happens when you can tell there’s feedback in your performance, but you can’t tell where it’s coming from. Look on the console’s input meters, usually near the input faders. You’re looking for anything that is clipping or significantly louder than it should be. If you can nail down what channel or mix is the problem, but you still can’t hear the feedback clearly enough to know where it’s feeding back, just start cutting low-mids out of that channel or mix. I usually start at 325Hz. This is definitely a last-ditch attempt to save a bad situation, and after the end of the service, you’ll want to figure out what needs to be fixed for a more permanent solution. In the meantime though, you’ll get through it.
Learn more about how to use your EQ
Use these tips to help you overcome feedback at your church or live venue. If you have any questions about the gear we suggested, you can always call your Sweetwater Sales Engineer at (800) 222-4700.