

In order to go faster, you need to slow down. It sounds like contradictory advice, but no matter what you’re trying to create or what you’re trying to do, taking the time to slow down and focus on your workflow can improve your overall experience and allow you to work faster and more efficiently in the future.
Whether you’re using Ableton Live primarily in the studio or on the stage, here are a few tips that will help enhance your workflow. This will allow you to spend more time creating music and spend less time fiddling with your laptop onstage.
Use Live’s browser

Figure 1
Using Live’s browser will instantly improve your workflow. Add the folders you use to store samples, sounds, or other live sets to the browser using the “Places” feature. You can quickly access those files directly from within Live, without needing to dig around on your computer for them.

Figure 2
Find a built-in preset that you really like? Save it as a favorite so that you can access it again quickly. With a preset selected in the browser, press a number (1–7) on your keyboard to assign that sound as a favorite. You’ll notice it now has a color next to the name that corresponds with the color under the “Favorites” section of the browser (fig. 2).

Figure 3
You can even rename the favorites (fig. 3) so you can create categories of sounds or effects that you can quickly reference the next time you’re working in Live.
Add FX to tracks
Need to add reverb to your track? Don’t lift your fingers off your keyboard to use your mouse. Use these steps to quickly add any effect to a track.
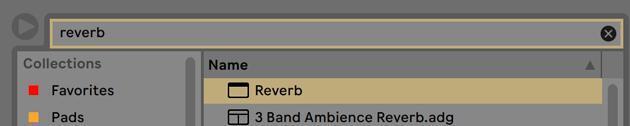
Figure 4
- Press Command F on Mac (Control F on PC) to open the search feature of the browser.
- Type “Reverb” or the name of whatever device/preset you’re looking for.
- Hit “Return.” If the effect you want isn’t the first item in the list, use the arrow keys on your keyboard to navigate the list (fig. 4).
- Hit “Return” again to add that effect to your track.
This is one of my favorite tricks to use when I’m working in Live. You can quickly add sounds and effects to your set without really thinking about it.
Create a default track type
Do you find yourself adding the same effects to your tracks? Maybe you use the new Channel EQ effect included in Live 10.1 on almost all your tracks. Save yourself the time of adding the effects and create a default track type. Here’s how.

Figure 5
Create your dream channel strip by adding the effects you want to a new audio or MIDI track. In this case, I’m going to add Utility and Channel EQ devices to a new audio track (fig. 5).
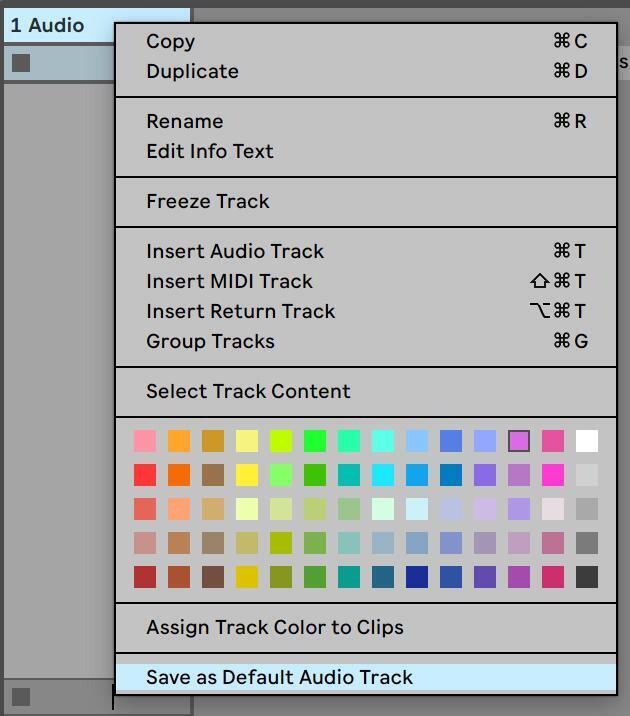
Figure 6
Right-click on the track title bar and select “Save as Default Audio Track” (fig. 6).
Now when you create a new audio track, those effects will be preloaded on your track.
This will save you precious time and let you get straight to recording and creating music.
Save your presets
Do you often find yourself trying to remember how to re-create that great-sounding patch you made a few weeks ago? You can reopen the previous Live set and try to find that preset or try to create it from memory. Save yourself the effort, and save your preset as soon as you create it.
Select all the devices and effects used to create your sound with your mouse.

Figure 7
Press Command G on Mac (or Control G on PC) to group all your devices into an Instrument Rack (fig. 7).

Figure 8
Rename the Instrument Rack to a name that will help you find it later (fig. 8).

Figure 9
Hit the Save icon on the Instrument Rack to save your sound into the User Library folder of Live’s Library (fig. 9).
Next time you’re looking for the perfect sound, you can search in Live’s Browser and reuse your sound quickly!
Learn keyboard shortcuts
This is the biggest gamechanger to your workflow. If you’re not working on learning keyboard shortcuts, stop what you’re doing right now and do that! When I’m working in a new software, I print out the keyboard shortcuts and tape them up near my desk. As I’m working, I constantly reference them and try to internalize them.

Figure 10
If you use your mouse to access an option in the menu bar, pay attention to the keyboard shortcut shown next to the item so you can use the keyboard shortcut next time (fig. 10).
Create and save templates
Create and save templates often. Are you using Live for keys? Create a keys template with all your presets labeled and save it. Are you controlling lights with Ableton Live? Create a template and save the template with all your presets named and labeled.
Do you record demos of your songs in Live? Create a demo song template that you can open and start recording instantly. Add a basic drum rack with drum sounds, a go-to bass, pad, and piano sound, and your default vocal chain to a track. Name your tracks and save that Live set as “Recording Template.”

Figure 11
Next time you start a song, open the template and use the “Save Live Set As” command (fig. 11) to duplicate your file and start creating!
The goal of any good software is to get out of your way. Whether you’re recording a song or performing onstage, you shouldn’t have to focus on the software or think about what you’re doing. Taking the time to slow down and improve your workflow will benefit you immensely. Applying these tips will help you speed up your workflow in Live immediately!