
There’s been a resurgence in bluegrass and old-time string band music recently (thank you, Ken Burns and public television), so I wanted to talk about some of the techniques I use to record bluegrass and string bands. Like most of us, I generally work in a multitrack world; my usual approach does not include recording the whole group with a single stereo pair of microphones placed 8’–10′ in front of the group as some people do. Most of my recordings are done with each of the instruments close-miked and often isolated from each other (in time as well as space, since overdubs are so common).
Two Reasons for Close-miking
There are a couple of reasons that close-miking instruments has become common practice, both in the home/project studio environment and in larger commercial facilities. The first reason is to achieve isolation from the other instruments in the room, which makes signal processing, such as EQing, much easier. In addition, bleed from other instruments can make the task of punching in to fix mistakes difficult or impossible to achieve without being noticeable. If you have to replace four measures of acoustic guitar that were originally recorded in a room with a banjo, then the sound of the banjo will change in the final mix, unless it’s also replayed while recording the guitar repair.
The second reason for close-miking instruments is that it’s much easier to achieve an acceptable sound in a less than optimal recording environment than with the use of distant-miking techniques. While the development of low-cost, high-quality recording gear has expanded our ability to create great recordings in nontraditional recording environments, there are disadvantages as well. One of the biggest disadvantages of recording in the privacy of your own home is that your home (probably) wasn’t designed for recording. Low ceilings, small rooms, and the lack of isolation from the outside world can all contribute to a situation where close-miking each instrument works best, because it lessens the chance of recording the sound of a boxy room, passing traffic, barking dogs, and the neighbor’s lawnmower.
The First Step – Listen
At this point, I’d like to emphasize that before you can hope to record an instrument well, you have to know what that instrument sounds like. You have to go over to it and hear where the sound comes from, how that sound changes over the face of the instrument, and how it changes with distance from the instrument. To illustrate this point, think about an acoustic guitar. We all know what an acoustic guitar sounds like, don’t we? Well, probably not, since (a) few of us put our ears as close to a guitar as we put a mic and (b) every guitar sounds different.
A good way to listen to an acoustic guitar (or any other instrument) is to have someone else play the guitar, while you plug one ear canal (put your finger over the flap and press it down tight) and put your other ear in front of it. Now, move around and listen to the way the tone of the instrument changes when you move your position from the soundhole to the bridge to where the neck of the guitar meets the body. An alternative method (though I heartily recommend that you actually get down and listen) is to wear closed-back headphones and move the mic around, while you listen to the tonal changes that are caused by miking different parts of the guitar.
There are always caveats, and here are mine: I’ll be generally discussing techniques that work for me; if you try these methods and don’t like the results, then, by all means, experiment until you find sounds that make you smile. The key to improving your recording skills — and, ultimately, the sound of your recordings — is experimentation.
The Instruments
When Bill Monroe hired Lester Flatt and Earl Scruggs in 1945, the instrumentation that Monroe’s Blue Grass Boys used became the standard setup for most of the groups that followed: Monroe’s mandolin paired with Lester Flatt’s Martin acoustic guitar, Earl Scruggs’s 5-string banjo, Chubby Wise’s fiddle, and Howard Watts’s upright bass to create the iconic sound that most folks recognize as bluegrass. Though Dobro wasn’t a completely unknown instrument (Dobro player Bashful Brother Oswald joined Roy Acuff’s Smoky Mountain Boys at the Grand Ole Opry in January 1939 — though the Smoky Mountain Boys was an old-time string band rather than a bluegrass band), there was never a Dobro (or resonator guitar) in Bill Monroe’s band. However, in 1955, Flatt and Scruggs hired Josh Graves to play Dobro in their group, and the Dobro sound has become an integral part of bluegrass music.
Guitars
There are lots of different acoustic guitar sounds being used these days. In the country field, strummed acoustics are often used as a rhythmic instrument and a background texture, occupying the same space and serving the same purpose as the hi-hat. In other situations, including a lot of contemporary bluegrass, the acoustic can be the driving force of the song, providing not only fullness in the lower-mid registers but also most of the harmonic information; in that case, a full-range sound is more appropriate.
As a general rule, I prefer the sound of small-diaphragm mics on acoustic guitar. The off-axis and reflected sound of large-diaphragm mics can sound a little unnatural, unless the guitar is recorded in a fairly dead room.
For many years, the recording guitar of choice among Nashville session players has been the (comparatively) inexpensive Martin D-18, while bluegrass musicians typically played a Martin D-28 or D-35. (All Martin “D” series guitars are the same size. D-18s have mahogany backs and sides, while the higher-priced instruments have rosewood backs and sides. Besides that, the higher the number, the more ornamentation/inlay on the instrument.) The reason that live performers wanted D-28 or D-35 guitars is really quite simple: they are amazingly loud. If you play unamplified acoustic music, then you need all the help that you can get to play over the noise of the crowd, and those models helped provide the volume that you need. Much of the volume of those guitars is in the lower-mid range, which helps the projection of the instruments. A D-18, on the other hand, is more evenly balanced, though it’s likely to be quieter. This makes it more appropriate for general acoustic guitar recording, where you don’t need sheer volume. D-18s aren’t the only guitars used in local studios, of course, but I bring this up to point out that it is much easier to get a balanced acoustic guitar sound on tape if the guitar sounds good to begin with.
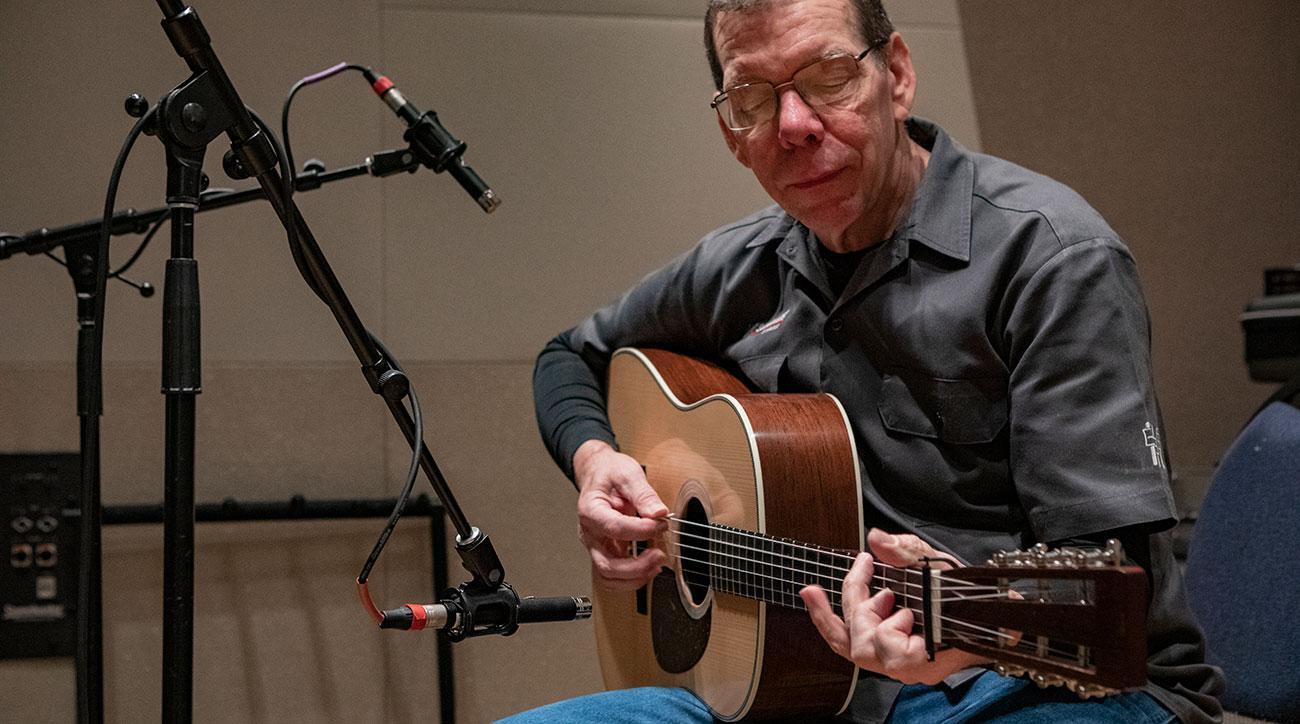
While a couple of small-diaphragm microphones in an XY setup, centered about 8″ from the guitar, and pointed at a spot on the body midway between the soundhole and the lower-bout end of the guitar works quite well, the mics don’t have to be set up in any of the typical stereo configurations. Bil VornDick, a Nashville-based producer and engineer, regularly uses a placement that can yield excellent results. With his method, one microphone is placed 8″–12″ from the guitar and about 6″ below the neck, pointing up at the point where the neck meets the body of the guitar. The other mic is 12″–18″ away from the guitar at approximately the level of the player’s chin, pointing down toward the middle of the instrument.
My standard microphones for acoustic guitar recording are a pair of Telefunken M60 small-diaphragm microphones with a transformer. Since I like the guitar tone to be fairly transparent, I’ll use Millennia preamps and, if I use a compressor, a Manley ELOP+ that sounds a little brighter than a vintage optical compressor.
Violin/Fiddle
For an instrument so small, the sound of a fiddle is surprisingly complex. (And since I’m thinking about it, there isn’t any difference between a fiddle and a violin.) When choosing the best microphone placement for a fiddle, think about where the sound originates. While most of the sound of an acoustic guitar comes primarily from the front of the instrument, sound comes from the top of the fiddle, the bottom of the fiddle, and even from the sides. Because of this, miking the instrument isn’t as simple as it seems. Close-miking, which seems to work just fine with most instruments, seldom works out particularly well on fiddle. If you place a mic less than a foot away from the bridge, then the result is liable to be harsh and screechy (unless you use a microphone that is particularly warm sounding). To combat this, try putting the mic between 18″ and 2′ above the instrument and a bit off-axis from the top. (If the fiddle is held at an angle, then you can put the mic directly overhead.)
Since the right mic choice can really affect the tone of the recorded instrument, I will often use a small-diaphragm mic, like the Warm Audio WA-84, above the fiddle, plugged into a Great River Electronics MP-2NV. If I use a compressor, then I’ll usually go with my all-around favorite compressor: Tube-Tech’s CL 1B.
Here’s another option: When you listen to someone else play a violin, you aren’t actually listening to it from above; you listen from the front, the side, and even from below. Picture yourself sitting down and listening to a fiddle player standing in front of you. You might try putting a large-diaphragm mic, like the Miktek CV4, a couple of feet in front of the fiddle, at about the level of a seated listener’s ears. If the performer is in a nice-sounding room, then try a figure-8 pattern; otherwise, you’ll probably be happiest with a cardioid pattern.
Mandolin
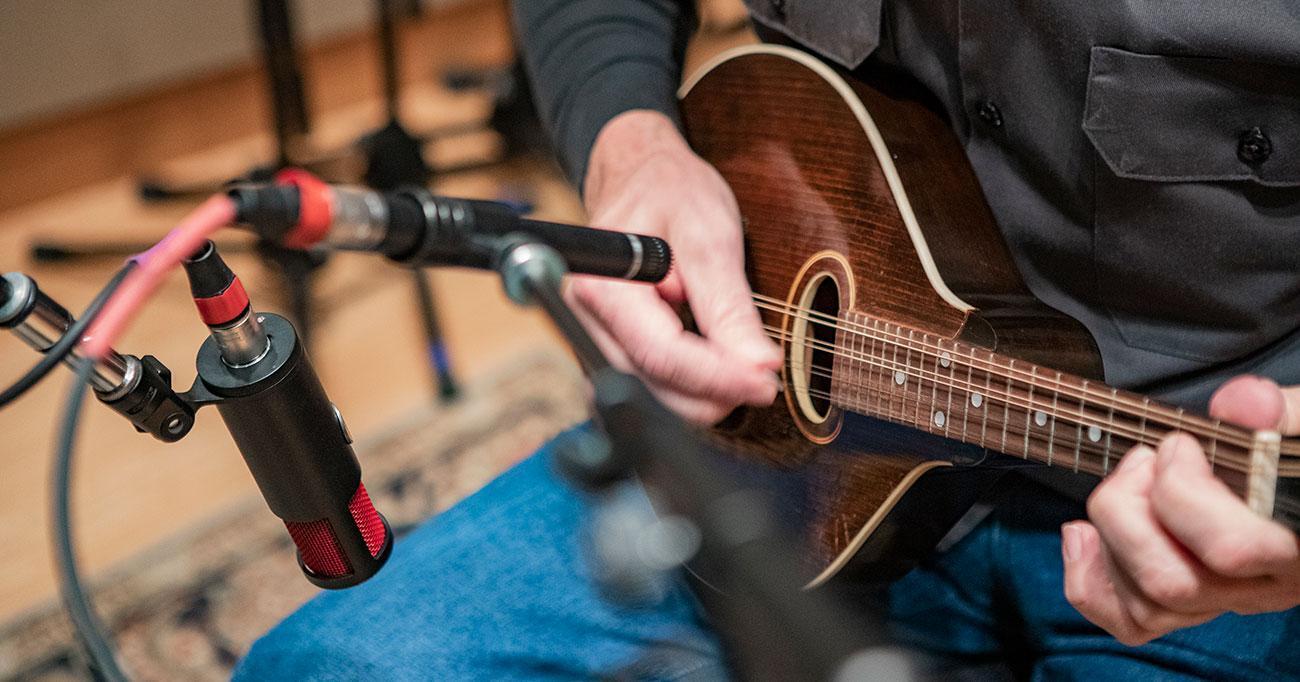
Since mandolin is tuned like a fiddle, has F-holes like a fiddle, and is the same size as a fiddle, it seems logical that you can record it like a fiddle. But sometimes logic isn’t helpful at all. I find that although a warm sound works best for fiddle whose notes have a slow attack time, mandolins are much more percussive. I generally use a DPA 4011A small-diaphragm mic about 10″ from the instrument, pointing toward the strings at about the end of the neck, combined with a transparent preamp, like the Rupert Neve Designs Shelford 5052 preamp. However, much like the acoustic guitar, multiple microphones can be successfully used on mandolin.
If you have a spare track, then a 2-mic setup for mandolin is worth investigating. Try the 4011A about 2′ above the instrument and a second microphone (I like Shure’s KSM313 ribbon mic) about a foot away from where the neck meets the body, pointing up from below. Remember that although the tracks can be panned hard left and right, it’s not necessary — you can pan each mic anywhere within the stereo field. I don’t consider these pairs of tracks to be “stereo”; they’re simply an instrument recorded with two microphones.
Before leaving the discussion of mandolin miking, I want to point out that the “traditional” mandolin sound you can hear on recordings from the 1940s and 1950s was usually captured with an RCA44 ribbon mic, placed a lot farther away than is common these days. A few years ago, I experimented with a classic ’44 and discovered that the mandolin sound didn’t snap into focus until the microphone was around 30″ from the instrument — a distance that makes more sense when you remember that most of those recordings were done with most of the group gathered around a single mic. When you have five people playing at once, the mic has to be that far away. If you want that sound, then the closest thing to a vintage RCA44 is the AEA R44CE, which you can put 30″ away from the mandolin.
Banjo
Banjo is another oft-maligned instrument. People make jokes about banjos and banjo players almost as often as they make jokes about accordions and accordion players. (Insert your favorite banjo joke here!) A good banjo is really loud. Years ago, I lived in an apartment building that had several musicians as tenants, including two brothers who played banjo and mandolin, respectively. We all used to get together and play when we were not working, which was quite a bit in those days, and that old Gibson banjo could completely drown out two guitars, a mandolin, and an upright bass. They are that loud.
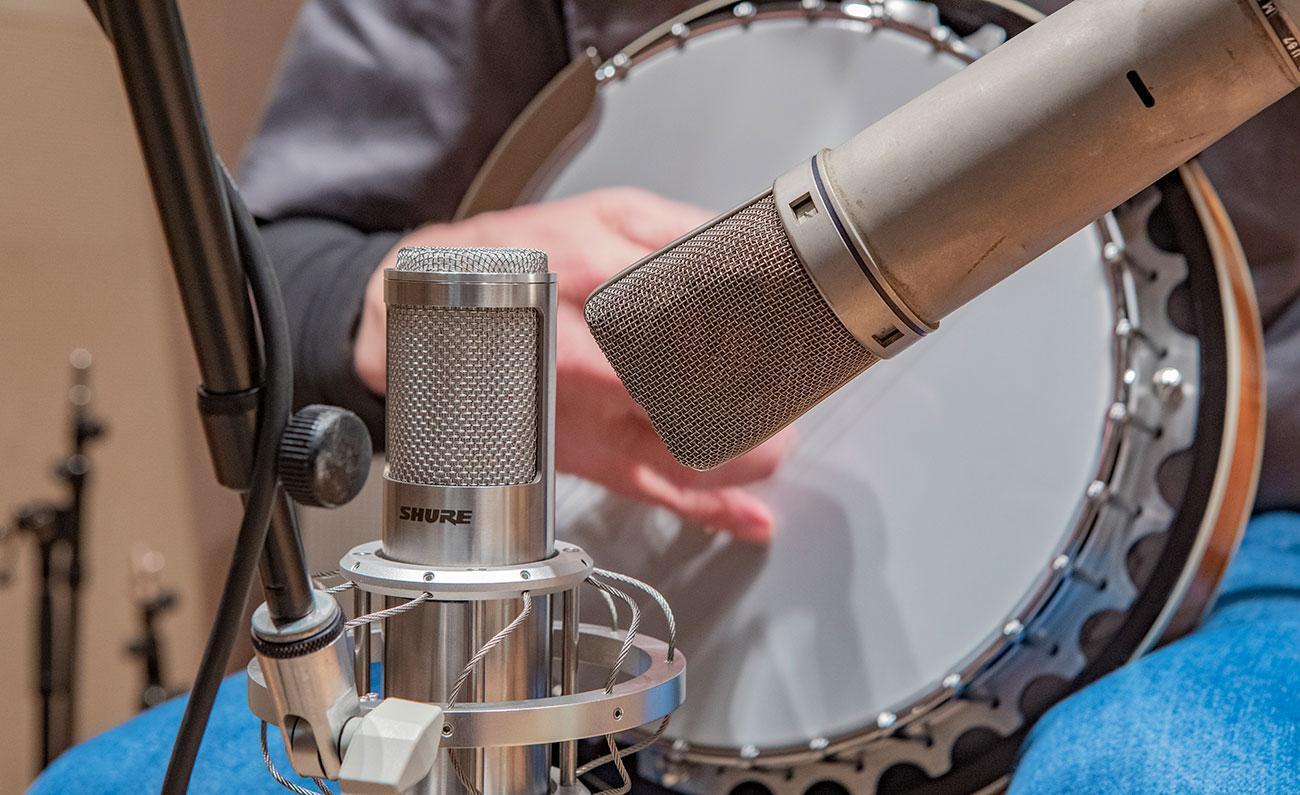
Banjos have really sharp transients as well. Modern banjos are played with metal fingerpicks, so the attack of each note can be really pointy. For a fairly contemporary sound, I will use a large-diaphragm condenser, like a Neumann U 87 Ai, positioned 8″–12″ in front of the point where the neck meets the body, and if I want a more old-school sound, then I’ll use Shure’s KSM353 ribbon mic about a foot in front of the banjo. I like the sound of the Daking preamp on banjo, in case I need a touch of the Daking’s included EQ. If I want to compress the banjo sound a bit, then I’ll generally use a Daking FET III compressor.
Dobro
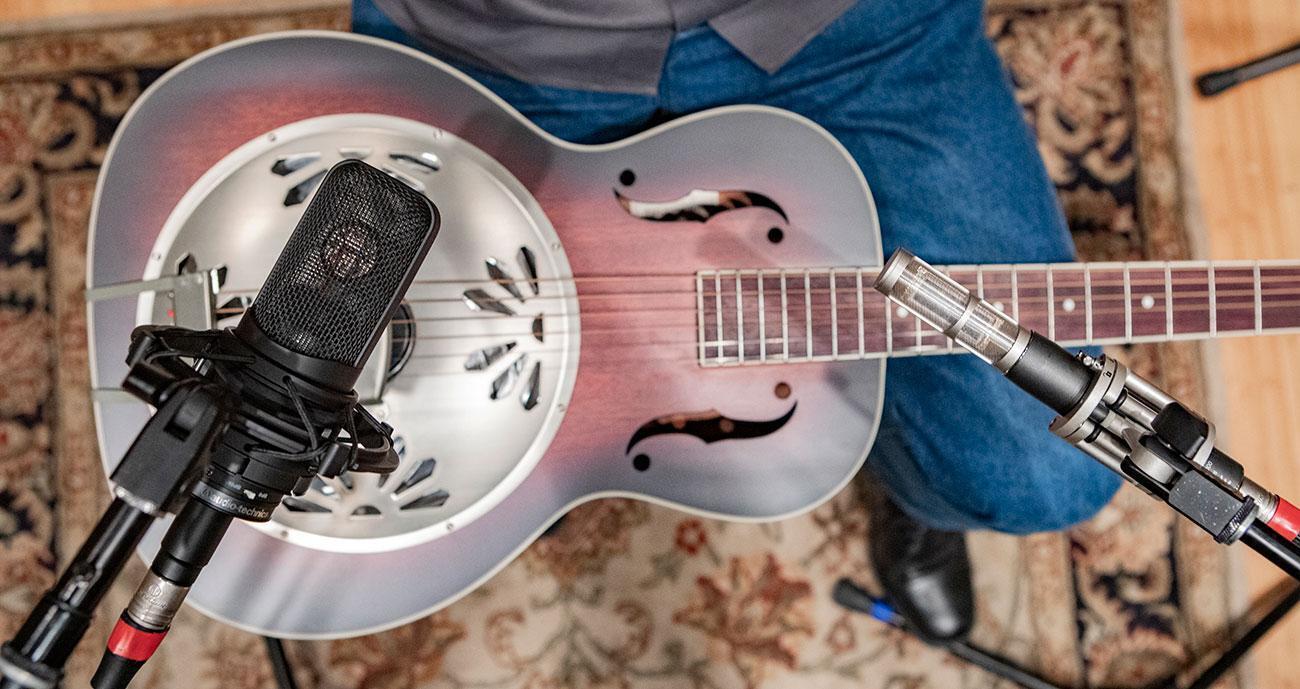
Dobro is an instrument that may not be quite as common in bluegrass as the others I’ve mentioned. If you aren’t familiar with it, then it’s (more or less) a square-necked resonator guitar. The strings cross over the bridge of the instrument, which rests on a metal cone (think of a shallow 12″ speaker with a raised center on which the bridge rests — that’s the resonator). The bodies of Dobros are either all metal or wood, and the resonator is always metal. Round-necked models can be played as slide guitars (a lot of blues players played Dobros), or they may be fingerpicked (Chet Atkins played a Del Vecchio resonator on several albums). Square-necked models have the strings raised around a half inch and are played with a bar (like a steel guitar) and fingerpicks. This is another surprisingly loud instrument. It’s also a full-range instrument, in that there is a lot of low-frequency information as well as high-frequency information.
Because of that, whenever possible, it’s nice to use two mics on Dobro. It’s not that you can’t get a good sound with only one mic, but the textures are more interesting with two. The microphones are placed about 2′ over the instrument and about 3′ apart. I like an Audio-Technica AT5045 where the neck meets the body and an AT4050 over the resonator. Try a tube preamp, like the Tube-Tech MP2A, if you have one available, to help mellow out the Dobro.
Acoustic Bass
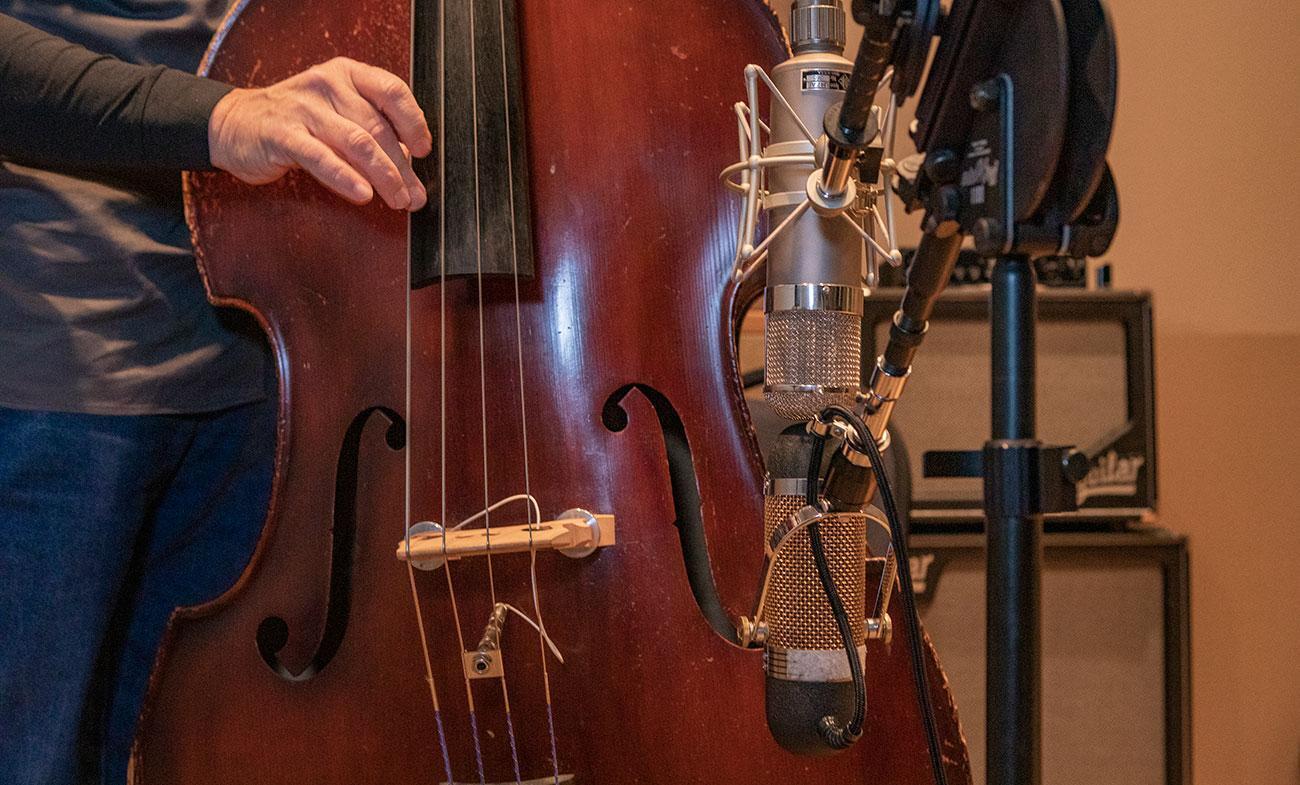
Acoustic bass is a very interesting instrument. In addition to the fact that every bass has different recording characteristics, the style of the player and the style of the music seem to make the sound of the bass even more varied than other acoustic instruments. (Perhaps the fact that I’m a bassist colors my opinion a bit.) Another thing to remember is that most of a real acoustic bass’s magic comes from the volume of air being moved by the instrument, which can’t be accurately reproduced by most small studio monitors. The entire top (the front of the instrument) of an acoustic bass resonates, so microphone placement is critical.
If you’re going to use one microphone on an acoustic bass, then I’d suggest a large-diaphragm mic placed 12″–18″ in front of the F-hole on the right side of the bass — when looking at it, the bassist would call it the left side. In any case, I’d put it in front of the F-hole closest to the G string. My favorite upright mic is Telefunken’s U47.
I talk about microphones and placement like it matters, but the best country bass sound I ever got from my upright bass came from longtime Nashville engineer Lou Bradley. Lou has been engineering sessions in Nashville for 35 years and has recorded seemingly everybody. I’d been playing electric bass all day, so when the producer asked me to play upright on the next song, Lou walked into the room, grabbed an old EV dynamic vocal mic that had been the talkback mic all day, set it in front of the bass, and walked back into the control room. The sound was great! When I asked him later how he got such a great sound with a cheap mic and no time to experiment, he just said, “I know what a bass is supposed to sound like.”
One of the iconic upright bass sounds is one that’s been around for about 70 years: an RCA44 ribbon mic about 2′ from the bass, more or less in front of the bridge, but more toward the high strings. Long out of production, this mic has a wonderfully warm sound and a pronounced proximity effect. In fact, the bass boost of the proximity effect begins to be noticeable 4′ or 5′ away. If the sound of your room permits, then you could successfully place a ribbon like the RCA44 much farther away. The best way to get the sound of a vintage RCA44 is to use the AEA R44CE mentioned above.
The warmth of a ribbon works for many styles of music, but sometimes you may want more definition than a ribbon gives. So another option is to use a couple of microphones: I use a U47 and an AEA R84 ribbon mic. I place them one on top of the other, with the capsule of the U47 in the same plane as the R84’s ribbon. The U47 gives me a bit more clarity, and the R84 adds a bit of low-frequency goodness.
In Conclusion
As I mentioned at the top of this piece, these microphone choices and placements are simply starting points. If you don’t have the specific mics or preamps, then use what you have, move things around until you find sounds that you like, and have fun with the experimentation! If you are interested in any of the gear mentioned, then give your Sales Engineer a call at (800) 222-4700!