
We want our projects to sound as good as possible, right? But does that mean we need to record at 96kHz or 192kHz? Maybe not — here’s how to obtain the sound quality of high sample rates in projects recorded at 44.1/48kHz.
Potential Problems with 44.1/48kHz Projects
Sounds generated “in the box” with potentially high harmonic content, such as virtual instruments and distortion (e.g., saturation, amp sims), can generate high-frequency harmonics that interfere with the project’s sample rate. This creates foldover distortion, also called aliasing. Extreme aliasing can generate sounds that weren’t a part of the original audio.
This is almost never an issue when recording through an audio interface, thanks to modern audio-interface design. However, these recording scenarios explain why some people swear that recording at high sample rates improves sound quality while others say it makes no difference. It depends on whether they’re generating sounds in the box or bringing sounds into the DAW via an audio interface.
Although recording projects at a high sample rate (such as 96kHz or 192kHz) seems like a solution, there are limitations. You may not be able to stream as many channels of audio, and higher sample rates use more computer processing power. Fortunately, when dealing with sounds generated in the box, it’s possible to obtain the benefits of high-sample-rate recording in low-sample-rate projects.
Solution 1: Take Advantage of a Plug-in’s Oversampling Option
Some plug-ins have an internal oversampling option (fig. 1). As far as the plug-in is concerned, its sample rate is higher than the song’s sample rate. So, foldover distortion occurs outside the audio range. Internal oversampling almost always solves aliasing issues.
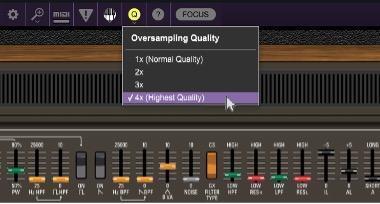
However, internal oversampling does have limitations:
- Oversampling requires more CPU power. If all your instruments are oversampling internally, then you may not be able to use as many instances or may need to increase latency to accommodate them.
- A lower oversampling factor such as 2x may not eliminate all aliasing. So, oversampling an oversampled instrument can improve the sound further.
Solution 2: Change the Project’s Sample Rate & Render as Audio
With many DAWs and audio interfaces, it’s easy to oversample virtual instruments and other plug-ins:
- For your audio interface and DAW, select a higher sample rate (e.g., 96kHz or 192kHz) for your 44.1/48kHz project. This assumes the plug-in can handle a higher sample rate.
- Bounce or render the track to be oversampled to a new audio track.
- Return the audio interface and DAW to the project’s original sample rate.
Because the audio was bounced at a higher sample rate, it retains the higher sample rate’s audio quality even when played back at a lower sample rate. This may seem counterintuitive, but the bounced sound exists in the audio range. 44.1kHz and 48kHz can play back sounds in the audio range. So, the audio is not being generated by an in-the-box sound source that can cause aliasing.
Solution 3: Foolproof Oversampling
If you can’t easily change the sample rate for the DAW and audio interface, then use this foolproof method. We’ll assume the project has a 44.1kHz sampling rate and that the virtual instrument’s MIDI track has been finalized. Here’s how to oversample any virtual instrument:
- Save the virtual instrument’s preset so you can recall it in step 4.
- Extend the beginning of the MIDI clip driving the instrument to the project’s beginning then export the MIDI clip.
- Close the existing project. Then, create a new project with a higher sample rate, such as 96kHz or 192kHz, that has the same tempo (or tempo map) as the original project.
- Insert the virtual instrument you used previously and load the preset saved in step 1.
- Import the MIDI clip and assign it to the instrument track.
- Render the instrument track, starting at the song’s beginning.
- Export the rendered audio, then close the project.
- Open the original project with the 44.1kHz sample rate.
- Import the rendered audio. Almost all recording software will convert the sample rate back down to 44.1kHz when you import it. As with Solution 2 above, the project with the lower sample rate still retains the sound quality of the higher sample rate.
Is Oversampling Worth the Effort?
It depends. The older the plug-in, the more likely it is you’ll hear an improvement, even if it’s subtle. But oversampling may not improve sound quality either because there’s not enough harmonic content to be a problem or the plug-in already oversamples internally. Also consider that some musicians prefer the gritty sound of foldover distortion. Fortunately, it’s easy enough to emulate the effect of using a higher sample rate. So, listen to the results and judge for yourself whether it improves the sound. In many cases, it does.
This excerpt is from the Sweetwater Publishing e-book The Musician’s Audio Handbook, reprinted with permission from the author.