As churches have moved away from physical hymnals, we’ve transitioned to using lyrics displayed on a screen, most often using ProPresenter to display them. If you’re using ProPresenter for lyrics, imagine this for a moment: Your lyrics are perfect every time, even if you jump around within the song or repeat a section. Better yet, imagine doing the work once to make this happen and then never having to program your lyrics again. All this and more is possible when you use Ableton Live and the ProPresenter MIDI module to automate your lyrics. Here’s how to make it happen.
What You’ll Need:
- A Mac computer with ProPresenter 6
- ProPresenter MIDI module
- A PC or Mac running Ableton Live
- ProPresenter MIDI cues (free download here)
It’s important to note, while ProPresenter is available for Mac and PC, the MIDI module only works with a Mac. The computer running Ableton Live can be either a Mac or PC. While it’s possible to run both ProPresenter and Ableton on the same computer, let’s assume for the sake of this article that you have your Ableton computer onstage and your ProPresenter computer at front of house (FOH), or a video booth somewhere else.
Connecting Your Machines
In order to connect both machines, you need to send MIDI from Ableton Live to your ProPresenter machine. If the machines are close enough and you already have an audio interface or MIDI interface on both machines, you can connect them with a standard 5-pin MIDI cable. For the sake of this article though, we’ll assume that these machines are separated by some greater distance, so we’re going to connect both machines using an RTP MIDI connection. Here’s how to set up your connection between both machines.
Creating an RTP MIDI Session Between Two Computers
First, connect both machines using an Ethernet cable, or connect both machines to the same wired network. On your ProPresenter Mac, use Spotlight (cmd+space bar) to search for Audio MIDI Setup (fig. 1).

Figure 1
In the Audio MIDI Setup menu bar, choose Show MIDI Studio from the Window options (as shown in fig. 2).

Figure 2
Double-click on the MIDI Network Setup option. Click the plus icon (+) below My Sessions to create a session. Click the check box next to the name to enable the session, such as Session 1 in fig. 3.

Figure 3
In the Bonjour Name field, make sure you have a name listed. If nothing is visible, you can double-click the box and enter a name. Under “Who may connect to me,” choose Anyone. Follow this same process on your Ableton computer. If you’re using a PC for your Ableton machine, you can download and use this software, which will function just like the Mac’s MIDI Network Setup.
With a session enabled on both machines, click on the name of your ProPresenter computer in the Directory from your Ableton computer. If the connection is successful, you’ll see your ProPresenter computer show up in the Participants section (fig. 4).

Figure 4
Now with the connection made between both machines, let’s route MIDI from Ableton to ProPresenter.
Routing MIDI from Ableton Live
Open Live’s Preferences pane (Cmd+,) and head to the Link/MIDI tab (fig. 5).

Figure 5
Under the MIDI routings section, scroll down until you see the output for the network MIDI session we created earlier. Unless you changed the name, it will show up as Network (Session 1) by default. Enable Track for the output, and make sure Sync and Remote are disabled. Close Live’s Preferences window.
Create a MIDI track, or use an existing MIDI track. Make sure you can see the I/O for track, or enable it using the I/O show/hide button (fig. 6).

Figure 6
Under the MIDI To section of that track, choose your RTP session “Network (Session 1)” (fig. 7). Now any MIDI clips we place in that track will route to our RTP MIDI session.

Figure 7
Now let’s set up ProPresenter to receive MIDI from our RTP session.
Receiving MIDI in ProPresenter
If you haven’t yet, purchase the MIDI module under the Modules section of ProPresenter.
Open ProPresenter’s Preferences (conveniently also accessible using the cmd+, shortcut) and head to the Communications tab. Under Add Device, choose MIDI (fig. 8).

Figure 8
Name the connection if you’d like, and choose Session 1 under the Sources section. Make sure Reconnect is enabled and hit Save (fig. 9).

Figure 9
In ProPresenter’s Preferences panel, click the Connect button which will display Connected (as seen in fig. 10).

Figure 10
Now you’ve connected ProPresenter to receive MIDI from our RTP session. Now there’s only one more setting before we’re ready to start programming our cues.
Adjusting ProPresenter MIDI Note Preferences
ProPresenter allows you to choose which notes control which functions in ProPresenter. If you’re using the free ProPresenter cues mentioned earlier, you’ll want to adjust the MIDI note defaults so you can use the template. With the Communications tab still open, click the MIDI Setup button (see lower right in fig. 10 above).
In the Auto Fill section, type 0 and hit the Auto Fill button (fig. 11).

Figure 11
This will populate MIDI note numbers for every function, starting with 0 (see fig. 12).
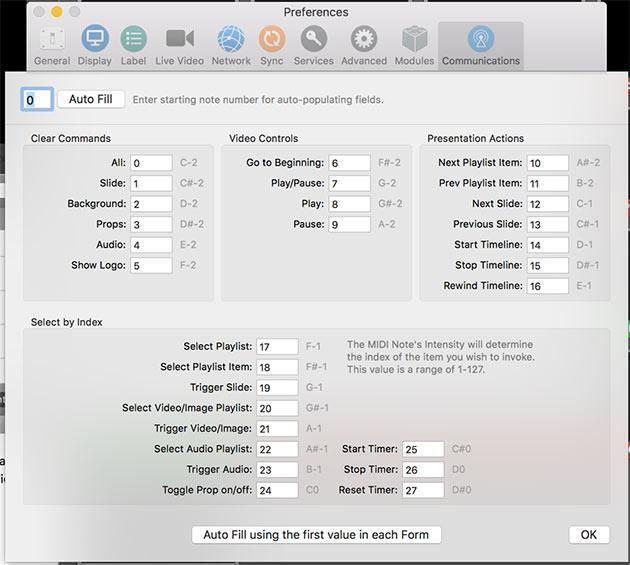
Figure 12
This now means MIDI clips included in the ProPresenter template will correspond to the correct MIDI functions in ProPresenter.
Understanding the ProPresenter Cues Template
To speed up the process of programming lyric cues in Ableton, it helps to work from a template. If you haven’t yet, click here to download the free cues template.
To quickly access the template, you should add it as a Place in Live’s browser (fig. 13).

Figure 13
At the bottom of the browser, click Add Folder (fig. 14).

Figure 14
Navigate to the ProPresenter cues files on your computer and click Open (fig. 15).

Figure 15
Click the arrow to the left of the Live project to see all the tracks included. Each track represents a section of cues, and each clip represents a specific cue in the ProPresenter MIDI module MIDI Setup window that we configured earlier (fig. 16).

Figure 16
As we drag these cues into MIDI tracks that are routed to our RTP MIDI session, they will trigger specific commands in ProPresenter. Now let’s get to programming our lyric cues.
Programming Your Cues
While we can trigger multiple types of MIDI commands and cues in ProPresenter, we’re going to focus primarily on programming and triggering lyrics.
Using the techniques explained earlier, open the MIDI cues template in Live’s browser. Expand the Select Playlist commands (fig. 17).

Figure 17
Add a clip into a MIDI track that corresponds with the Playlist your songs are in. For example, if your songs are in Playlist 4, drag in the Select Playlist 4 command to select that playlist.
Now let’s call up a specific song in that playlist. Expand the Select Playlist Item commands in Live’s browser. What number in your playlist is your song? If your song is number 5 in your playlist, drag the Select Playlist Item 5 clip into Ableton (fig. 18).

Figure 18
Make sure to offset this clip from your previous clip so they don’t send at the same time. If you drag the clip into a separate track, make sure that track is set to route MIDI to the RTP MIDI network session we created earlier.
Now with the correct playlist and song selected, let’s start adding MIDI clips for each slide in our song to our session. Expand the Trigger Slide commands in Live’s browser. Drag a clip that corresponds to each slide in ProPresenter onto your timeline. If your verse slide is Slide 1, drag the Slide 1 clip onto your timeline in Arrangement view so that it triggers at just the right time (fig. 19). Since you’ll likely want all your slides to happen early, you can slide or nudge them earlier, so they happen before each song section.

Figure 19
While this is the most time-consuming portion of the task, you only need to do it once. Save your lyric cues in your song file so that the next time you build a set with that song, your cues come along with it.
One and Done
Now your lyrics are programmed once, and perfectly in sync with your track. This allows a worship leader to spend time getting their lyric cues perfectly right and know they’ll always be consistent. It also frees up your current ProPresenter volunteer to focus on the design and format of your slides. Imagine moving from just pressing the space bar to being intentional about what is on the screen. You can even have a volunteer with a design background create your slides during the week. There are so many possibilities that this integration allows, and best of all, it is affordable and simple enough that any church, no matter the size, can do it.
If you need Ableton Live to implement this cool shortcut, contact your Sales Engineer at (800) 222-4700.