The Line 6 Helix Multi-effects Floor Processor and the Native plug-in have been a huge hit among guitar players — but the same kind of creative options they bring to guitar can also apply to bass. It may seem that bass processing hasn’t been explored all that much because it’s a very different instrument compared to the guitar; it needs to hold down the low end, maintain its percussive punch, and stay solid and focused. Effects like reverb, delay, chorus, and the like that are staples for guitar often seem out of place with bass.
Helix has the usual effects you’d expect for bass — amps, cabs, dynamics processing, and EQ — but we can borrow a page from guitar processing and combine the solid low end of the bass with some inventive approaches that bring the bass into new tonal territories. While working on a follow-up to my Craig Anderton’s Amazing Multiband Helix Presets pack for guitar, I wanted to see how far Helix could stretch the sound of the bass while staying true to its essence and character. We all know the train wrecks that can happen when guitar players think they’re bass players, but having played bass for decades, I wanted to avoid any effects overkill with processing. Following are four of my favorite Helix tips for bass.
Eight-string Bass
Helix has pitch shifting, but it needs to be tamed for bass. Fig. 1 below shows parallel processing; the primary path is for the solid bass sound, the secondary one for the “virtual octave” strings. This preset gives a credible eight-string bass sound for single-note lines.

The Graphic EQ in the secondary path (left line) cuts all frequencies to minimum, except 125Hz, 250Hz, and 500Hz, which are all boosted by +3dB, and 1kHz, which has a +7.6dB boost. This keeps extraneous frequencies out of the Simple Pitch block (middle line). You still need to play relatively cleanly, but this helps tidy up the sound.
The Simple Pitch block’s Interval is set to +12, while Shift Level and Mix are at maximum so that this block passes only the pitch-shifted sound. Setting the Delay parameter to 20ms emulates the delay of a physical bass, as hitting the higher string of an octave pair occurs slightly after hitting the lower string. Next comes the LA Studio Comp (right line; my favorite Line 6 dynamics processor for bass) to smooth out the sound, followed by the 8×10 Ampeg SVT E cabinet set to its default settings to “bassify” the sound a bit more.
Finally, the primary path uses the Simple EQ block to provide a mild low-frequency boost and a strong high-frequency boost to add brightness.
Stereo Bass
The traditional bass pan placement is in the center of the stereo field and as a mono signal. Because bass frequencies are nondirectional, it makes sense to have them in the center. This is also important with vinyl, due to the physical constraints of vinyl records. I’ve always treated stereo bass as more or less taboo, except for EDM-oriented synth bass parts — spreading these more to the sides allows for more room in the center for the kick, snare, and vocals.
However, it’s possible to spread the electric bass image a bit for a more diffused sound while still keeping it centered and having it collapse properly on mono playback systems. Fig. 2 shows a preset for a stereo DI type of sound.
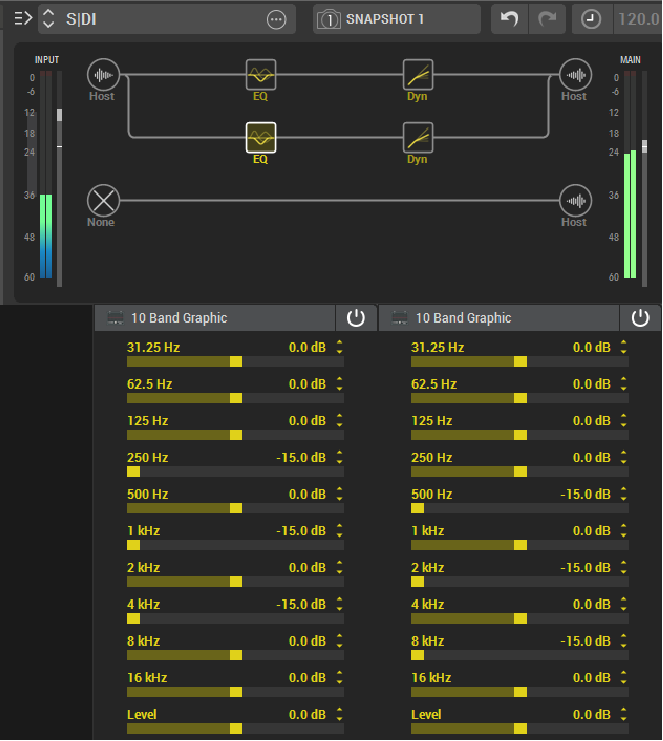
As with the previous example, this uses parallel processing. Each path has a 10-band Graphic EQ but note the levels for the bands: 31.25Hz, 62.5Hz, and 125Hz are the same for both paths, so the lowest frequencies are centered. Higher frequency bands alternate between the left and right channels, which gives stereo imaging. This isn’t a huge stereo image, but rather, it diffuses the sound somewhat to the sides. Although most of the time you do want bass right down the middle, a bit of a stereo image can work well in some musical contexts.
Each path also has LA Studio Comp with essentially the same settings as for the Eight-string Bass preset above, but with slightly more gain and emphasis.
Basic Bi-amping
For guitar, I often use multiband distortion with three or four bands. Using this many bands isn’t as relevant with bass, but bi-amping — where the lows go to one effects path, and the highs go to a second effects path — definitely has merit.
The Split block is ideal for this because it has a frequency crossover mode. In Fig. 3, the Split (left line) has a crossover point of 190Hz. The Reverse parameter switches the high and low paths. The Mixer block (right line) mixes the two paths back together.
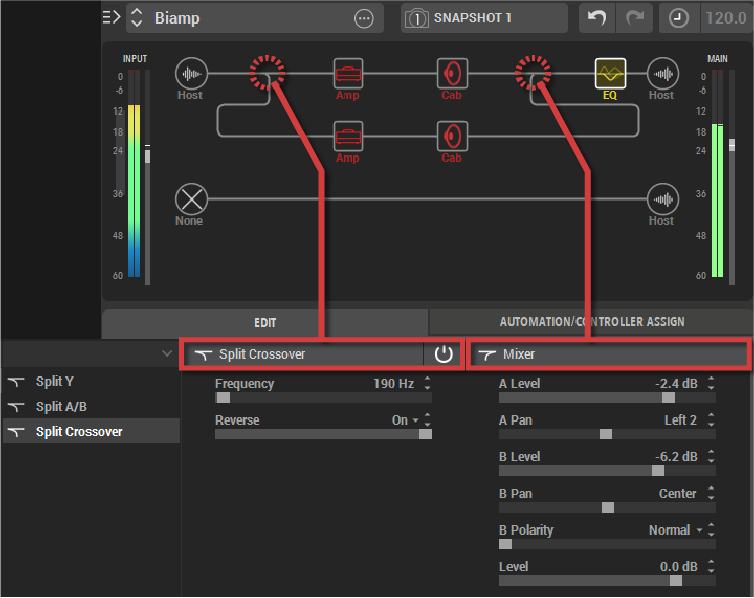
In this example, bi-amping goes to two different amps and cabs so you can optimize the sound for the different frequency ranges. Perhaps you want growl on the low frequencies and punch in the highs, or a booming, clean low end with crunched highs; bi-amping handles these scenarios. It can also be useful with some effects — you might want to compress the lows but not the highs (or vice versa) or add an envelope filter to only the high frequencies for a funk-bass sound. The main advantage of bi-amping with bass is that you can retain a strong low end while adding different types of effects on the high frequencies.
Bi-amped Stereo
I usually want straightforward bass processing — give me some EQ and dynamics processing, and I’m happy. However, I also tend toward simpler musical arrangements these days, and adding a little extra ear candy to existing parts often means you don’t need more parts. For example, I use Harmonic Editing in Studio One on drums to overlay a sense of pitch, which is almost like having another melodic instrument in the background.
Fig. 4 shows a preset where only the high frequencies are processed and given a stereo spread that moves in the stereo field. This sits on top of the solid bass part, which provides an effect that (for lack of a better term) I call “Dancing Highs.”

The primary path at the top is the straight bass sound. It uses the Low and High Cut filter (left line) to remove all the highs above 1kHz and an LA Studio Comp to smooth out the sound.
The secondary path uses two EQs (middle line) with the same settings to cut the lows in each branch. The high frequency branches each have their own Harmonic Tremolo processor. The settings for these are identical, except that the speed for one is 0.1Hz, and the other is 0.4Hz. The Mixer (right line) pans branch A left and branch B right.
It’s surprising how little effect needs to be added to liven up the sound a bit. Because the high frequencies are low level, processing them is kind of like adding a dusting of powdered sugar on top of a chocolate cake. Of the various volume blocks, the one on the extreme left provides a boost to the high frequencies, while the other ones are for balancing out the levels of the various paths.
Of course, Helix sounds fine on bass with just an amp and a cab; I don’t want to turn the bass into a different instrument, and you probably don’t want to either. But there are many possibilities for stretching your bass tones in ways that retain the essence of the bass while enhancing its overall impact — and Helix provides a useful, well-chosen set of tools for bass just as well as for guitar.