
If you own a Universal Audio Apollo of any flavor, then you’re already well aware of its sonic excellence and the quality of the UAD plug-ins it powers. Today, we’re going to look at something that adds a whole new layer of magic to your Apollo: Unison plug-ins.
Using plug-ins to model classic analog gear is certainly not new, but before Unison plug-ins, all of these processes happened in the digital domain. Unison plug-ins take a big step forward, because they create a handshake between the analog front end of the Apollo and the digital model. All mic preamp inputs (or guitar amps or pedals) have different impedances that they present to the transducer, whether a microphone or a guitar. The input impedance affects the physical “loading” of the source, which in turn changes the tonality of the sound. This effect is almost impossible to model in the digital domain.
Universal Audio Unison-capable plug-ins change the rules by adding the ability for the plug-in to set the impedance of the Apollo’s preamp or hi-Z input in the analog domain, just like what happens with an external piece of hardware. This makes replicating the sound of vintage mic preamps, for example, much more accurate whether they’re relatively low impedance or higher impedance. It also makes guitar amp and pedal models sound more authentic.
Which Plug-in and Where?
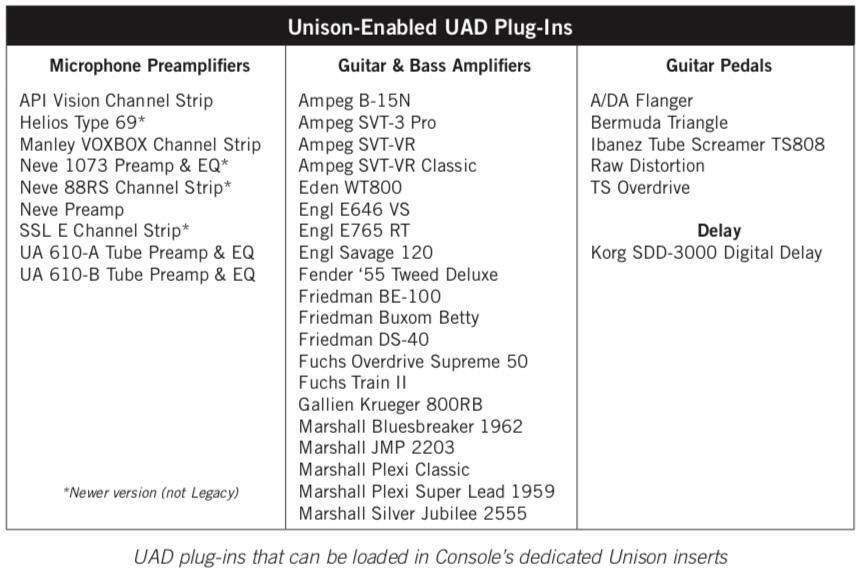
Universal Audio has developed an extensive list of plug-ins that take advantage of the powerful Unison technology, and they’re always working on more. The current list, as of this writing, is below:
This leads us to the first step in the process. To use the Unison feature, you must use the UA Console application and load the plug-in into the special Unison slot at the very top of the channel strip. Don’t worry, the system will only let you choose Unison plug-ins for this position, and UA has included a couple in their basic system bundle so you can try them out immediately upon purchase, or demo an option like the API mic preamp or Marshall Jubilee before you buy it.
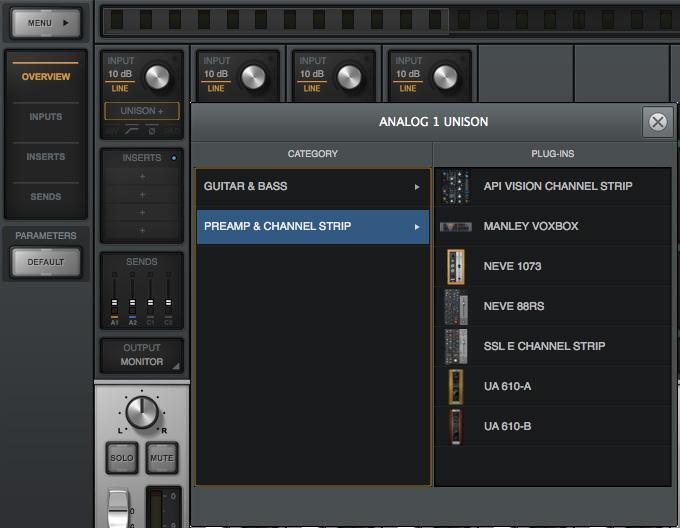
While you can use these plug-ins within your DAW, you’re not taking full advantage of the power of Unison unless you load them in the top slot in the Console application. Important: Keep in mind that unlike the other DSP slots in Console, the Unison slot is always active and any processing you do in the plug-in will always be recorded to disk.
Hands On
If you push the Preamp button or knob on your Apollo, you’ll notice that the ring around the monitor control turns orange, and you now have control over the first gain stage in the selected Unison plug-in. This has more effect on some plug-ins than others. In the case of several of them, this is a fairly coarse gain control. In fact, on the green-face UA 610A plug-in, it only switches between Hi and Low gain settings.
Gain Stage mode is where the fun really happens. Push and hold the Preamp knob for two seconds (or the Preamp button on the Mark II Apollo Twin), and you’ll see the CH1 indicator start flashing on the hardware and an orange dot will appear on the plug-in interface control that you were just adjusting with the Preamp knob.
If you push the Preamp button or knob again, it will advance to the next gain control and turn yellow (or green on the API and Helios plug-ins), and a yellow dot will appear on the next control in the on-screen plug-in interface. Another push of the Preamp knob or button will take you to the third gain stage in most plug-ins.
Here is the way it works: The orange and yellow controls are fully modeled and can sculpt your tone with all kinds of DSP-injected goodness to add subtle warmth or intense crunch. Because these are separately modeled controls, 55dB of coarse gain on the Neve 1073 plug-in may sound slightly different than 45dB of gain with the fader turned up to +10. Think of the system as being similar to a guitar amplifier with a master volume control. Turn up either (or both!) of the gain controls in the plug-in to get the level of color or crunch that you’re seeking.
If the output is too loud to be usable, push the Preamp button to advance to the output control (the encoder ring turns green), which allows you to adjust the volume without affecting the tone. It is far more satisfying to dial in the distortion with a knob, and you may even find yourself closing your eyes while you do so to focus in on just the sound you want. The differences between the two gain stages can be subtle, so you’ll want to play with them to get a feel for how both affect the nuances of your sound.
When you have it locked in just where you want it, hold the Preamp knob or button down for two seconds again, and your Apollo will switch back to normal mode, where a push of the button advances to the next preamp channel.
Guitar and Bass
The guitar amp plug-ins follow the same basic protocol as the mic preamps. When you switch into Gain Stage mode, you’re cycling through two different gain controls and an output level control. Some of the guitar and bass amp plug-ins have the output control labeled Power Soak instead, but the idea is identical. If you get confused, just remember that the light ring on the Apollo encoder is your friend. If it is orange or yellow, then you’re changing the tone. If it’s green, then you’re only changing the output level.
A Tracking Session Dream
Since you can instantiate different Unison plug-ins on each preamp channel, you have the freedom to create a completely customized console for your perfect sound. API preamps for the drums, a Neve 1073 on the vocals, and a UA 610-B for the bass guitar direct input make for sweet sounds that in the “real world” you could only get with a bunch of external hardware or by overdubbing in two or three different studios. With Unison, you can build a tracking console that works just like you want it to, and then when you finish, you can save your session. When you come back for overdubs, recall your session and everything will be right where you left it. Pure tonal bliss!
If you have any questions about Universal Audio products, don’t hesitate to reach out to your Sweetwater Sales Engineer at (800) 222-4700.