
Yamaha MODX Firmware Update Instructions
In this guide, we will show you how to update the firmware on the Yamaha MODX. You’ll learn how to check the firmware version, format the USB thumb drive, back up MODX data, and install the firmware. Follow the instructions below to get started.
Format the USB thumb drive
IMPORTANT: Whenever you format a drive, it will erase all the data, so make sure anything important is backed up to a different drive or your computer beforehand.
Before you back up your MODX data and update the Yamaha firmware, you’ll need to format the USB thumb drive. While you can format it on your computer, it’s recommended to format it directly on the MODX for full compatibility. After you’ve formatted the USB drive, keep it connected so you can back up your MODX user data.
- Connect the USB thumb drive to the MODX TO DEVICE USB port.
- Press the Utility button or the gear icon, followed by Contents.
- Select Load, press Content Type, and choose User File.
- Press Job on the top-right corner of the display, select the USB thumb drive, and then press Format.
- Press Format to confirm, name your USB thumb drive (e.g., “MODX drive”), and then press Done to complete.
- Leave the USB drive inserted and continue to back up your MODX data.
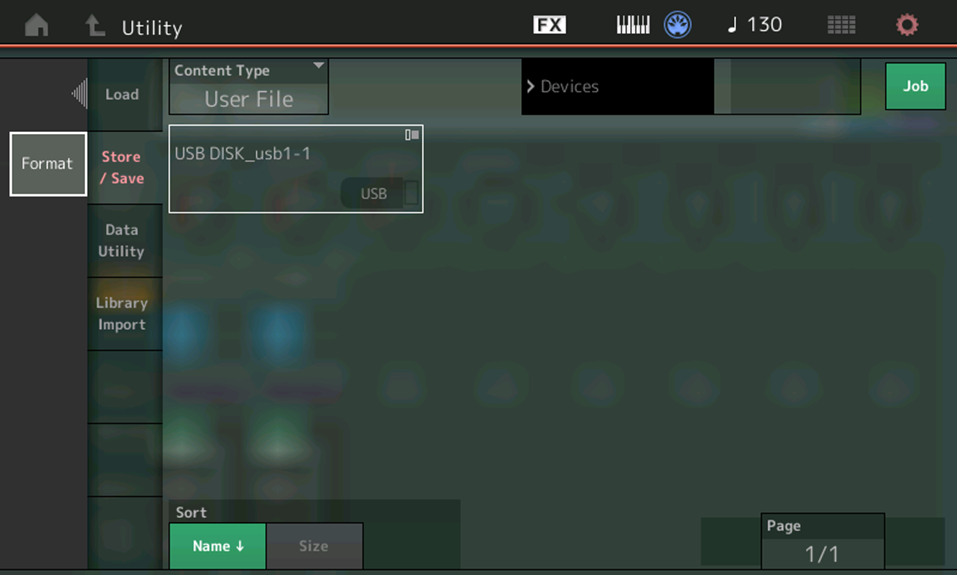
Formatting a USB thumb drive on a MODX
Back up MODX data
Once the USB thumb drive is formatted, you’ll want to back up any user data onto it. Whenever you perform a firmware update, all user sounds and settings will be erased and reverted to factory defaults, just like when performing a factory reset. Follow these steps to back up MODX data onto the newly formatted USB thumb drive.
- If applicable, connect the formatted USB thumb drive to the back of your MODX.
- Press the Utility button or the gear icon on the touch panel and then press Contents.
- Press Content type, select Backup File, and then choose Store/Save.
- Select the USB drive on the screen and press Save New File.
- Rename the file and then press Done.
Update the MODX firmware
Once the thumb drive has been formatted, and the user data has been backed up, you can update the firmware on your MODX. Before you update the firmware, it’s good practice to check the currently installed firmware and compare it to the latest one listed on the MODX download page. Please note that Yamaha lists the download as “OS Updater.”
- Press the Utility button or press the gear icon on the touch panel.
- Press Settings, then select System. The firmware version installed on your MODX will be listed on the bottom of the screen labeled “MODX Firmware Version : *.**.*(c)2018 Yamaha Corporation.”
- Go to the Firmware/Software section of the MODX download page, and locate the latest OS Updater file.
Download the firmware file
Once you confirm the MODX firmware requires updating, you can begin the update. You’ll need to connect the USB thumb drive you formatted on the MODX to your computer, download the firmware, and then transfer the files to the drive.
- Navigate to the Firmware/Software section on the MODX download page, and download the OS Updater V*.** .zip file.
- Connect the newly formatted USB thumb drive to your computer.
- Go to your Downloads folder, extract the .pgm firmware file, then copy and paste the file onto the USB thumb drive.
- PC: Right-click the .zip file, select Extract all…, and then click Extract. Open the uncompressed folder, then copy and paste only the .pgm file to the connected USB thumb drive.
- Mac: Double-click the .zip file, open the uncompressed folder, then copy and paste only the .pgm file to the connected USB thumb drive.
Update the MODX firmware
IMPORTANT: Do not power off, disconnect the USB thumb drive, or press any buttons or keys while the MODX firmware is installing. Doing so may result in a corrupt installation or brick the unit.
Now that the firmware files are on the USB thumb drive, you can update the MODX. The process takes approximately 3–5 minutes, so be patient while it’s being installed. Follow these steps to complete the firmware update.
- Power off the MODX. If applicable, connect the formatted USB thumb drive with the firmware file to the unit.
- Press and hold the Cursor Up and Utility buttons while powering on the MODX, then let go once the Update screen appears. The MODX will now search for the firmware file.
- After you see Finished on the display, turn the unit off and back on again.
- Check the firmware version to confirm it has been successfully updated.
How to restore MODX user data
Once everything has been completed, the last step is to restore any MODX user data you may have backed up before installing the firmware. The process is straightforward, too.
- Press the Utility button or the gear icon on the touch panel, and then press Contents.
- Press Content type, select Backup File, and then select Load.
- Choose the backup file you created, and lastly, select Load.
When you need help, Sweetwater has the answers!
Our knowledge base contains over 28,000 expertly written tech articles that will give you answers and help you get the most out of your gear. Our pro musicians and gear experts update content daily to keep you informed and on your way. Best of all, it’s totally FREE, and it’s just another reason that you get more at Sweetwater.com.

