
TC Helicon Perform-V Quickstart Guide
The TC-Helicon Perform-V vocal effects processor is a great multi-effects processor to go along with your studio or live-performance rigs. In this guide, we will show you how to register, set up, and use it for the first time. Follow the sections below to get started.
Register the Perform-V
Before getting set up, you must register the Perform-V with TC-Helicon. When registering the device, you will receive a three-year extended warranty. Please note that you must register the unit within the first 90 days of purchase.
Setup and Connections
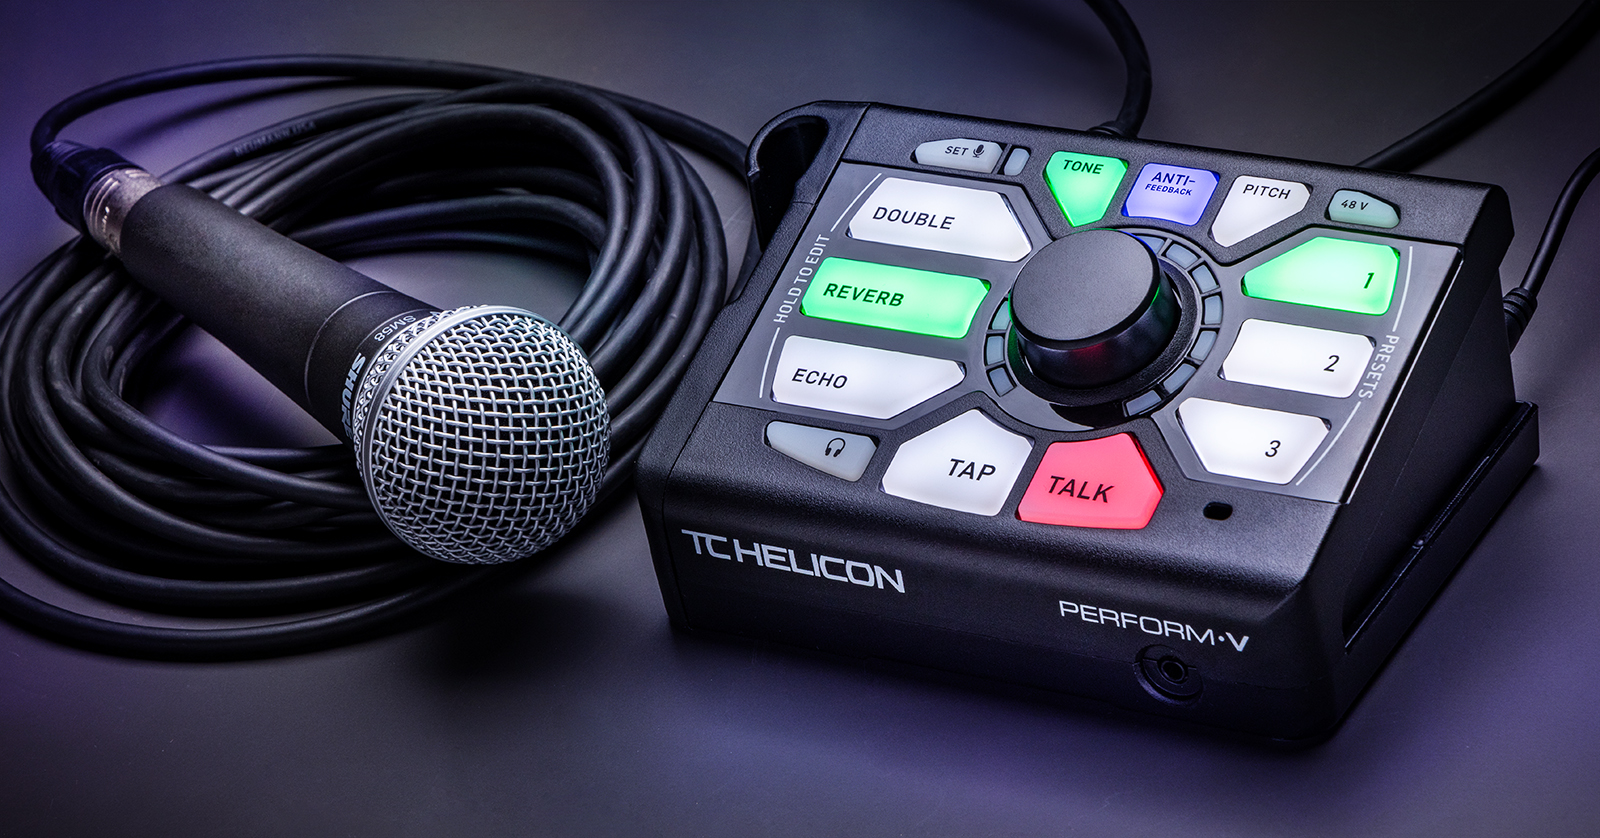
Once you register your device, it’s time to get set up and connected. One great thing about the Perform-V is that it’s straightforward to connect: all you need to do is connect your microphone to the MIC IN jack, then connect it to an audio interface or mixer via the MIC OUT jack.
You can connect any media player (e.g., a smartphone) via the AUX jack to stream music. What’s unique is that any incoming chord information coming from the media player’s output will be used to determine the key or scale for the Harmony or HardTune effects.
Footswitch (optional)
IMPORTANT! You must connect the footswitch to your Perform-V before you power it on. If you connect it when the power is on, the pedal will not work, and you will need to power cycle the unit.
If you have TC-Helicon’s Switch-3 or Switch-6, connect it to the PEDAL jack. You can use the footswitch to control almost any function on the Perform-V except for the following:
- 48V
- Lock/Mute (Talk is programmable)
- Trim
- Headphone Level
How to Use the Perform-V
The TC-Helicon Perform-V has plenty of features and effects for you to work with. Its basic and intuitive controls make it easy to work with onstage. This guide covers the essentials, so check out the Perform-V Reference Manual for more in-depth information.
Go to the Products page on the TC Electronic website, and search for your product.
Open your product page and click Downloads.
TIP: There’s no need to manually save your presets, as they are automatically stored in the unit’s memory.
- With your microphone connected and the unit turned on, press and hold the SET button for two seconds and sing at performance level. This will automatically set the output level.
- Press the 48V button if you’re using a condenser microphone. Make sure you turn it on after the microphone is plugged in, and make sure to turn it off before unplugging it!
- Press one of the three Preset buttons to create a preset.
- Press one of the effect buttons to enable that effect (Double, Reverb, or Echo), then use the knob to adjust the amount of the effect you want to apply.
- If you want to add Echo (delay), tap the tempo using the Tap Tempo button to customize the length of the delay.
- If all the LEDs surrounding the knob are filled, and you continue turning the knob, the effect style will change. For example, if you enable the reverb effect and keep turning the knob, it will scroll through Room, Club, Hall, and Beamed reverb.
One preset, two banks
There are two banks per preset. If you press the Preset button once, it will glow green. If you press it again, the Preset button will glow blue. This allows you to add different effects to each bank, which is perfect if, let’s say, you want each part of a song (verse, chorus, bridge) to have a different vocal effect.
So, if you want to add reverb for a verse, press the Preset button (green) once and then press Reverb. If you want a doubled effect for the chorus, press the Preset button (blue) again, then press Double. You can now switch between effects on the fly.
VoiceSupport Software
TC-Helicon created a desktop application that allows you to access the reference manuals, manage factory and user presets, and update your Perform-V firmware. This is useful, as you can only have three presets stored on your Perform-V at a time.
Download the VoiceSupport 2 app.
Go to the Products page on the TC Electronic website and search for “VoiceSupport.”
Open the VoiceSupport product page and click Downloads. Download and install the version for macOS or Windows.
Beaming Effects
IMPORTANT! Make sure you’re in a quiet room. Turn up your mobile device’s volume, or else it will not capture the beaming effect.
One feature of the TC-Helicon Perform-V that sets it apart from other multi-effects processors is its ability to beam presets not only from the VoiceSupport software, but also from your Android device. In this guide, we will cover how to beam presets through your mobile device, as you just need to drag and drop effects via the VoiceSupport app.
- On your Android device, download the Perform-V app from the Google Play Store.
- Select the preset bank on the Perform-V that you wish to beam the effect to.
- Hold your mobile device close to the built-in microphone (located at the bottom-right of the unit). Press BEAM. It will then play a tone that sounds like an old dial-up modem.
- The effect is now loaded on your Perform-V.
When you need help, Sweetwater has the answers!
Our knowledge base contains over 28,000 expertly written tech articles that will give you answers and help you get the most out of your gear. Our pro musicians and gear experts update content daily to keep you informed and on your way. Best of all, it’s totally FREE, and it’s just another reason that you get more at Sweetwater.com.


Offer applies only to single-receipt qualifying purchases. Select manufacturers may require that only the manufacturer’s products qualify towards the minimum purchase amount needed to be eligible for promotional financing. Otherwise, an invoice that meets the minimum purchase amount and contains at least one qualifying manufacturer product is eligible for promotional financing. No interest will be charged on promo purchase balance, and equal monthly payments are required on promo purchase until it is paid in full. The payments equal the amount financed divided by the number of months in the promo period, rounded up to the next whole dollar. These payments may be higher than the payments that would be required if this purchase was a non-promo purchase. During the last month(s) of the promo period the required monthly payment may be reduced due to the prior months’ rounding. Regular account terms apply to non-promo purchases. New Accounts as of 07/31/2025: Purchase APR is 34.99%. Penalty APR is 39.99%. Min Interest Charge is $2. Existing cardholders: See your credit card agreement terms. Subject to credit approval.
Offer applies only to single-receipt qualifying purchases. No interest will be charged on the promo balance if you pay it off, in full, within the promo period. If you do not, interest will be charged on the promo balance from the purchase date. The required minimum monthly payments may or may not pay off the promo balance before the end of the promo period, depending on purchase amount, promo length and payment allocation. Regular account terms apply to non-promo purchases and, after promo period ends, to the promo balance. New Accounts as of 07/31/2025: Purchase APR is 34.99%. Penalty APR is 39.99%. Min Interest Charge is $2. Existing cardholders: See your credit card agreement terms. Subject to credit approval.
The estimated required monthly payment shown which excludes taxes and delivery equals the amount financed divided by the number of months in the promo period, rounded up to the next cent. During the last month(s) of the promo period the required monthly payment may be reduced due to this rounding. These payments apply only with the financing offer shown. If you make these payments by the due date each month, you should pay off this amount financed within the promo period, if it is the only balance you are paying off. If you have other balances on your account, this payment will be added to any other minimum monthly payments.
Applies only to select items from this manufacturer. Ask your Sweetwater Sales Engineer for more details.