
OP-Z Quickstart Guide
How to use this guide
In this guide, we will show you how to get started with the Teenage Engineering OP-Z. That means we’ll show you how to use the sequencer, pair and control settings using the app, and import content. Before you begin, we recommend getting familiar with our diagram below, along with the paper overlays that came with your OP-Z. Then read through the sections below to get started.
Getting Started
The OP-Z is a step sequencer that you can use as a standalone device or control through the OP-Z iOS app. The initial set up for the OP-Z is really easy. Use the included USB cable to charge it up, plug in some speakers or headphones, then start playing.
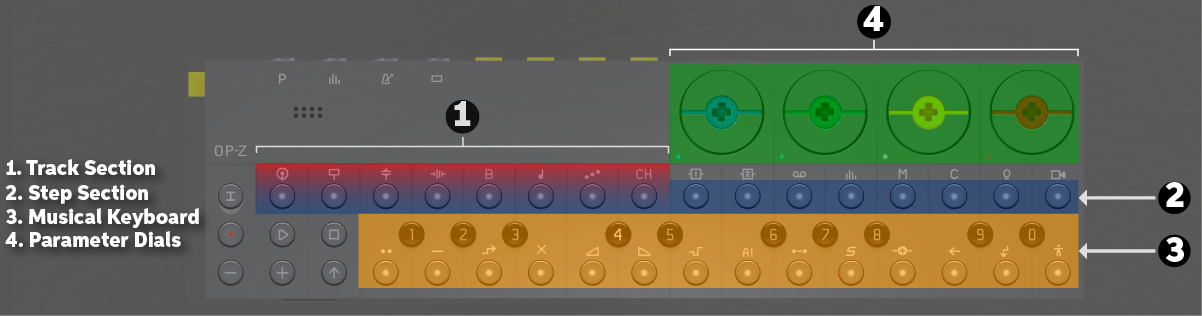
Sections of the OP-Z.
Create a pattern
Creating a pattern with the OP-Z is also pretty easy. Simply select the steps that you want to be triggered, then press play. You can create up to 10 projects with 16 patterns each. Follow these steps to get started.
1. Power the unit on using the yellow knob on the side.
2. Create a project by holding the PROJECT (![]() ) button, and select a number 1 – 0. Projects 1 – 9 are factory preset projects which you can edit or delete. If you want to start from scratch, select Project 0.
) button, and select a number 1 – 0. Projects 1 – 9 are factory preset projects which you can edit or delete. If you want to start from scratch, select Project 0.
3. Create a pattern by holding the TRACK (![]() ) button and select the sample track you would like to sequence.
) button and select the sample track you would like to sequence.
4. Select a sample using the musical keyboard, then press the step buttons in which you’d like to trigger the sample. To record live, hold the RECORD (![]() ) button and play a sample on the musical keyboard section while the project is in playback mode.
) button and play a sample on the musical keyboard section while the project is in playback mode.
5. Adjust any parameters such as pitch, attack, or filter using the color wheels. Visit the OP-Z reference chart for a full list of parameter changes you can make.
Saving projects
By default, the OP-Z will auto-save your projects. If you do want to save a project manually, hold the PROJECT (![]() ) and TRACK (
) and TRACK (![]() ) buttons for a few seconds to enter manual save mode. Save the project by holding PROJECT (
) buttons for a few seconds to enter manual save mode. Save the project by holding PROJECT (![]() ) and pressing the respective project number.
) and pressing the respective project number.
Import custom samples
You have the ability to import, export, backup, and restore both factory and custom content and projects to your OP-Z hardware while in Content Mode. To boot into Content Mode, hold the TRACK (![]() ) button while turning the unit on. Let go once you see the top row of LED’s stay solid green.
) button while turning the unit on. Let go once you see the top row of LED’s stay solid green.
Importing sounds
1. Boot into Content Mode, connect the OP-Z to a computer, then open the samplepacks folder.
2. Open the instrument folder and then place your sample into one of the 10 “slot” folders available. Only one sample can be in a slot folder at a time.
3. Disconnect the OP-Z from the computer. The unit will automatically update and reset. Once completed, you’ll be able to trigger your new samples.
Backup and restore content
1. Boot into Content Mode, then connect the OP-Z to a computer.
2. To back up content and projects, copy and paste the files from the OP-Z to your computer. To restore, paste the files from the computer to the location on the OP-Z.
What audio files can I use?
The OP-Z only accepts .aif audio files. If you need to convert .wav or .mp3 samples, consider using the OP-1 Drum Utility plug-in.
Navigating to the Samplepacks folder.
Using the App
How to pair an OP-Z
In order to control the OP-Z with your iOS device, you need to download the iOS app and pair it via Bluetooth. Once paired, you can control device parameters, load samples, and also change MIDI settings. Follow these steps to pair the devices together.
1. Download and install the OP-Z app from the Apple Store.
2. Launch the app and, when prompted, press the button on the back of your unit. A blue LED will flash, then turn solid green.
3. Select the OP-Z in the Bluetooth Devices list.
Pairing an OP-Z.
Use the app for control
There’s a lot you can do with the OP-Z app such as change sound samples, change sample and effect parameters, and also edit the MIDI setup. To access these features, just launch the app and select the option from the home screen. Note that the OP-Z must be paired in order to change any settings.
Configurator
The Configurator section is where you can change the currently loaded sound samples.
1. Select the instrument you want to change by pressing the + or – button.
2. Select the sample you wish to use then drag and drop it into the slot of your choice.
3. Press Commit to load the sample.
OP-Z
The OP-Z section is where you can make changes to parameters such as the filter, FX level, and sample level. To change a parameter, tap the one you wish to change, and then move your finger up or down on the touchpad area to adjust the parameter value.
MIDI Setup
The MIDI Setup section is where you make all of your MIDI connectivity settings such as editing MIDI CC numbers for individual tracks, and global MIDI settings.
- To change the MIDI CC number of a particular track, select the CC number, then use the Touch Pad to change its value.
- Enable or disable the Global MIDI settings by pressing the box next to it.
Adjusting a sample parameter.
Loading a sample.
Disk Modes
Changing the disk mode of the OP-Z allows you to import, back up, restore, and upgrade content. While in Content Mode, you are able to import or export content when it’s connected to a computer via USB. In Upgrade Mode, you can upgrade the firmware or perform a factory reset.
Upgrading and resetting
If you need to perform a firmware update or factory reset, you’ll need to boot into upgrade mode. To access it, hold the SCREEN (![]() ) button while turning the unit on, letting go once you see the bass drum LED flash white and the parameter dial LED’s stay solid.
) button while turning the unit on, letting go once you see the bass drum LED flash white and the parameter dial LED’s stay solid.
Firmware update
1. Boot into upgrade mode then connect the OP-Z to a computer via USB.
2. Download the latest firmware file, and drag it into the main folder of the OP-Z drive.
3. Eject the disk and wait for the update to complete. The firmware installation is completed when you see a flashing green LED on the side of the unit. DO NOT TURN THE UNIT OFF WHILE AN UPDATE IS IN PROCESS.
Factory reset
1. Boot into upgrade mode, then press and hold the Screen and Stop buttons.
2. Keep holding the buttons down until the bass drum LED is flashing white and the parameter dial LEDs are solid green.
OP-Z in upgrade mode.
Related Videos
Basic Sequencing
DMX Light Control
Photomatic
3D Visuals
When you need help, Sweetwater has the answers!
Our knowledge base contains over 28,000 expertly written tech articles that will give you answers and help you get the most out of your gear. Our pro musicians and gear experts update content daily to keep you informed and on your way. Best of all, it’s totally FREE, and it’s just another reason that you get more at Sweetwater.com.


Offer applies only to single-receipt qualifying purchases. Select manufacturers may require that only the manufacturer’s products qualify towards the minimum purchase amount needed to be eligible for promotional financing. Otherwise, an invoice that meets the minimum purchase amount and contains at least one qualifying manufacturer product is eligible for promotional financing. No interest will be charged on promo purchase balance, and equal monthly payments are required on promo purchase until it is paid in full. The payments equal the amount financed divided by the number of months in the promo period, rounded up to the next whole dollar. These payments may be higher than the payments that would be required if this purchase was a non-promo purchase. During the last month(s) of the promo period the required monthly payment may be reduced due to the prior months’ rounding. Regular account terms apply to non-promo purchases. New Accounts as of 07/31/2025: Purchase APR is 34.99%. Penalty APR is 39.99%. Min Interest Charge is $2. Existing cardholders: See your credit card agreement terms. Subject to credit approval.
Offer applies only to single-receipt qualifying purchases. No interest will be charged on the promo balance if you pay it off, in full, within the promo period. If you do not, interest will be charged on the promo balance from the purchase date. The required minimum monthly payments may or may not pay off the promo balance before the end of the promo period, depending on purchase amount, promo length and payment allocation. Regular account terms apply to non-promo purchases and, after promo period ends, to the promo balance. New Accounts as of 07/31/2025: Purchase APR is 34.99%. Penalty APR is 39.99%. Min Interest Charge is $2. Existing cardholders: See your credit card agreement terms. Subject to credit approval.
The estimated required monthly payment shown which excludes taxes and delivery equals the amount financed divided by the number of months in the promo period, rounded up to the next cent. During the last month(s) of the promo period the required monthly payment may be reduced due to this rounding. These payments apply only with the financing offer shown. If you make these payments by the due date each month, you should pay off this amount financed within the promo period, if it is the only balance you are paying off. If you have other balances on your account, this payment will be added to any other minimum monthly payments.
Applies only to select items from this manufacturer. Ask your Sweetwater Sales Engineer for more details.