
Mackie DLZ Creator Firmware Update
In this guide, we will show you how to perform a firmware update on your Mackie DLZ Creator mixer.
TIP: When the DLZ first became available, the Ethernet port was not yet functional. Upgrading the firmware to Version 1.1 or higher enables the Ethernet port to use the NDI (Network Device Interface) protocol for multi-channel audio over Ethernet to apps and hardware that support NDI.
From time to time, Mackie will release firmware updates which fix bugs and add new features and capabilities to the mixer. When you first take your DLZ out of the box, Mackie recommends that you check online to see if there is a newer firmware version available. Even if you’ve had your DLZ for months, you should check every now and then and install the newest update to enable the latest improvements.
Overview of the Firmware Update Process
To perform the update, you will need a compatible USB flash drive or microSD card.
The procedure is to connect the drive or card to your DLZ and format it.
Then you move over to your Mac or your Windows PC. Connect the drive or card.
On your computer, go to the Mackie website and download the updater file. You then copy the updater file to the drive or card.
You then connect the drive or card to the Mackie DLZ and start the update process.
Do You Need to Update?
How to Find the Version Number of the Firmware on Your Mackie DLZ Creator
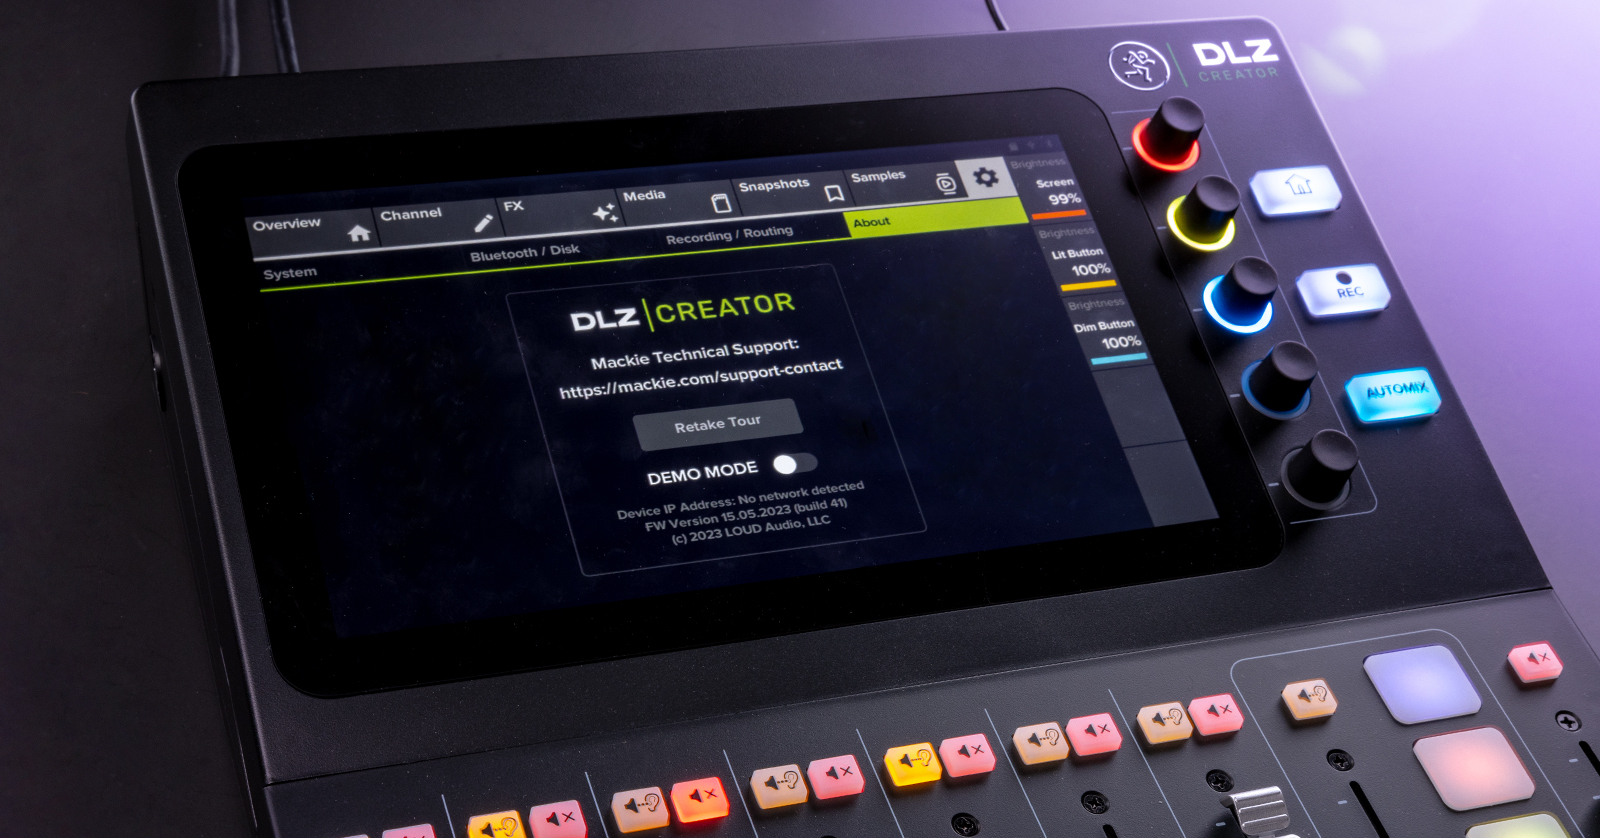
- On the touch screen of the DLZ, tap the System gear icon in the upper-right corner.
- On the System page, tap the About tab.
- On the bottom of the About panel, you will see FW Version and a number: for example, 1.0. Take note of it.
How to Find the Version Number of the Newest Mackie DLZ Creator Firmware
Go to the Mackie DLZ Creator product page. Scroll all the way down to the bottom and click on Downloads & Resources.
In the expanded list, you will see a link labeled Firmware Update and a number: for example, 1.0.2.
If this number is higher than the FW Version number on your DLZ’s About page, then you need to perform the update.
Click on the link. It will start a download of an updater file ending in .zip.
Performing the Update Step-by-step
Formatting a USB Flash Drive or microSD Card
First, you should format the USB flash drive or microSD card in the Mackie DLZ.
IMPORTANT! Formatting the drive or card erases any data on it. First check the drive on your computer to make sure it does not contain any important data. Make a copy of any data before you erase the drive or card.
- Insert the drive or card into the appropriate port on the back of the Mackie DLZ.
- From the Home page, tap the System gear icon.
- Tap the Bluetooth / Disk submenu.
- The display will indicate that an SD Card or a USB Drive is present.
- Click on the Format button below it. This will erase the card. Wait until the display says Formatting Done.
- Remove the drive or card.
For more information, see the Mackie DLZ Creator Owner’s Manual section Settings > Bluetooth / Disk.
Prepare the Updater on Your Computer
Connect the USB flash drive or microSD card to your Mac or your Windows PC.
When you followed the instructions above, you downloaded the .zip file to your computer. Find it and extract it if necessary.
It will create a folder with the version of the firmware in the name: for example, “DLZ Creator v.1.0.2 Firmware Update.”
Inside this folder, you will find the installation instructions and the release notes. You will also find a file ending in .upd.
- Copy this file ending in .upd to your newly formatted USB flash drive or microSD card. Wait until the operation is complete.
- Perform the Eject procedure on your Mac or your Windows PC to disconnect the drive or card.
Perform the Update on the Mackie DLZ Creator
- With the power turned off on the DLZ Creator, insert the USB flash drive or microSD card into the correct slot. Turn on the power.
- On the Home screen, tap the Media tab and select either usb:\ or sd:\ depending on whether you are using the USB flash drive or the microSD card.
- Near the upper-left corner, underneath the Channel tab, is an icon of a hand with the index finger pointing up. Tap it so the files on the selected source are visible.
- Select the file ending in .upd. It will illuminate.
- Tap the icon of the hand with the index finger. This will launch the file. A confirmation dialog will appear asking you if you are sure you want to perform this function.
- Wait while the update is installed. This will take several minutes.
- A message will appear indicating that the update was performed successfully.
IMPORTANT! Do not power off the DLZ or remove the drive or card during the update process.
Back on your computer, open the Release Notes document that came with the installer. Read it to see what has been fixed and what new updates and features have been provided.
Now please head over to Sweetwater’s Mackie DLZ Creator Quickstart Guide, and let’s make some podcasts!
Here is Mackie’s video on updating the firmware on the DLZ Creator.
When you need help, Sweetwater has the answers!
Our knowledge base contains over 28,000 expertly written tech articles that will give you answers and help you get the most out of your gear. Our pro musicians and gear experts update content daily to keep you informed and on your way. Best of all, it’s totally FREE, and it’s just another reason that you get more at Sweetwater.com.

