
Upgrading your tuning machines is perhaps the most common mod in the world of guitar and bass — and for good reason, too! If you’re experiencing recurring tuning issues and have already ruled out the usual suspects, then replacing your tuning machines is an all but surefire way to maximize the reliability and performance of your instrument. Join Sweetwater as we give you the comprehensive lowdown on tuning machines, how and when to upgrade them, and why they matter!
- Setting the Record Straight
- When to Consider Upgrading Your Tuners
- Initial Considerations
- Screw Holes, Peg Holes & Bushings
- Choices, Choices, Choices
Setting the Record Straight
Machine heads, tuners, tuning pegs — musicians have many names for the little buttons on the headstock, but they are most frequently called “tuning machines.” It’s mostly a simple issue of nomenclature: If they have a gear and spin around to modify the tuning, then they’re a tuning machine. However, note that the machine differentiation is essential, as traditional tension pegs found on orchestra instruments do not qualify because they’re not mechanical.
What about instrument-specific tuning machines? There are indeed many styles of instruments that require instrument-specific tuners — bass guitars require larger tuners with larger mounting systems, and classical guitars/slotted-headstock acoustic guitars need a distinct tuner design. Differences can be subtle, so it’s best to stick with a set of tuners designed explicitly for your respective instrument.
When to Consider Upgrading Your Tuners
In the world of guitar maintenance and repair, it’s understood that tuning issues may have little to do with the tuning machines themselves. Factors like old strings, improperly cut nut slots, and other setup issues (especially if you have a tremolo system) can also cause your tuning to waver.
Before you consider replacing the tuners on your headstock, we strongly recommend you fully evaluate your guitar for any underlying issues — a specialty of the Sweetwater Guitar Workshop. Even the most expensive tuning machine masterpieces aren’t going to fix a problem caused by an issue like nut binding, and a general setup is far less expensive and time-consuming than purchasing a whole new set of tuners. However, if you’ve tried everything else and the tuning machines are clearly the problem, then read on.
While it’s impossible for any tuning machine to keep a string perfectly in tune all the time, not all tuners perform equally. Even if your tuners deliver performance within the “acceptable” threshold, you can likely increase your instrument’s overall reliability with a tuning machine upgrade. So, a second scenario for which to consider upgrading your tuners is when you’re looking to squeeze every last drop of stability from your instrument.
And, finally, we arrive at our favorite reasons for swapping out tuners: aesthetics and the simple joy of modding. Not every mod has to be completed in the name of utility, so if you think your boring kidney-bean tuners would look better as a set of high-class, golden Grover 150G Imperial tuners, then we say go for it!
Initial Considerations
If you’ve wisely decided to invest in an upgraded set of tuners, then the first factor you need to consider is the layout and orientation of your tuners. Unless you’re ready to ream out and refill peg holes, you’ll be locked into using your guitar’s existing configuration.
A humble suggestion: unless you’re an experienced guitar tech, it’s better to stick with a set of tuners that requires the slightest modification possible (if any). There are so many tuning machine options available on the Sweetwater site that most players will have a simple, fully reversible option. Yes, most tuners can technically fit onto most headstocks with modification, and sometimes drilling new holes is unavoidable, but it can lead to a real mess. Once you drill that extra hole or ream out that post, there’s no going back without serious surgery.
Tuner Arrangement & Orientation
There are two main tuning machine orientations that you’re likely to encounter on a guitar: 3 x 3 and 6 inline. Note that these two general styles also apply to the bass guitar, albeit with fewer strings attached.

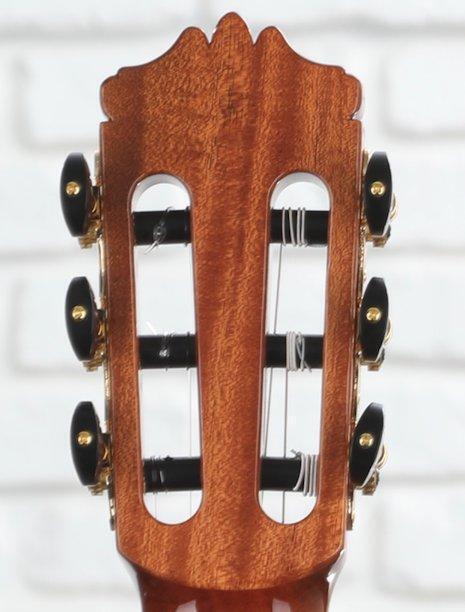
3 x 3 (2 x 2 on the electric bass guitar) is the most common guitar headstock configuration, sporting three (two on bass) individual tuning machines on either side of the guitar’s headstock. It’s a generally accepted standard for acoustic guitars, classical guitars, and many set-neck electric guitars.

The 6 inline tuner configuration places all the instrument’s tuners on a single side. This configuration is most common on solidbody guitars, but that’s by no means a concrete rule. Note that the bass version of this configuration, 4 inline, is by far the most common headstock orientation found on electric bass guitars.

Neither option is necessarily better than the other, and both have served admirably for decades and decades of stringed instrument service. There are also countless variations of these two setups, especially if you start venturing into the angular world of modern metal guitars. However, each orientation has limitations (mostly to do with the size and shape of the headstock) and specific styles of tuners associated with it.

Certain tuners are more flexible to orientation than others, while certain tuners (3-on-a-strip tuners) cannot be used in any way other than their intended orientations. So, your first order of business is to determine your headstock orientation and then explore your tuning machine options from there.
Screw Holes, Peg Holes & Bushings
Once you’ve determined orientation, there are two other compatibility specs to consider: the size of the peghead hole and the placement/style of the tuner’s screws. Unlike orientation, these specs are slightly more open to negotiation.
Peghead Holes
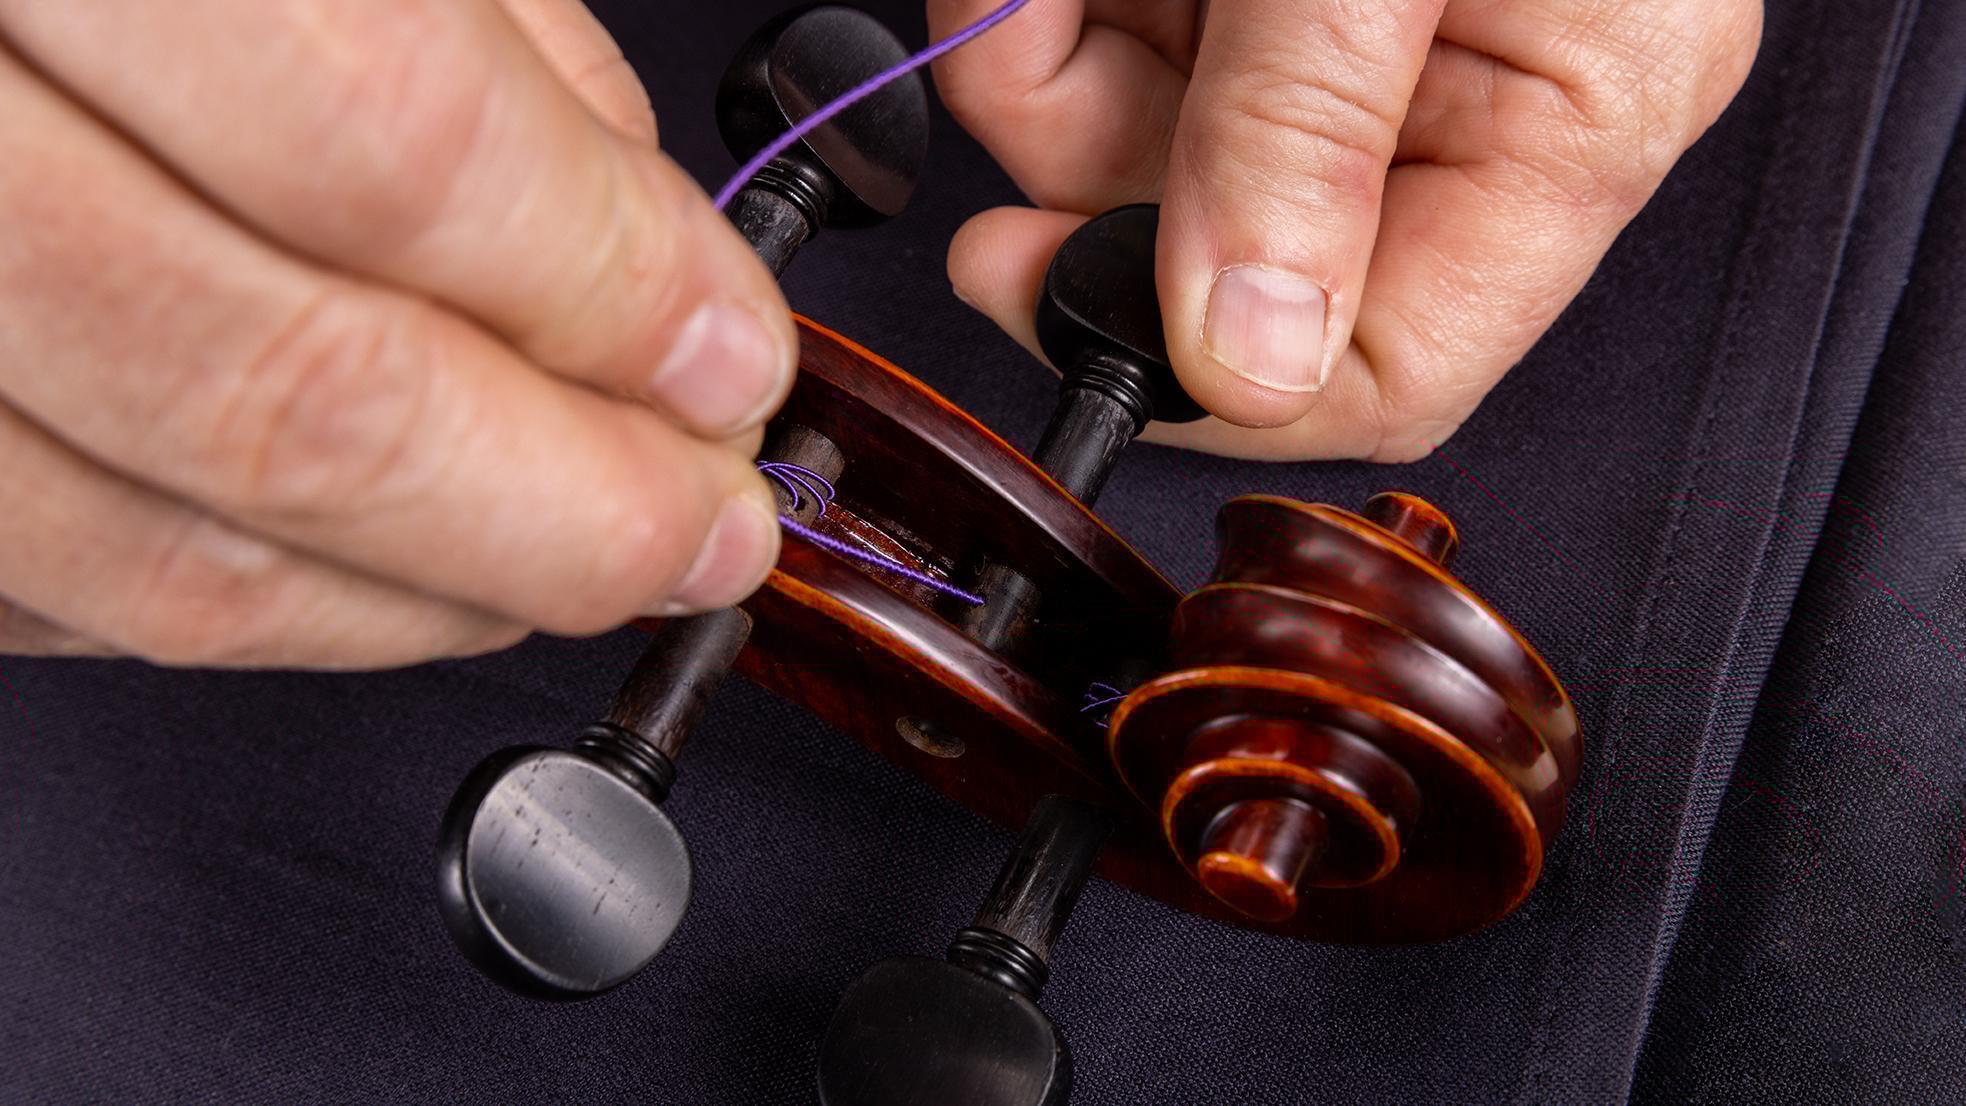
The holes drilled straight through your headstock are what we refer to as “peghead holes,” and these are designed to accommodate both the shaft (the bit of the tuning machine that sticks out above the headstock) and the bushing of the tuning machine. Since tuning machine shafts are not standardized, peghead holes come in a wide variety of dimensions.
First off: What’s a bushing? A bushing is a small metal insert that sits directly in a peghead hole, providing a barrier between the post and the bare wood of the hole. In addition to offering a far more precise fit than simply shoving the tuning machine post through raw wood, it also more evenly distributes the tension caused by the string pulling the tuner toward the body; without a bushing, it’s likely your tuning machine shaft would sit crooked or not quite perfectly centered.
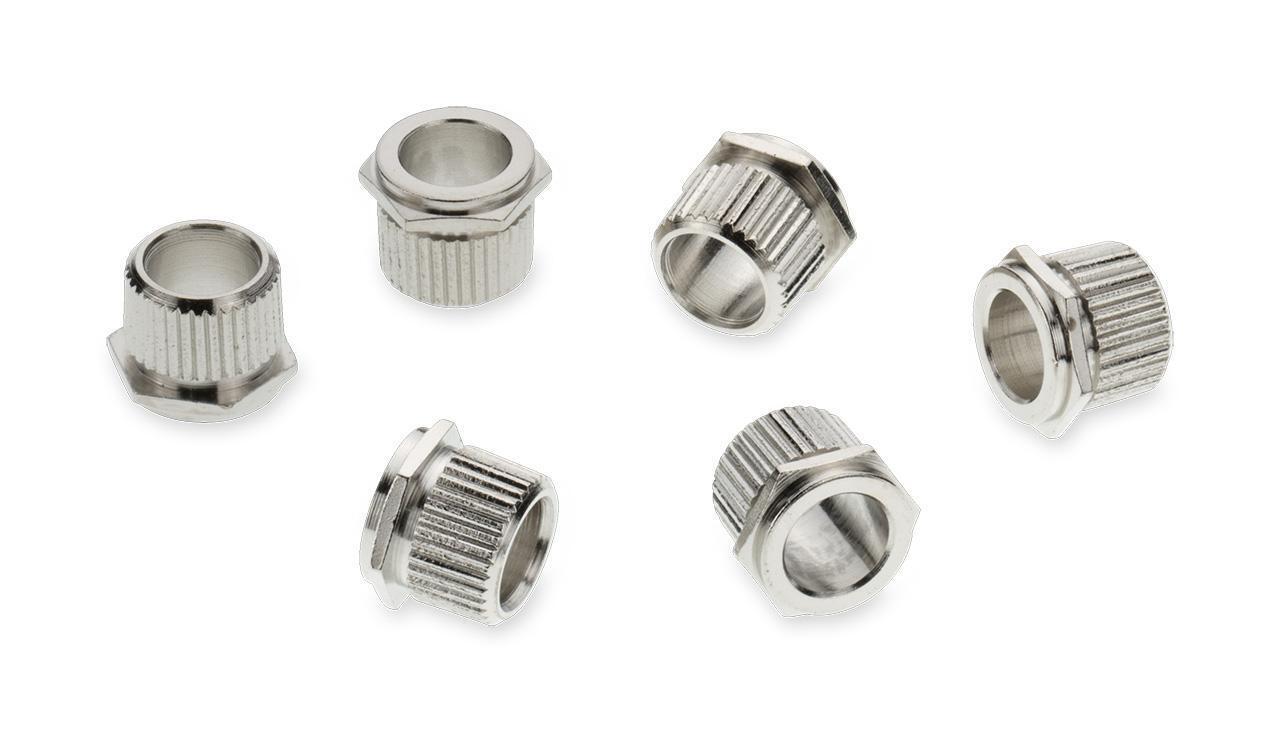
Bushing dimensions are just as numerous as tuning machine shaft dimensions, but luckily, bushings are generally included with replacement tuners. Vintage-style and open-back tuners are often pressed into the peghead hole, while more modern tuners often sport a nut at the top that physically tightens the bushing into place.
You must know your peghead hole size before purchasing a set of tuners if you’re not ready to commit to permanent modification. That said, a professional can easily ream out a peghead hole that’s too small, and many makers offer conversion bushings that allow you to fit a large-sized peghead hole with a smaller tuning machine shaft.
Screw Hole Placement & Orientation
While peghead holes are not standardized, there’s at least a degree of consistency between certain styles and brands — screw holes are a completely different ball game.
There are a few exceptions to the rule, but almost every tuning machine will come equipped with either a slot to attach a screw or an indexing pin that perfectly slots into a corresponding hole on your headstock. The problem is that every design does things differently. Any guitarist who has been around long enough will undoubtedly have encountered an old guitar or modified instrument with vestigial screw holes from an old set of tuning machines — it’s not a pretty sight.

It’s true that screw holes and indexing holes can be plugged and redrilled to accommodate most designs — but not without a few scars to show for it. If you want to keep your headstock free from extra holes, then you must pick out a set of tuners that share the same screw placement as your current ones.
Even then, the unfortunate truth is that sometimes, drilling is unavoidable (though it can often be hidden or minimized entirely with clever placement or a professional touch-up). As always, if you’re in doubt about drilling through your headstock or reaming out your tuning peg holes, then the Sweetwater Guitar Workshop should be your first choice for professional guitar or bass maintenance.
Choices, Choices, Choices
Now that the functional issues like orientation and compatibility are out of the way, it’s time to explore the plethora of tuning machine styles and designs available to you.
Round & Round: Tuning Machine Ratio
If you’re after a tuner with exceptional action and a smooth, precise operation, then gear ratio is a crucial spec to consider. Gear ratio tells you exactly how many rotations of the tuner’s key you need to result in a full revolution of the shaft.
For instance, an 18:1 ratio requires you to turn the key 18 times before the string fully wraps itself around the post. This gives you far greater control and accuracy than a lower-ratio gear, allowing you to adjust in finer increments. Although ratio is primarily a matter of personal taste, it’s indisputable that a higher ratio offers greater precision when tuning. Lastly, it’s important to remember that ratio is not related to reliability — it’s strictly a measure of the tuning machine’s action and accuracy.
Open-back Tuners vs. Closed-back Tuners
If their names didn’t already give it away, the difference between open-back tuners and closed-back tuners is that the former leaves its internal components — gear and all — exposed to the world. Open-back tuners were once the only type of tuning machine available, and they’re now mostly found on vintage or vintage-style instruments.
In comparison, closed-back tuners offer a physical barrier between the tuner’s internal components and the elements. This is typically a box-like metal enclosure that also allows the tuner to remain permanently lubricated.
In comparison, open-back tuners deliver more of a vintage vibe. Admittedly, there’s no functional benefit to an open-back tuner, although certain vintage-inspired instruments might look a tad strange if you swap out the old strip-style open-back tuners for a big set of closed-back tuners.
Well, what’s the real difference? Since they’re protected from dust, grime, and moisture, closed-back tuners are generally more reliable and require less maintenance. That’s not to say that an open-back tuner can’t perform equally well with proper lubrication and a thorough cleaning now and again, but it will require a bit more babying. Closed-back tuners are also inherently heavier than an open-back tuner and can sometimes add quite a bit of heft to a headstock.
Locking Tuners vs. Standard Tuners
Locking tuners are commonly found on modern and high-performance instruments and are perhaps the most distinct of all tuner variations. Instead of securing the string with tension and multiple wraps around the peg head, locking tuners clamp down directly onto the string as it enters the tuner. What’s so great about that? Two words: string replacement.
On a non-locking tuning machine, it’s always necessary to wrap the string around the tuner’s shaft once or twice for stability’s sake. These wraps take time and can also leave slack that needs to be pulled out of the string later.
In comparison, locking tuners allow you to slot the string straight through with minimal wrapping and then clamp down for stability. This results in a far faster string change and eliminates quite a bit of the slack found in an overwrapped string.
But what about reliability? You could argue that the physical clamp found on a locking tuner is more reliable than the old-school method of wraps and tension. But once you’ve fully stretched your strings out, the truth is that locking tuners and traditional tuning machines perform similarly. Moreover, even locking tuners require a little wrapping — you’re probably not tuning your string to pitch before clamping it down in the locking tuner.
Locking tuners are all about speed and efficiency, as they reduce the time needed for string changes and the breaking-in of the string. There are also very few objective downsides to using a locking tuner. They’re sometimes heavier than a non-locking tuner, and some guitarists feel they look out of place on a vintage-style instrument. Still, from a functional perspective, they’re generally as close to an objective “upgrade” as you can get.
Staggered Tuners
Finally, staggered tuners can be an excellent addition to a player running a Fender-style solidbody instrument or any guitar that lacks a headstock angle. Why? All the strings on your headstock require a bit of an angle when approaching the headstock — this is referred to as the “break angle.”
On many solidbody bolt-on instruments, the string posts sit at more or less the same height as the nut slot, which can negatively impact your instrument’s stability and playability. If you’ve ever wondered why your guitar has a string tree, then this is because string trees force your strings down so that they can approach the nut at an angle.
Staggered tuners offer a unique solution to this problem by staggering the heights of each tuner’s post. The low E will generally be the tallest, and each post will successively become lower until you end at the high E. This gives each string an acceptable break angle without requiring string trees. Note that staggered tuners are only useful on straight headstock guitars where you don’t want to use a string tree, so while they’re very effective, they’re also somewhat niche.
Tuning Out for Now
So, whether you’re in dire need of replacement tuners or simply looking to give your instrument a bold new look, upgrading your tuning machines should be at the top of your modding to-do list. Looking to refresh your axe with a new set of pegs? Make sure to call your personalized Sweetwater Sales Engineer at (800) 222-4700 for expert-level advice on our massive range of electric guitar, acoustic guitar, and electric bass guitar tuners!