There’s nothing like a great vocal performance — the vocal is the heart and soul of any song. But there’s also nothing more frustrating than a great vocal performance that’s shortchanged because it hasn’t been recorded or produced properly. Many times, while mixing someone’s material, they’re shocked at how just a few tweaks can change their vocal from something they thought might need to be re-recorded into a radio-ready, polished track.
We’ll start off with four tracking essentials then cover eight DSP techniques that can polish your vocal to pro-level perfection.
1 – Singing Is a Physical Activity
Vocals require exertion, and no amount of DSP can fix a tired vocal performance. Find out what time of day you’re at your peak for vocals. Steve Perry (the singer for Journey) told me he recorded his vocals early in the day — and I don’t think anyone would argue with the quality of his vocals. Also, always remember to push air from your diaphragm, don’t pull it from your throat.
2 – Choose the Right Mic
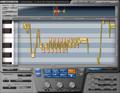
A directional mic, like one with a cardioid pickup pattern, works well when you sing straight into it. However, moving closer to the mic creates a bass buildup (called “proximity effect”). This can add or detract from your sound, depending on the vocal and the performance. Furthermore, sound hitting the mic’s sides (which can happen in smaller studios due to room reflections bouncing back at the mic) will be colored. When singing with other musicians, a directional mic may be essential to avoid bleed. Otherwise, try a high-quality, omnidirectional vocal mic, which may give better results. Some mics, like the Audio-Technica AT4050 (fig. 1), offer multiple patterns. Try both omni and cardioid patterns to find out which is most flattering to your voice.

3 – Choose the Right Condenser Mic Diaphragm Size
In general, large-diaphragm condenser mics are more sensitive than small-diaphragm condenser mics, but the tone is somewhat less bright. I recommend having both. I record narration and most vocals through a large-diaphragm mic; but for loud vocals, I use a small-diaphragm mic. But it’s a matter of personal taste — others might do the reverse.
4 – Study Mic Technique
Your voice will sound different if the mic is slightly above (brighter) or below your mouth (deeper, more chest pickup). Be far enough away from the mic that you can move in closer when your voice is quieter and further away when it’s louder. For an example of superb mic technique, watch any KD Lang live performance video, like her performance of Roy Orbison’s “Crying.” Among other subtleties, note how she backs off for just the “c” in “crying,” to minimize the initial transient, then brings the mic back in. Watch and learn.
Okay, now that we’ve recorded the vocal, let’s rev up the DSP.
5 – Remove Noise
You’ll encounter two types of unwanted noise: electronic hiss and mouth noises. To reduce preamp hiss, Magix Sound Forge and Steinberg WaveLab Pro include noise-reduction algorithms. Or, use a standalone restoration program like iZotope RX 7.
Hiss reduction works by capturing a “noiseprint” (a section of the recording that consists only of noise), saving that as a reference sample, then instructing the program to subtract anything with those characteristics from the vocal. Be sparing to avoid artifacts — reduce hiss by no more than 6 to 10dB.
For unwanted sounds (like mouth noises and headphone leakage) that happen between phrases, a noise gate might work, but I recommend taking the time to do any repairs manually. Cut the spaces between phrases (fig. 2) and apply very short fades going into and coming out from the vocal phrases for smooth transitions between signal and silence.
For mouth-click transients, iZotope RX 7’s Mouth De-click algorithm is downright magical. A manual alternative is to zoom in and split exactly on the transient. Then, create a fade-out before the transient and a fade-in afterward. If that doesn’t work, or produces an obvious gap, then cut the section with the click. This will create a gap, so time stretch the end of the clip before the gap so that it covers over the gap and continues slightly into the next clip. Finally, crossfade the section where the two clips overlap.
Another option is to use a clip-gain envelope to duck the level momentarily. Place envelope break-point nodes immediately before and after the click and then lower the envelope as much as needed to eliminate the click. Also, note that some programs, like Magix Vegas, introduce automatic fades at splits. Often, this is enough to eliminate the click if you split exactly on the click.
6 – Do You Need the Lowest Frequencies?
Consider inserting a steep highpass filter to cut the low frequencies below the vocal range where subsonics, hum, mud, and p-pops live. Some engineers recommend against this because the room sound can be a part of the vocal, so use your ears. A phase-linear EQ is usually the best choice for a highpass filter because, unlike conventional EQs, it won’t introduce phase changes above the cutoff frequency.
7 – Reduce Breath Noises, Inhales, and Ess Sounds
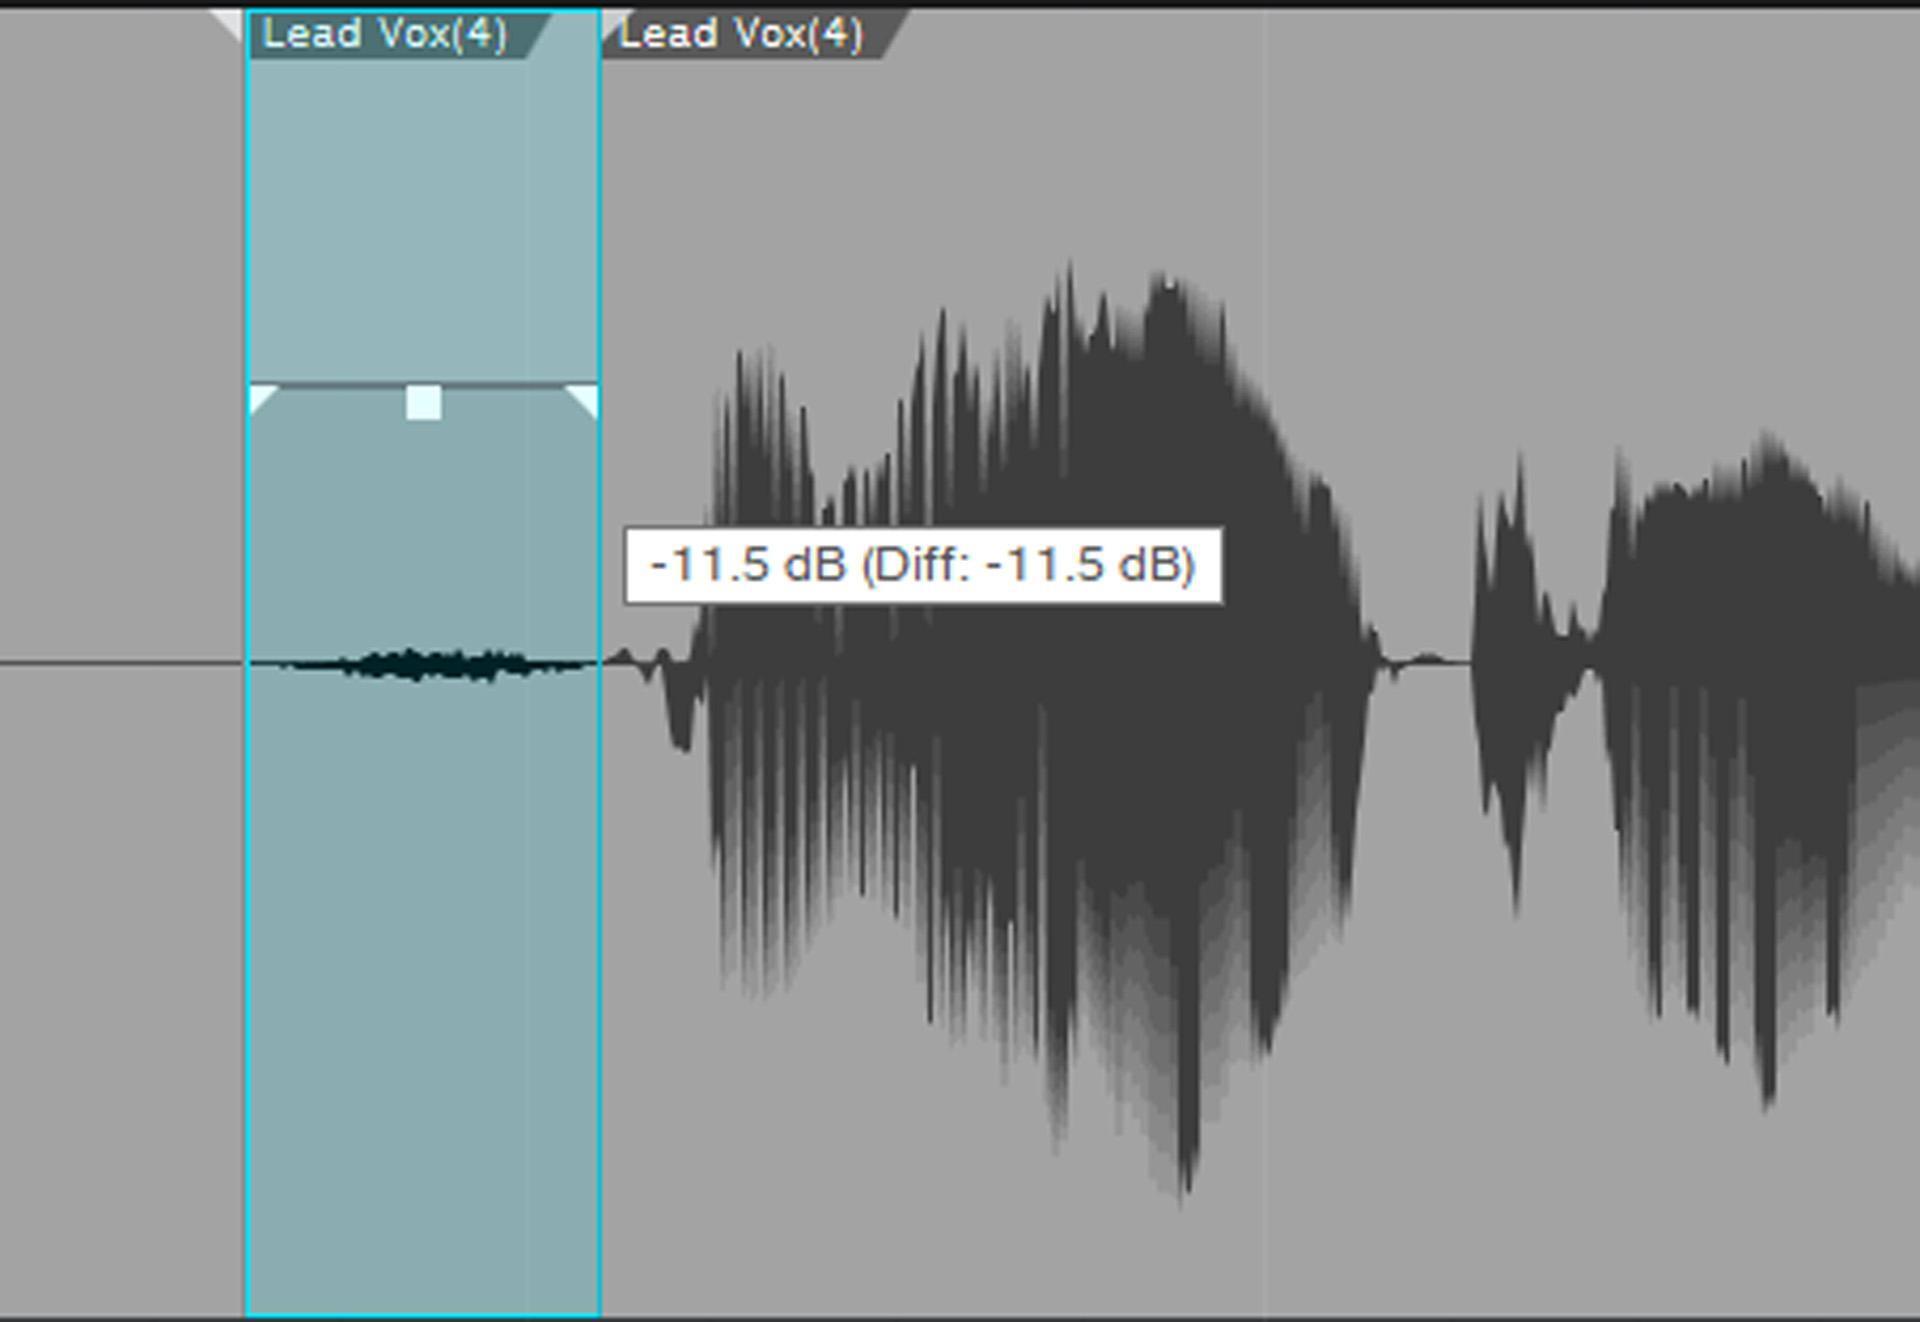
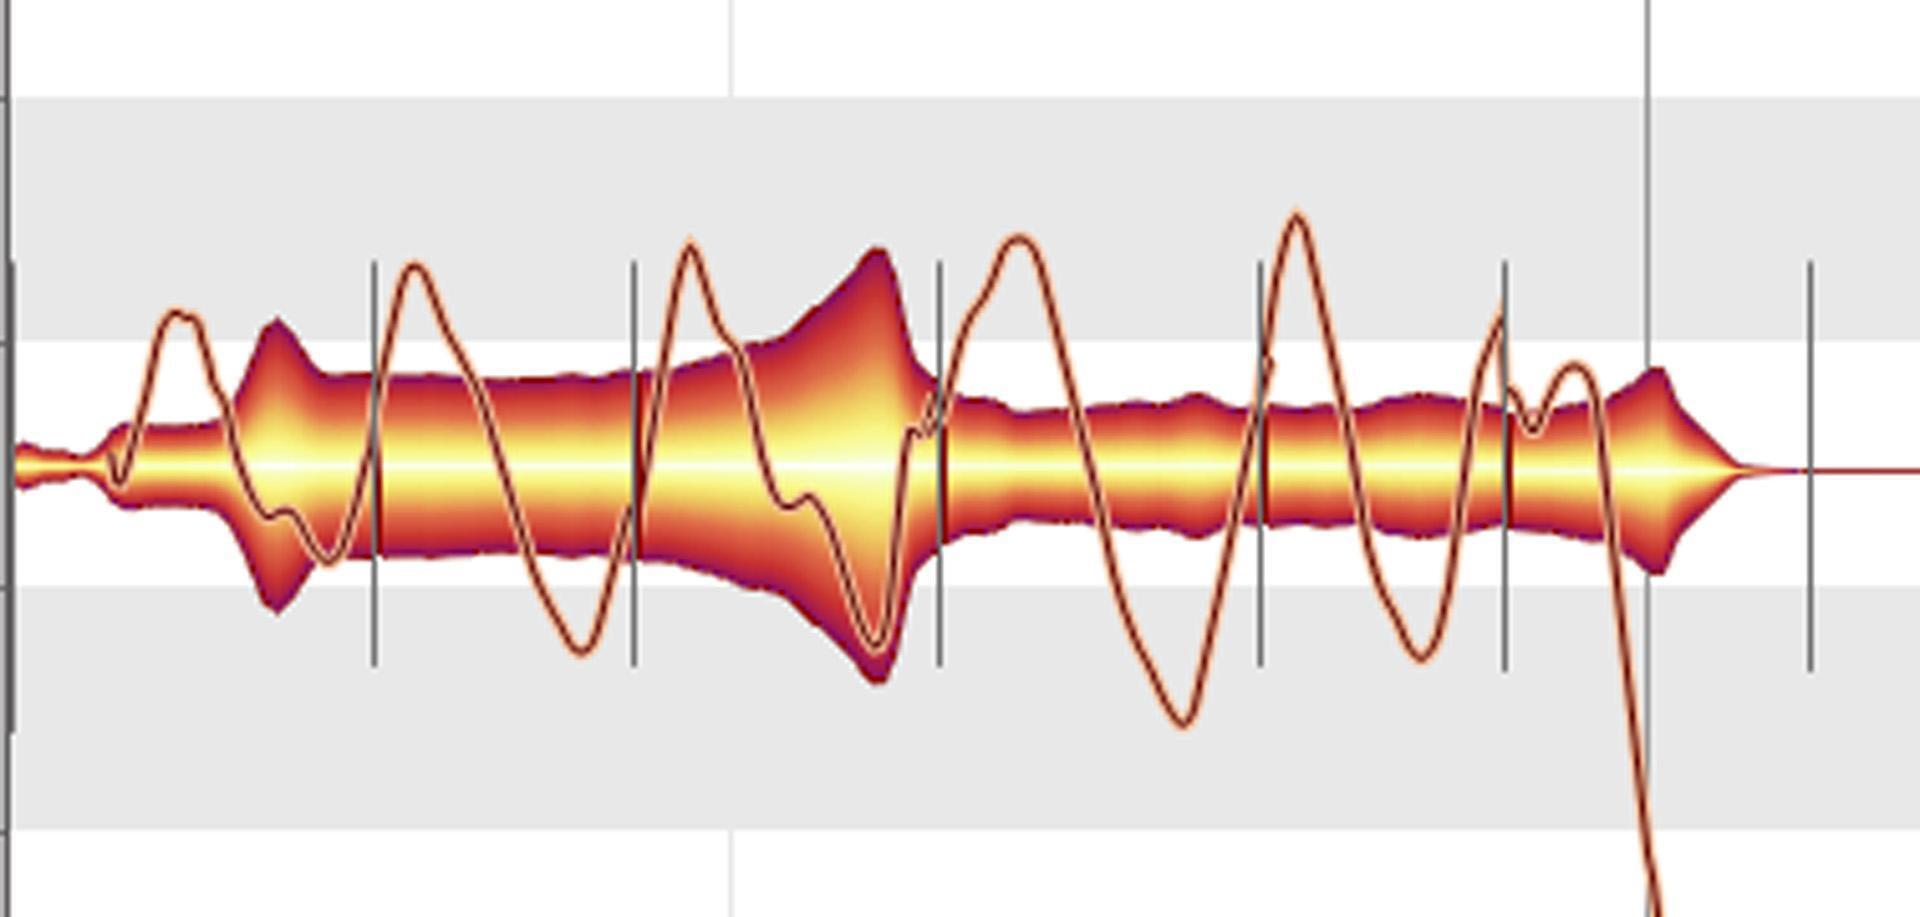
Breath inhales and ess sounds are a natural part of vocals, so don’t remove them entirely. However, following vocals with compression or limiting can bring up inhales and esses to the point of being objectionable. To reduce inhale levels, define the region with the inhale (i.e., drag across it or split at the beginning and end) and reduce the gain with DSP or a clip envelope so that it’s less obvious compared to the vocal yet retains the inhale’s essential character (fig. 3).
Although you can use a de-esser plug-in or a multiband compressor to reduce esses, defining the region with the ess sound (it will look like a round or oval blob with rough edges) allows for more detailed editing. Reduce its level the same way you reduce inhales.
8 – Reduce Plosive Severity
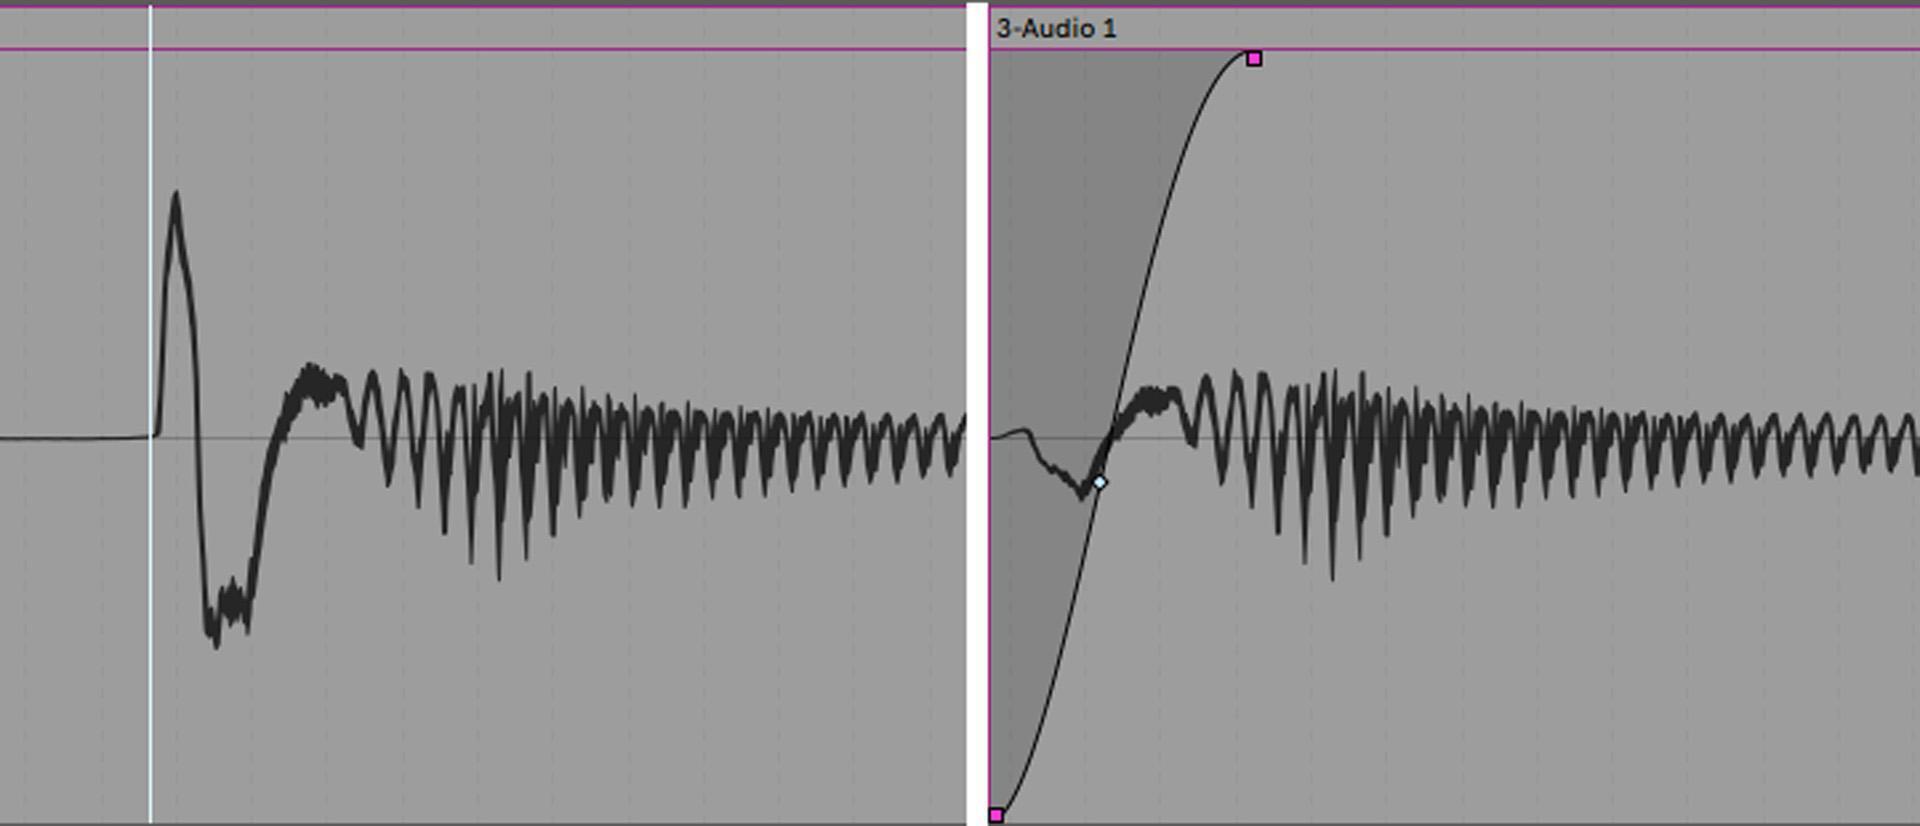
If plosives (popping caused by “p” or “b” sounds) are a consistent problem, use a high-quality pop filter when recording and try to aim your vocal slightly toward the side of the mic’s diaphragm. This may help reduce pops at the source yet retain the desired vocal sound. For a recorded vocal, a steep highpass filter can remove low frequencies where plosives like p-pops occur. The tradeoff is that this may take away some of the vocal frequencies that add warmth. A better (although more time-consuming) option is to zoom in on the p-pop (it will have a distinctive waveform that you’ll recognize after a while), split the clip just before the pop, then fade in over the p-pop (fig. 4). The fade’s duration determines the pop’s severity, so you can fine-tune the desired amount of “p” sound. A manual fade-in also avoids any possibility of phase shifts introduced by a non-linear-phase highpass filter.
If the problem is not just that there’s a pop but there’s also too much low-frequency component, the solution is to define the pop as a region and apply a steep highpass filter (e.g., 36 or 48 dB/octave) to only the plosive. This can also help reduce low-frequency “wind” components like an overly prominent “f” sound at the beginning of a word.
9 – Phrase-by-phrase Normalization/Gain Changes
I’m not a fan of compressing vocals if the level variations are considerable. This is because low-level sections might be unaffected while the high-level sections sound “squashed” and may have an unnatural sound quality. Instead, I alter the level of sections manually for consistency. Then, most of the compressor’s work is already done, so only a little bit of dynamics control is necessary. (If you overcompensate and later need to add an expressive element that wasn’t in the original vocal, such as the song becoming softer in a particular passage, you can fix this with track automation.)
There are four main ways to create a more consistent level without compression or limiting.
- Split the performance between phrases and raise or lower the level of individual phrases to obtain consistency. Sometimes with a relatively long phrase (i.e., not just a few words), normalizing sections to a consistent peak level (e.g., -6dB) is ideal and preserves any internal dynamics (i.e., inherent dynamics in the vocal performance).
- Use a clip envelope to alter the levels (fig. 5).
- Insert an automatic level-altering plug-in like Waves’ Vocal Rider.
- Use any version of Melodyne above Melodyne Essential.
The main advantage of changing the levels this way is that it doesn’t add any artifacts associated with compression. Even though the sound is more present and detailed, it sounds natural.
A benefit of manual editing is that you can define a region that starts immediately after an inhale, so the inhale isn’t brought up with the rest of the phrase. If your DAW does automatic crossfades when splitting a section of the audio, you can often get away with having a region boundary occur within existing audio, not just in the silent spaces between sections of audio. Before you commit to this type of edit, though, listen to the transition to make sure there’s no click or other discontinuity. If so, you’ll need to split the section to be normalized then crossfade it with its adjoining regions.
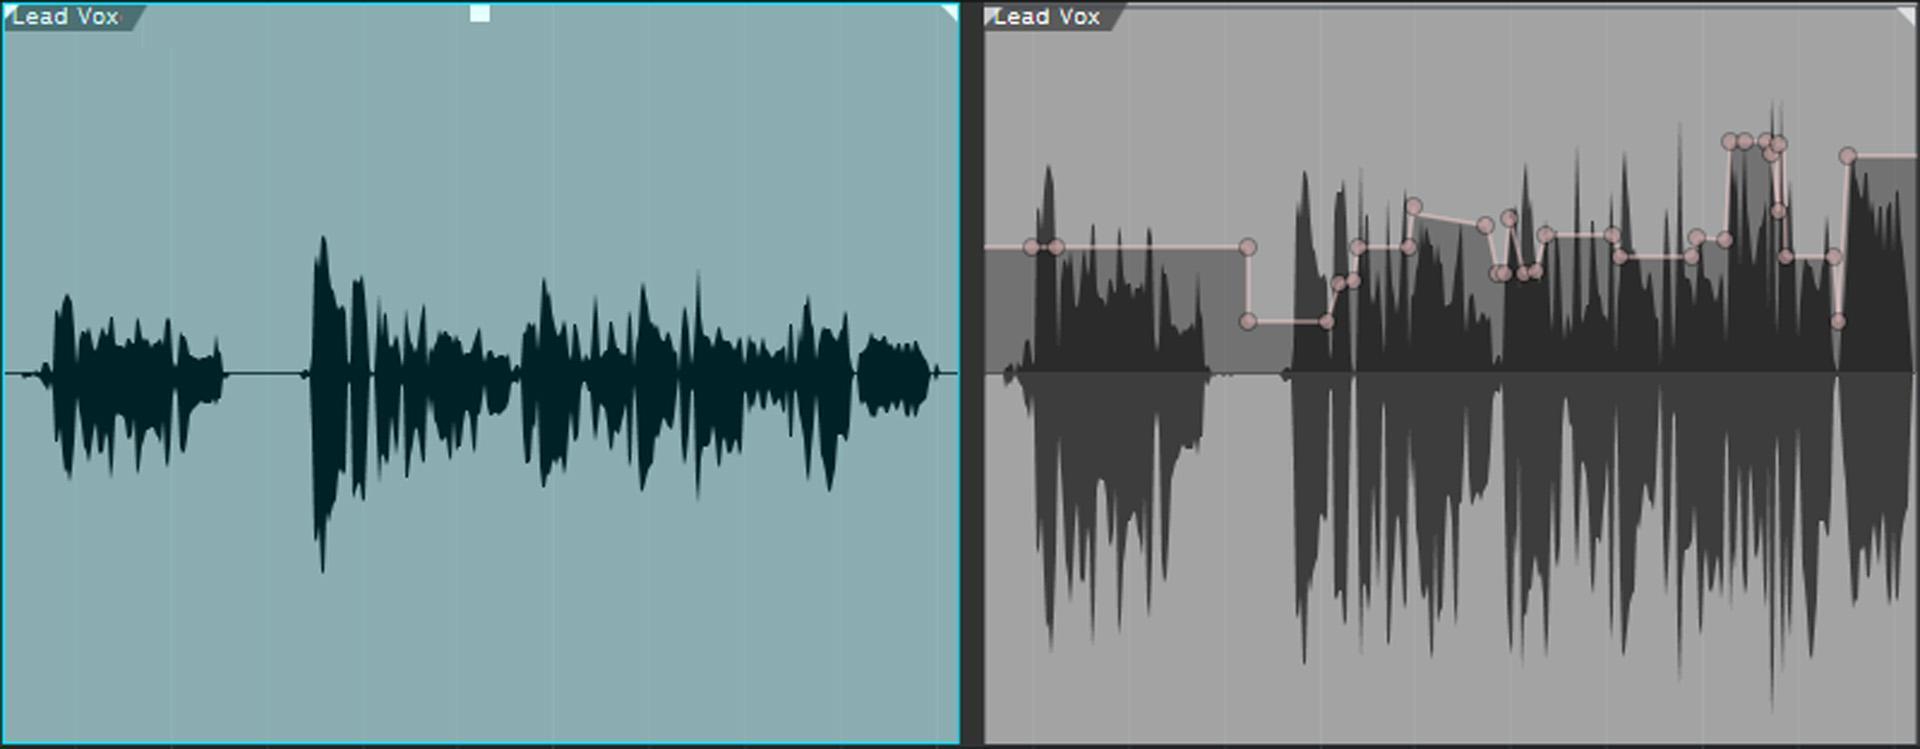
To alter levels with Melodyne, open the vocal that needs to be fixed in Melodyne then choose the Percussive algorithm. In this mode, the “blobs” represent individual words or, in some cases, phrases. Use the Amplitude tool to click on a blob, then drag higher to increase the level or lower to decrease the level (fig. 6). Remember that you can split blobs for more control (e.g., increase the level on only the end of a word where the singer ran low on breath; isolate an inhale to lower it).
10 – Pitch Correction
The preceding tips give a cleaner vocal with a more consistent level. With this solid foundation, you can tackle more elaborate processes.
Pitch correction has a bad reputation because, when misapplied, it sucks the life out of vocals — but when applied properly, it doesn’t get any credit because you don’t hear any problems.
All pitch-correction programs (e.g., Celemony Melodyne, Waves Tune, iZotope Nectar, and Antares Auto-Tune) work similarly. They analyze the vocal then display the note pitches graphically, somewhat like the “piano roll” view for MIDI notes. You can quantize the notes to a particular scale with “looser” or “tighter” correction, move notes manually without quantization, and sometimes alter timing and formant as well as pitch.
Pitch correction works best on dry, unprocessed vocals (other than the level adjustments or de-essing mentioned previously). Any modulation or time-based effects can make pitch correction glitchy — even EQ that emphasizes high frequencies can create unpitched sibilants that confuse pitch-correction algorithms. If your pitch-correction processor inserts as a plug-in, then insert it prior to other processors in the signal chain.
The secret to natural-sounding pitch correction is simple: correct only the notes that sound out of tune, not necessarily the ones that look out of tune. Manual correction takes more effort than doing select all/correct all, but you’ll be rewarded with a vocal that doesn’t have a “corrected” sound.
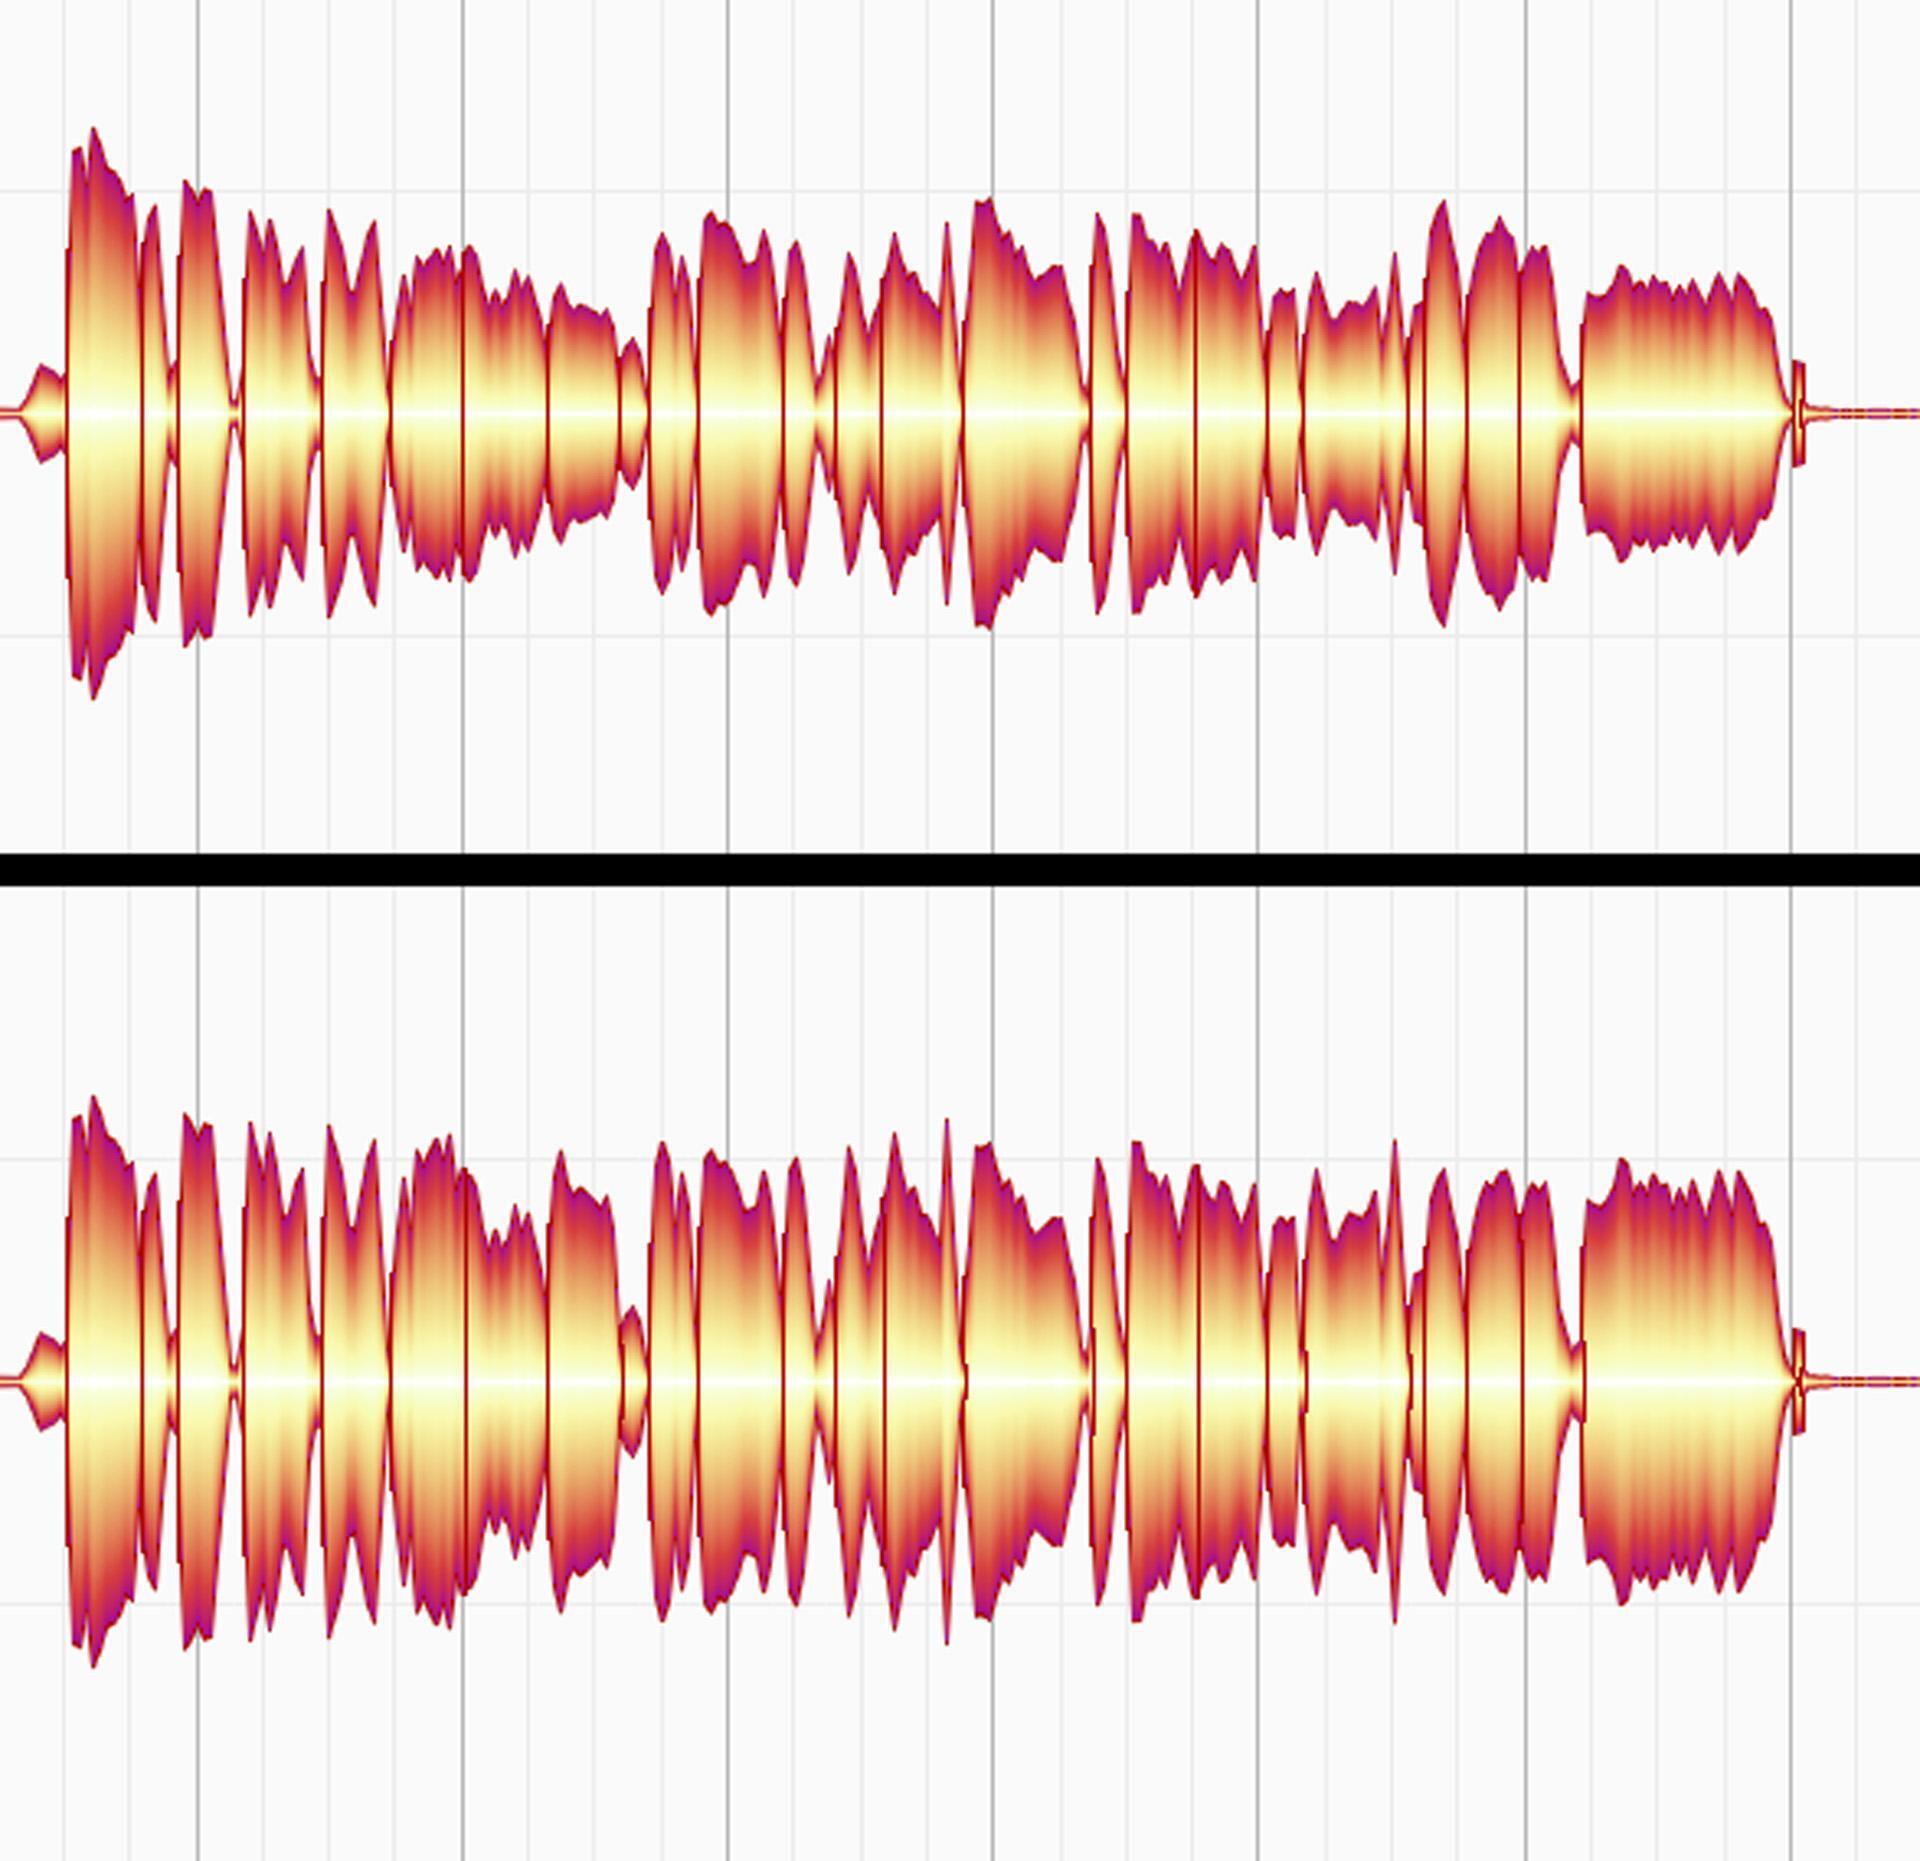
Another consideration is that a singer’s pitch often slides between notes (fig. 7). Pitch correction may alter these slides, which can be partially responsible for pitch-corrected vocals sounding unnatural. It’s important not to “correct” slides that contribute to a vocal’s effectiveness.
11 – Tweak the Vibrato
If vibrato “runs away” from the pitch, the pitch variations can become excessive. You can fix this issue with Melodyne’s Note Separation tool. (Don’t assume this tool isn’t in Melodyne Essential because there’s no button for it; hover over the top of a note, and the Note Separation tool appears as a vertical bar cursor with two arrows.)
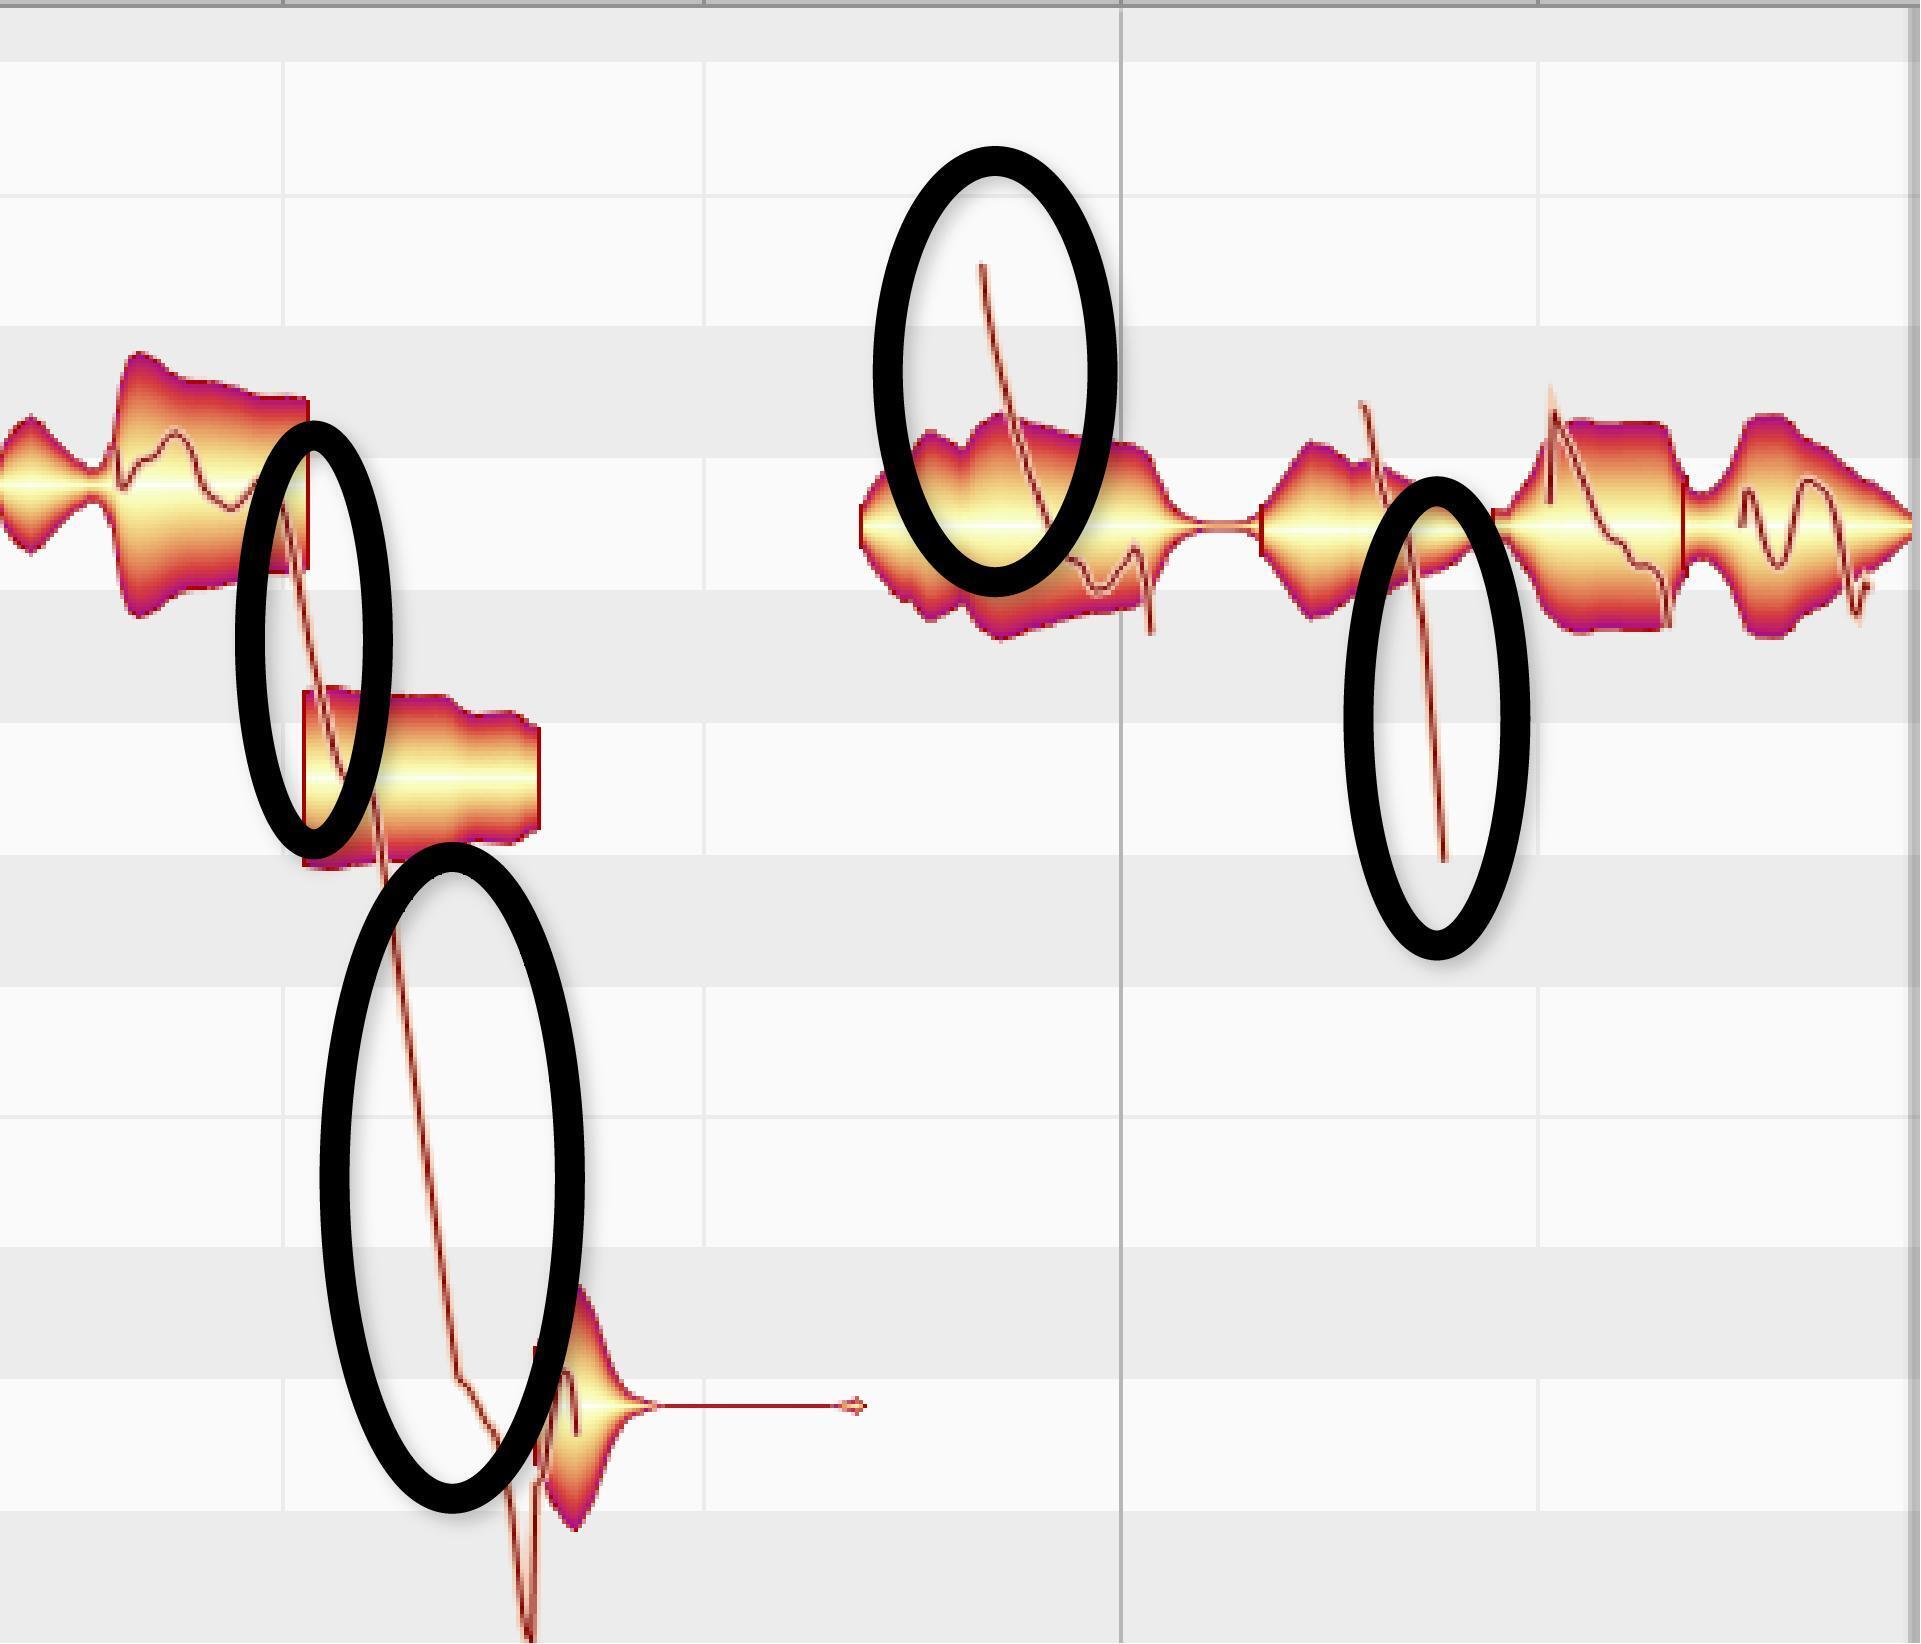
Figure 8 shows a note with ragged vibrato (top image) and how to fix it. Use the Note Separation tool to separate the blob at each cycle of vibrato (middle image). The blobs have changed pitch because the displayed pitch is based on the blob’s average pitch. Cutting the note into smaller blobs defines the average pitch more precisely. (Note that separation can also improve pitch-correction performance — vowels carry pitch more than consonants, so separating them from the consonants can give more accurate results.)
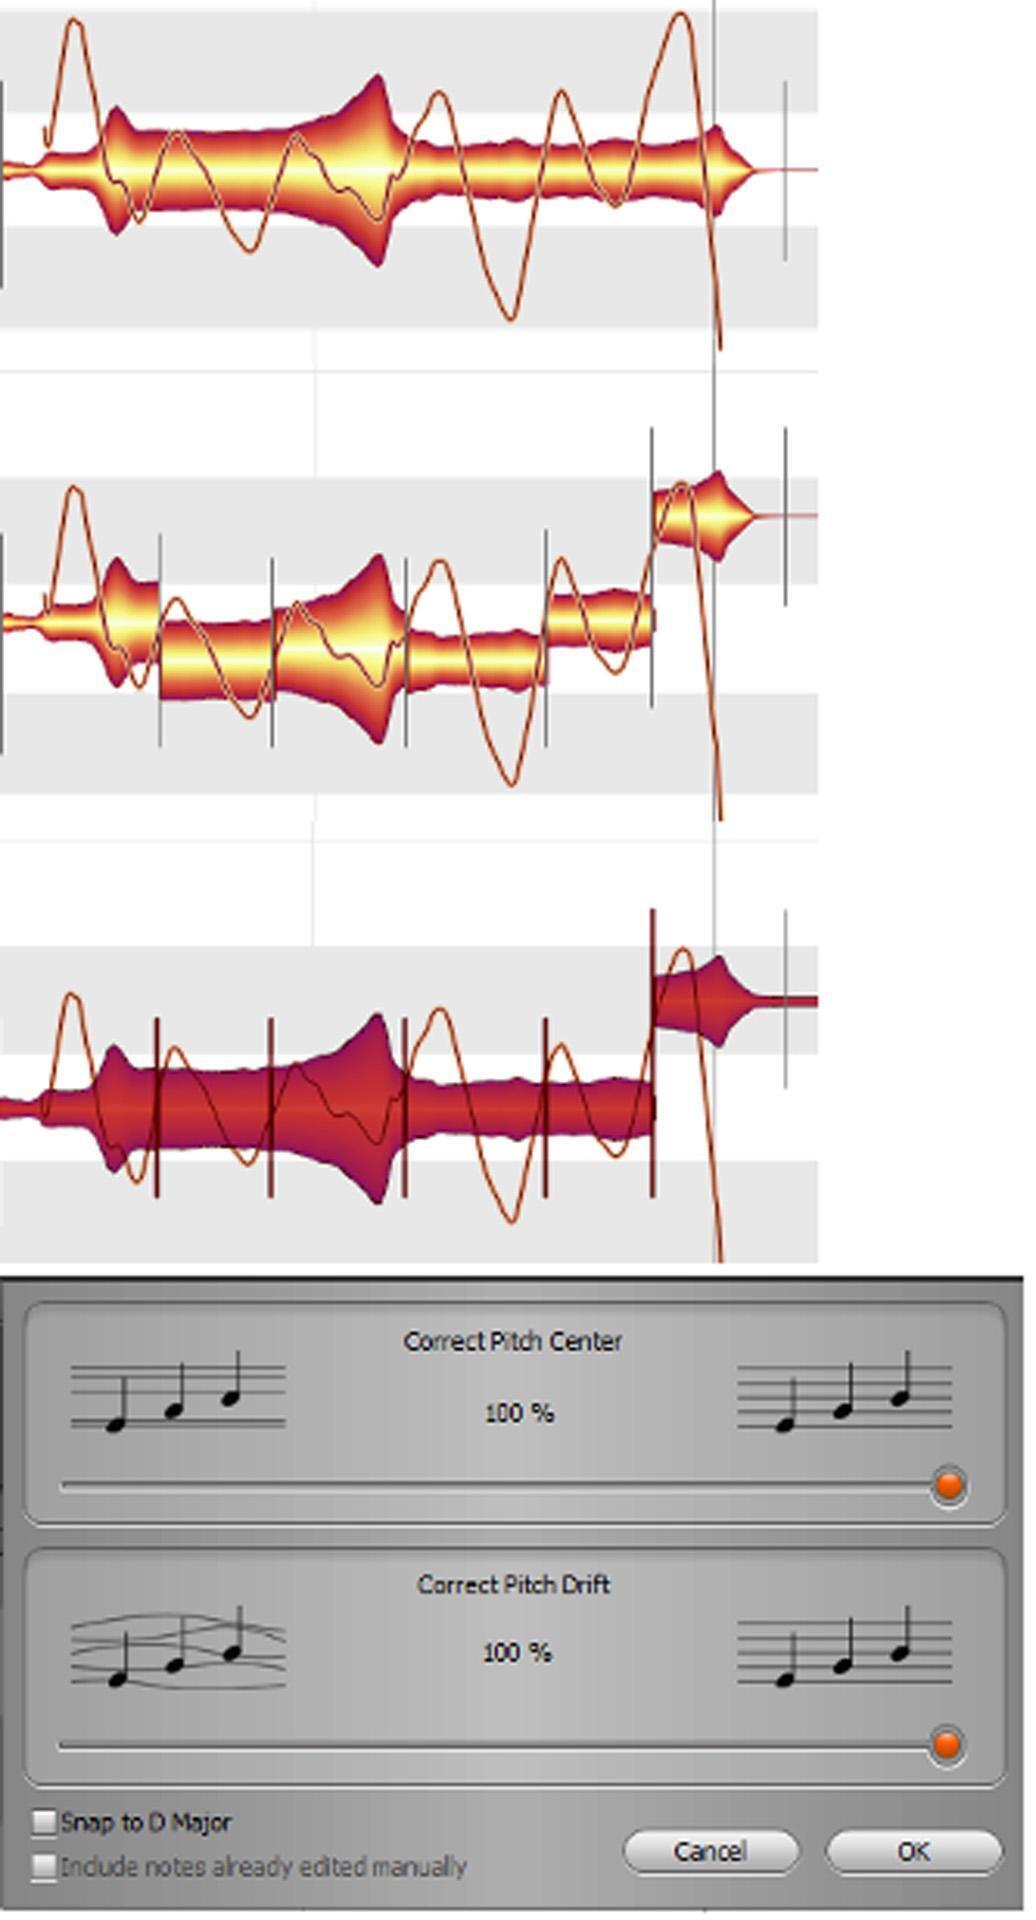
Next, correct the pitch center and pitch drift (the bottom image shows the results of 100% correction). But note the rightmost blob — it’s jumped up a semitone because Melodyne thinks it’s a different pitch now that it’s been cut. Drop it down a semitone so it matches the other pitches, and you’re done.
With Melodyne Editor and above, the Pitch Modulation tool can fine-tune the vibrato depth, which allows for greater consistency (fig. 9). You may see some discontinuities, but you likely won’t hear them.
If a note doesn’t have any vibrato, or if you’ve “flattened” pitch variations with pitch correction, try using a vibrato plug-in only on certain notes. If there’s no vibrato processor per se, you can usually edit a chorus or flanger to produce vibrato (fig. 10). Use only a single voice of flanging or chorusing, set the mix balance to processed sound only, pull way back on the depth (keep it subtle, or it will sound artificial), and set the rate for the desired vibrato speed. Automating the depth can fade the vibrato in and out for a more realistic effect. Use this for only short sections, with very little depth, to avoid a fake sound.
12 – Fix Notes That Don’t End at the Same Time
If one word in a vocal ends before the same word that’s the correct length in a different (e.g., doubled or harmony) vocal, then split the short word before the word starts and use time stretching to lengthen it (fig. 11).
In some cases, artifacts due to time stretching may be unavoidable. If so, you may be able to split a note during the note’s sustain, stretch the end longer, and then crossfade over the split to make a smooth transition between the main part of the note and its sustaining end.
Time stretching can also make sure entire phrases are aligned with each other. The VocALign Project program from Synchro Arts can do this automatically, but you can split and time stretch the words manually in one vocal so that its timing matches a different vocal.
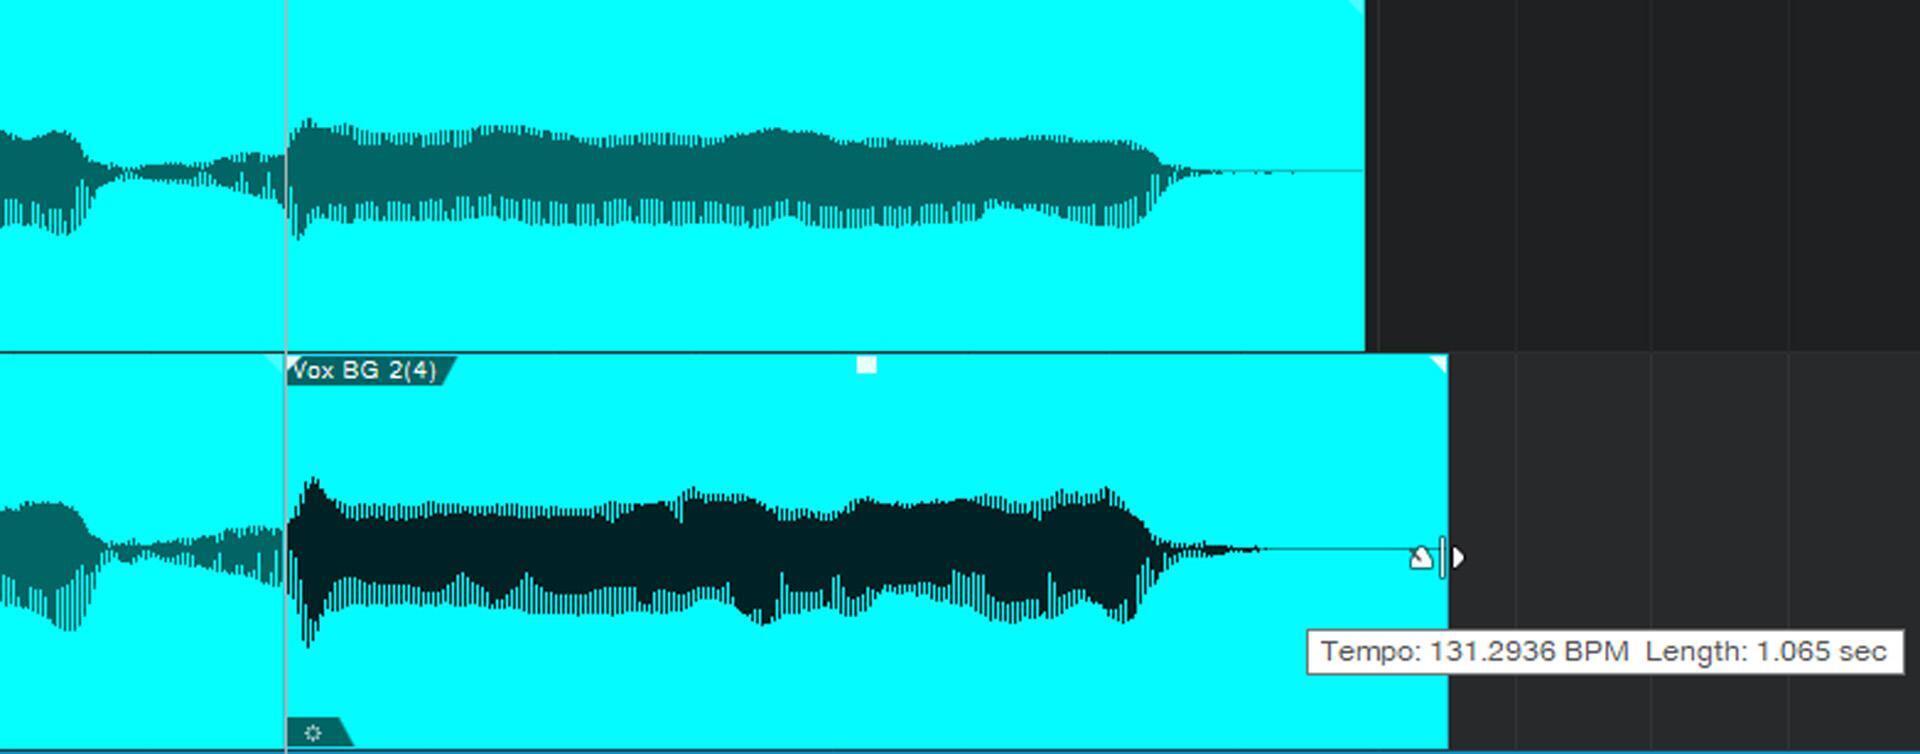
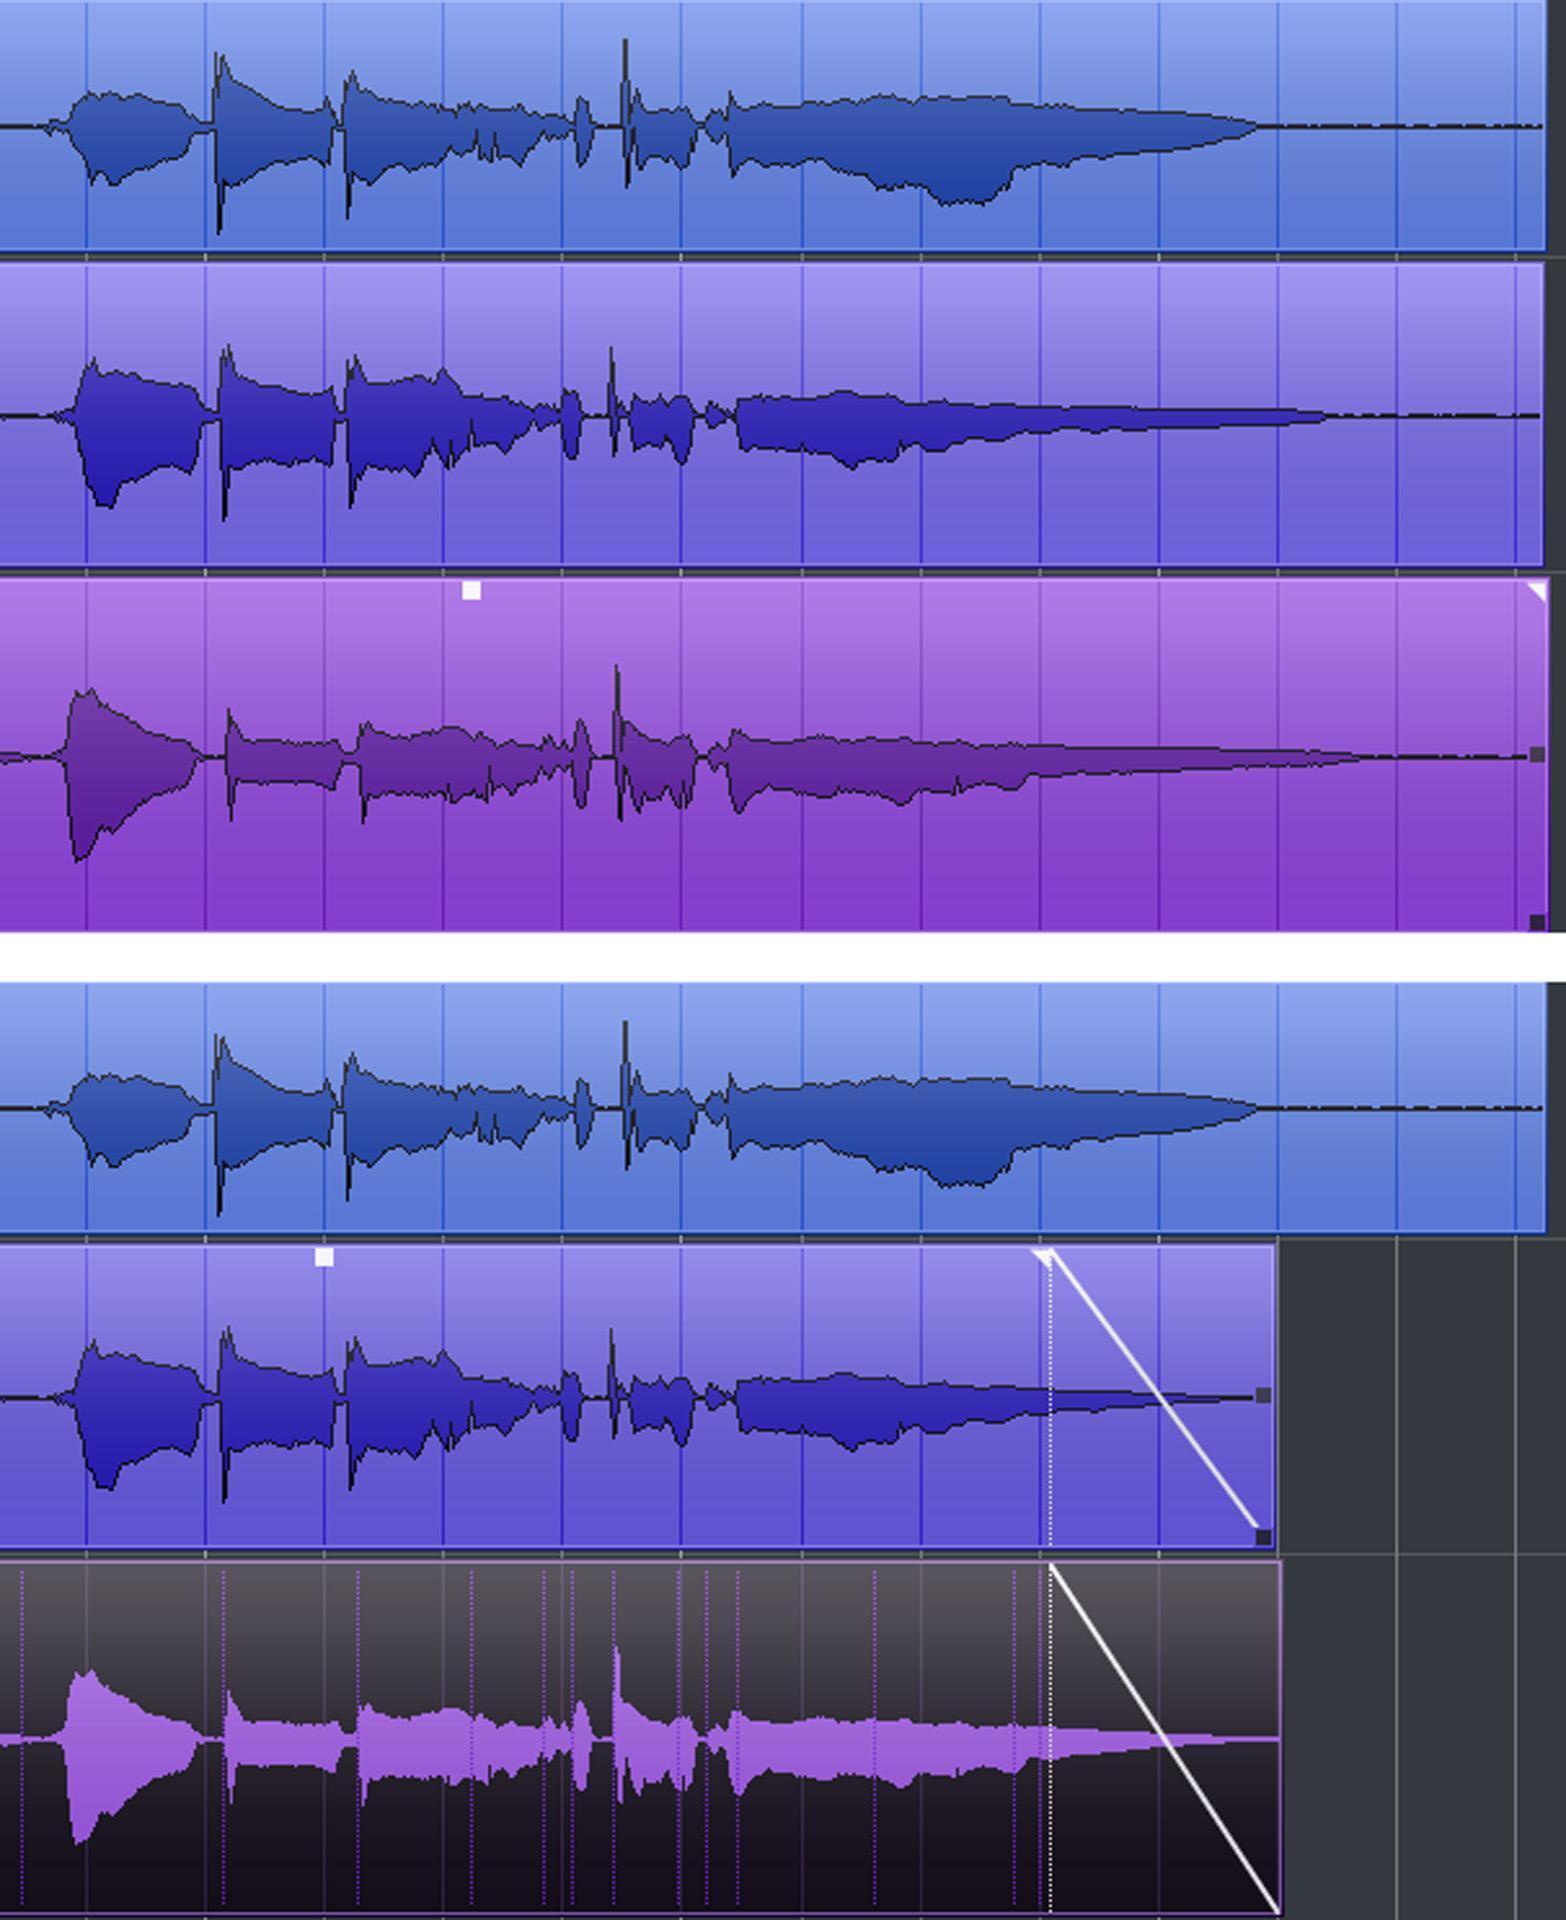
If a note extends too long, simply fade it so that its length matches the “reference” vocal. Or, split during the sustain, move the end closer to the beginning, and add a crossfade for a smooth transition between the two sections. To tighten multiple parts, for example background tracks, you can add a common, simultaneous fade (fig. 12).
Is All This Effort Worth It?
Yes! It can take an hour or so to optimize a typical song’s vocal track, but a smooth, consistent performance that hasn’t been compromised by excessive dynamics processing or pitch correction gives the vocal more importance — and, as far as I’m concerned, the lead vocal is the most crucial part of any song. If people love the vocal, it almost doesn’t matter what the rest of the song is doing.