The Line 6 Helix has many talents, and they include being a cross-platform audio interface — with features that even many dedicated audio interfaces don’t have.
You can record vocals and keyboards as well as guitars, but it’s even possible to monitor through effects with zero latency while recording the processed sound — and/or a dry version for later processing. And then there are the built-in re-amping guitar options… furthermore, the HX Edit software can edit Helix while it’s serving as a USB interface.
But that’s enough of an introduction — let’s start interfacing.
The Big Picture
Most audio interfaces have an associated app for input and output routing. With Helix, HX Edit provides a similar function. Just as inputs to an audio interface appear as input options for a DAW’s tracks and outputs are available as destinations for tracks and buses, Helix’s I/O works similarly.
However, there are two main differences compared to typical interfaces. First, Helix has a wide variety of input types — including guitar, mic, Variax, aux, and the receive jacks for send/receive jack pairs. Second, Helix’s heart and soul is hardware-based, real-time processing. Unlike traditional audio interfaces where zero-latency monitoring is an added feature, with Helix, it’s the norm. For example, Helix output USB 1/2 is a stereo output like you’d expect from any audio interface — but it’s a hardware-based output that sits at the end of all the Helix processing. So, it can send the processed signal or dry signal, either of which you can monitor without latency, to your DAW.
Like typical audio interfaces, Helix needs drivers; your choices are similar to other interfaces. Also, like any high-performance audio interface, do not use a USB hub. Plug Helix into a USB port that’s on your computer’s motherboard or you may encounter connectivity issues.
MacOS
Helix is compliant with the Mac’s Core Audio drivers. When patching a Mac’s USB port to the Helix, it will show up as a selectable device in the Audio/MIDI Setup panel (located under Utilities). While that works fine, I highly recommend downloading and installing Line 6’s Core Audio driver, which can choose among 44.1kHz, 48kHz, 88.2kHz, and 96kHz sample rates. With the Mac’s native drivers, only 48kHz is available.
Windows
Helix works with Windows’ native drivers; but for better performance, download the Line 6 ASIO drivers. Go to Line6.com and click on “Downloads.” Under the All Software tab, choose “HX Edit,” your operating system, and click on “Go.” Download and install the latest HX Edit version, which also installs the needed drivers.
In your host, open the Helix Control Panel (your host may not call it that; it could be referred to as “Settings” or something similar). The six ASIO buffer choices, from “Extra Small” to “Extra Large,” are 64, 128, 256, 512, 1024, and 2048 samples. Choose the smallest option consistent with stable audio performance. While the window is open, set the Helix bit depth. You choose Helix’s sample rate in your host (44.1kHz, 48kHz, 88.2kHz, or 96kHz).
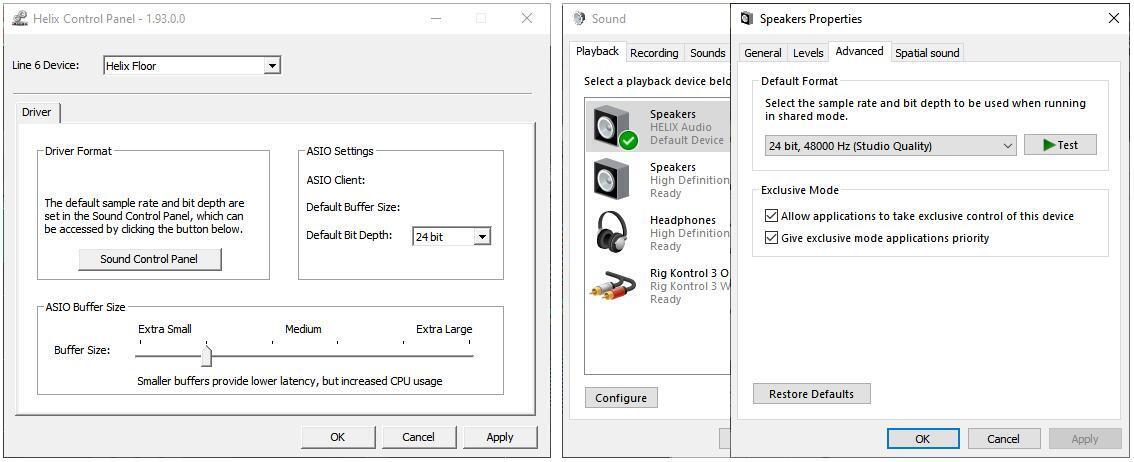
You can ignore the Sound Control Panel button, unless you want Helix to share playback with Windows’ native drivers (e.g., listen to YouTube while working with Helix). If so, click on “Sound Control Panel,” then “Speakers” for Helix Audio, and make it the default device if it isn’t already (see fig. 1). Click on its “Properties,” go to the Advanced tab, and set the desired format for Windows playback.
Aggregating Interfaces
Helix is basically an 8-in, 8-out analog interface (there’s also a S/PDIF output, but you can’t access that from HX Edit). If you need more I/O, with both Mac and Windows, you can aggregate other interfaces. For more information, check out this article: “How to Add More Inputs to Your Audio Interface.”
Helix Global Settings
HX Edit doesn’t expose all of the Helix parameters related to audio interfacing; you’ll need to call up a few of them on the unit itself under the Global Settings. These are the kinds of parameters you don’t need to adjust often, but they are key to setting up the I/O.
There are many ways to set up Helix for different studio and live-performance scenarios, and to cover them all is beyond the scope of this article. So, we’ll cover the main aspects of using Helix as an audio interface for computer applications and the crucial Global Settings.
HX Edit Software
Although you can edit what we’re about to describe in the Helix floor unit, since you’re using it as a computer interface, take advantage of the HX Edit program. The Input and Output blocks are where you set up the I/O. Some of it may seem confusing because the routing is designed to offer creative possibilities as well as utilitarian ones. However, the Multi Input and Multi Output blocks will cover most of your needs. Matters get more complex only when using Helix to go beyond simply getting audio in and out of a computer.
Multi In and Out, USB 1/2 Destination
In page one of the Helix hardware’s Global Settings, assign USB 1/2 as the Multi Destination. Multi in listens to anything that looks like a guitar: Guitar, Aux, and Variax, and there’s a handy Trim control for level. The Multi out is post-Helix processing and plays back through three sets of outputs: XLR, 1/4″, and headphones.
The most important point about the Multi blocks is that they are part of the Helix hardware, so they’re independent of whatever is happening within your computer — it’s like zero-latency monitoring on steroids. Also, your DAW’s tracks all stream through USB 1/2.
Recording with a Mic
The Helix’s main attraction is guitar processing, but you can also record vocals (Helix can do some really tasty vocal processing). Plug the mic into the rear-panel Mic input. Global Settings for Mic include 48V phantom power on/off for condenser mics, Mic In Gain (up to 60dB), and Mic In Low Cut. Adjust all of these as desired.

- Choose Mic for the Helix input block (fig. 2). Choose Multi for the output block, and you’ll hear the mic with zero-latency monitoring — the mic is being mixed in with the DAW’s output stream.
- To monitor the mic with Helix effects (like compression, EQ, reverb, etc. — whatever the vocalist likes), insert the processor(s) between the Mic input and the Multi output.
- To record the processed track in mono, assign a mono DAW track’s input to the appropriate Helix output, which will be listed in your DAW as Helix Input 1 or 2 (because it’s an input to your DAW). Similarly, for stereo effects, assign a DAW’s stereo track input to what’s listed as Inputs 1+2.
- Enable record, and you’ll record the processed mic sound. Conceptually, this resembles Universal Audio’s powered plug-ins, where you can monitor with effects and record the effects with essentially zero latency. Along with USB 1/2, the USB 3/4 and USB 5/6 pairs can also be treated as stereo streams or as two independent mono streams per pair. Therefore, if you insert a stereo processor into Helix, then what you hear can be stereo, even with a mono mic input. Note that the following examples use USB 3/4, but you can substitute USB 5/6 instead — they’re functionally equivalent.
You can also record the dry sound while monitoring with effects at zero latency (fig. 3). That gives the benefits of hearing effects while recording, but you’ll have the dry signal available for subsequent processing. Think of it as re-amping for vocals.

- Set both input blocks to Mic.
- To record the mic signal without any added effects, send the dry Mic path to USB 3/4. This feeds the mono mic signal to both USB 3 and 4, so assign a mono DAW track input that’s recording the mic to the outputs that appear in your DAW as either Input 3 or Input 4 in mono or as Inputs 3+4 for stereo. Do not enable the DAW track’s input monitor.
- To also monitor with effects, set the second path to Mic, insert an effect, and send its output to Multi. You’ll hear the processed sound mixed in with your DAW’s tracks, while the track into which you’re feeding the mic records the dry sound.
Here’s yet another variation. Suppose you want to monitor through plug-in effects inserted in your host’s mixer instead of through the Helix effects. Do this by sending the mic signal directly to a USB bus output and setting the DAW’s track input to this output.
- Similar to fig. 2 above, send the mic to USB 3/4.
- In the DAW track where you want to record the mic, set the input to record the appropriate Helix output. Because the output appears as an input to your DAW, choose Input 3 or 4 for a mono track or Inputs 3+4 for a stereo track.
- Enable the track’s input monitor.
- Set the second Helix path’s input to None.
Now the mic bypasses Helix’s processing altogether and goes directly to the computer. Since you’re monitoring the computer’s output, you’ll hear any effects plug-ins inserted in a track. Of course, now that you’re out of the Helix hardware environment, you’ll hear the usual latency caused by monitoring through a computer.
Recording Guitar
Similar techniques to recording a mic apply to guitar, whether this is a guitar plugged into the input jack or aux input (e.g., for active guitars with “hot” pickups) or a Variax plugged into the Variax input. Select the desired input option with the Input block. As with the mic examples, you can monitor through Helix effects with zero latency while recording the processed or dry sound.
Recording Line-level Instruments
To record a mono or stereo drum machine or synthesizer, the effects loop Return jacks (labeled as Return 1 and 2 on the screen) can also serve as inputs (fig. 4). For stereo instruments, you’ll need to patch into two of the inputs (1 and 2, or 3 and 4 — not to be confused with the similarly numbered USB I/O). Also, under the Global Settings, you can choose whether these are line- or instrument-level inputs (this also sets levels for the associated Send jacks).

Set the input blocks to Return 1 and Return 2 (or 3 and 4). The output blocks go to USB 3/4 or USB 5/6. Unlike mono signals, we don’t have the luxury of being able to record the inputs dry and monitor with effects, although as described above, you can record with effects inserted between the input and output blocks as well as monitor through computer plug-ins.
What happens at your DAW depends upon how it handles input routing. With mono tracks, assign one track’s input to Helix Input 5, the other to Helix Input 6, and pan them oppositely. With a stereo track, assign its input to Helix Inputs 5+6.
By the way, Helix also has 5-pin DIN connectors for MIDI, so it’s a MIDI interface as well as an audio interface. You can plug a keyboard controller into the MIDI in and control virtual instruments with it.
The DI Shortcut
So far, we’ve covered how to take advantage of the Helix hardware to provide zero-latency monitoring, even with processed sounds (which we can also record). However, Helix has a special “shortcut” for recording a DI signal. Inputs 7 and 8 tap off the input signals before they’re processed by Helix, so recording into a stereo DAW track assigned to Inputs 7+8 (or a mono track assigned to input 7 or 8) preserves the dry audio for later re-amping. In the Global Settings for Ins/Outs, you can assign Inputs 7 and 8 independently to guitar, mic, aux, Variax, or Variax magnetic pickups.
This means you can mic a physical amp and record that with or without effects into a track while also recording the dry signal onto another track — or record direct guitar through Helix effects into a track while again recording the dry signal onto another track.
Re-amping with Helix
The easiest way to re-amp tracks recorded dry is to use the Helix Native plug-in. It does exactly what the Helix floor unit does, and you can exchange presets between the floor unit and Helix Native software. Just process the dry track with Helix Native as an insert plug-in — instant re-amping.
But if you don’t have Helix Native, most DAWs can also re-amp though Helix (fig. 5). You’ll need two tracks. Record your dry guitar; or if you recorded the output from USB 7/8 into a track’s input(s), use that for your dry track. Assign the DAW track’s output, or a send from the track, to USB 3/4 or (USB 5/6). Assign a Helix input block to USB 3/4 or (USB 5/6). Now the Helix input is listening to the dry track, and you can insert Helix effects blocks to process the sound. Assign the Helix output block to USB 1/2.

Because the processed Helix sound feeds USB 1/2, you’ll hear the processed output in your headphones or monitor speakers. After you get the sound you want, add another track in your DAW, and set its input to Inputs 1+2. Record-enable the track, start recording, and you’ll record the processed Helix sound.
The Bottom Line
Ask most guitar players to describe Helix, and they’d probably say it’s a really cool multi-effects box. And that’s true. But now, you know it’s also an audio interface because the same effects used for guitar can apply to voice, keyboards, and more. You can even monitor through effects with zero latency, and what’s more, re-amping is a given.
Sure, you can’t set up four mics and record a drum set through your Helix… but for solo and duo artists, if you have a Helix, you probably don’t need a separate audio interface.