
This is a “necessity is the mother of invention” technique. While recording a female classical guitarist, it was difficult to obtain a good sound with stereo miking. Aside from the phase shifts, her quiet playing required turning the gain way up on two mic preamps. This doubled the hiss.
A single, high-quality condenser mic solved the phase issues and sounded great. However, the lack of a stereo image was a problem. Electronic ambience or image enhancement plug-ins sounded artificial. They also created a less intimate feel. This went against her goal of wanting to sound like she was playing a few feet away from you in her living room. What to do?
The Overview
When you sit in front of an acoustic guitar player, the body’s “boom” comes more from the left, and the finger squeaks and fretting noises come more from the right. The center is the body of the guitar sound. So, this solution splits the mic to three buses, each of which covers its own frequency band:
- Panning the low frequencies more to the left localizes the sound of the body’s boom.
- Panning the high frequencies more to the right localizes the sounds of the fretting and finger squeaks.
- Panning the range between the low and high frequencies to center provides most of the guitar sound.
Low-cut and high-cut filtering separate the frequencies into bands. However, these need to be linear-phase EQs to avoid phase issues when combining the three bands in parallel. Cubase Pro’s Frequency 2 EQ is ideal for this application because it can enable linear phase operation selectively for each of its bands. (If you’re not using Cubase, then other linear-phase EQs, such as FabFilter’s Pro-Q 3, can do the job.)
Editing the filter slopes and frequencies, and the levels and panning of the bands, offers flexible “virtual miking.”
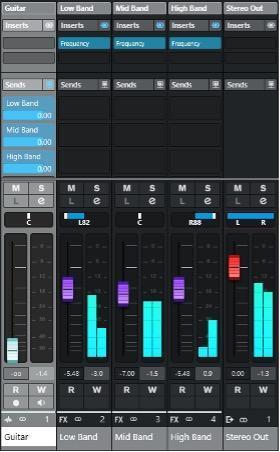
MixConsole Layout
Fig. 1 below shows the MixConsole layout. The guitar track has three pre-fader sends to the FX channels. Each FX channel incorporates a Frequency 2 EQ.
Filter Settings
Fig. 2 shows the filter settings. All slopes are 6dB/octave.
- The mid band has a low-cut filter at 200Hz and a high-cut filter at 2kHz.
- The low band has a high-cut filter at 200Hz (same frequency as the mid band’s low-cut filter).
- The high band has a low-cut filter at 2kHz (same frequency as the mid band’s high-cut filter).
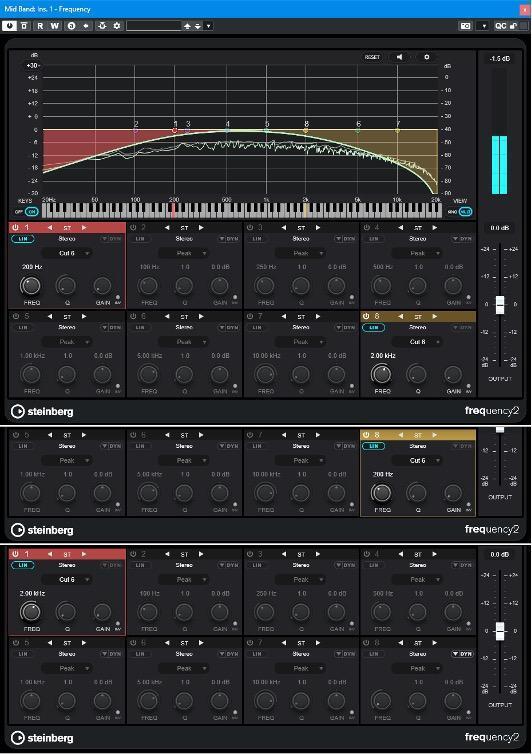
If you change a frequency in one filter, then make sure its related frequency is changed in the other filter. For example, if you change the high band’s low-cut frequency to 2.5kHz, then the mid band’s high-cut frequency also needs to change to 2.5kHz. Doing so produces the flattest response if you need to collapse the output to mono.
Different slopes produce different effects. A 6dB/octave slope sounds the most natural due to overlap among the three bands. Because the EQs are linear phase, there are no phase conflicts with the overlapping frequencies.
Increasing the slope causes a wider and more separated sound. Although not as realistic as 6dB/octave slopes, in a context such as a background strummed acoustic part, the extra separation adds width.
Levels and Panning
The interplay between the level and panning controls offers a huge amount of flexibility. Settings can range from conservative enhancement to dramatic stereo separation. Here are additional tips:
- Pan the low band a little more toward the center for a better blend with the main guitar sound. This also avoids a “left-heavy” sound.
- Pan the high band full right for the maximum stereo effect or slightly toward center for a more natural sound.
- Keep the mid band panned to center unless you want to weight the image more toward one side of the stereo field. For example, with two layered acoustic guitars, you might weight one more toward the left and the other more toward the right.
- The mid band level determines whether the sound is mono or separated. This is probably the most critical setting.
- To brighten the sound, increase the high band’s level a bit.
- Using the Combined Panner for the output channel makes it easy to do mono vs. stereo reality checks.
- This technique is ideal for experimentation. Try different filter slopes, overlapping filter ranges, and nonoverlapping filter ranges. Optimize your choices based on the audio source material.
- Editing the equalization alters the imaging. This is a different way of looking at EQ because it not only alters frequency response but also affects spectral distribution in the stereo field.
- Try adding reverb to only the mid band. This keeps the low band from getting muddy, and the high band normally loses highs in a room anyway, so there’s less reverb on the high frequencies. Stereo reverb increases the spread.
The audio example is subtle because it’s optimized for a natural sound. The effect is most obvious on headphones.
The first part uses the stereoization technique. The second part is the original mono sound. Note that when you collapse the first part to mono, the tone will be essentially identical to the mono version.