
Because so many groove/beats-oriented musicians are into Ableton Live, it’s often assumed the program is only for them. But Live is also a unique application for any kind of songwriting — rock, country, whatever. (Note: For info on Live’s basics, please see The 5-minute Ableton Live Crash Course.
By songwriting, I don’t necessarily mean “recording in the studio” but coming up with a song quickly, before the inspiration fades. Although some of the parts you record while writing the song may end up being keepers, you might replace them with something more polished later on — either in Live itself, or using a different program.
Three Main Songwriting Attributes of Ableton Live
- Live has two different views. Session View is where you work with loops, while Arrangement View is like a traditional linear DAW. The views are integrated — you can experiment in Session View while recording the results in Arrangement View for later editing, or record (for example) fooling around on guitar in Arrangement View, and then export inspired sections as loops to experiment with in Session View. This makes for a very flexible creative workflow.
- Live can be a ReWire client to a ReWire-compatible host program. If your main DAW isn’t Live, you can still start songwriting in Live, and then ReWire it into your host of choice (or export files from Live and then import them into your host).
- Ableton Live Intro is very affordable, so it’s not an expensive songwriting partner to complement a different DAW. Its main limitations compared with the higher versions are 16 tracks and 8 scenes, less content, and fewer plug-ins, but it’s fine for songwriting. Also, some products from Focusrite, Akai Professional, Novation, and other companies bundle a “lite” version of Ableton Live; and you can download a 30-day free trial of the full version to experiment with the program.
There are as many ways to write a song as there are songwriters. However, I don’t think my usual approach differs much from the norm — start with a concept or title for the “story,” come up with a cool chord progression or beat as a sort of backing track to start the arrangement, and then play it over and over while trying out different vocals to come up with lyrics and a melody line.
Starting the Song
For the concept or title, you’re on your own! Where Live shines is assembling a backing track quickly using the Session View. After giving the song a direction, you can switch over to Arrangement View and concentrate on vocals.
The quickest route to creating a functional track is using existing loops. In addition to Live’s included content, several companies make genre-specific construction kits with loops for multiple instruments that work together. However, you’ll usually want to avoid using a single construction kit, because it establishes a song’s direction. It’s better to mix and match various loops; Live makes it easy to transpose loops to different keys, change tempo, and isolate parts of a loop. For example, if a rhythm guitar loop plays a chord progression, you can isolate just one of the chords and repeat it, then copy and transpose it to create your own chord progression.
Open Live’s Browser, and audition loops to see which ones work well together. After finding some good combinations, place them in the same row so you can trigger them as a Scene. Build a collection of scenes that work well, and then trigger different Scenes to try out various Scene orders within the song. Note that you can also duplicate a Scene and transpose its loops to create a chord change with the same basic instrumentation.
Suppose you try various loops in Session View and eventually find a drum, pad, and bass loop that work well for a basic, 8-bar verse. You want them to play through for four bars, then drop two semitones for two bars, then return for the last two bars.
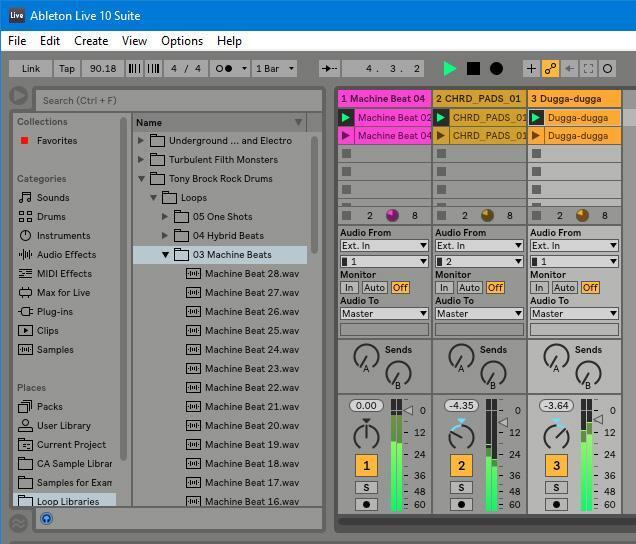
Create one scene with the original loops and another with the melodic loops transposed down two semitones (fig. 1). This is a very basic example; you could sketch out the entire song if you wanted, but let’s keep things simple for now.
Click the first Scene to verify it has the clips you want, then double-click on Stop to return to the beginning. Click record, and trigger the Scenes as needed to create the backing tracks for your verse. Stop sometime after the eight bars have played.
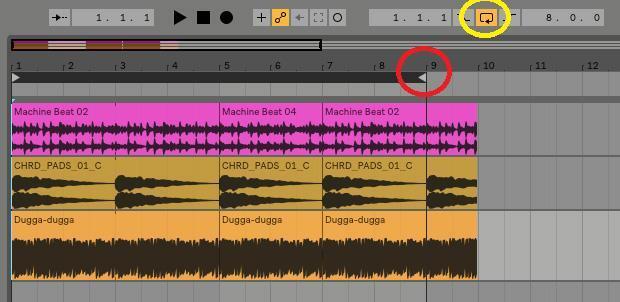
Now go into the Arrangement View, and hit F10 — there’s your 8-bar verse (fig. 2). Set the Loop End at the start of the ninth measure, and turn on the Loop Switch.
Now let’s try out different vocals on the verse. Create an audio track, set input and levels, record enable the track, and start recording. It will appear that you’re overwriting the vocal with each pass of the loop, but you’re not — each take is being added to the end of the previous take. Record as many takes as you want.
Once you’ve stopped, you’ll see all your takes as one long, linear sample in the Sample Editor. Turn on Loop, and now as you move the Sample Editor Loop Brace, you can hear the different takes (fig. 3).

But here’s the really cool part: slide the Loop Brace from left to right as you look at the audio track in Arrangement View, and you’ll see that the Loop Brace provides a moveable window on the takes. It can just as easily select a complete take, or pick up the end from one take and the beginning of another; regardless of where you place the Loop Brace, what it selects will play back in the correct place within the arrangement. For example, if you like the end of the second take but the beginning of the third one, and move the Loop Brace to incorporate those sections, the beginning of the third take will play back followed by the end of the second take. It’s somewhat difficult to explain, but as you move the Loop Brace, you’ll hear and see what I’m talking about. It’s like an express version of comping, but not as detailed — after all, you’re writing a song, not perfecting a vocal.
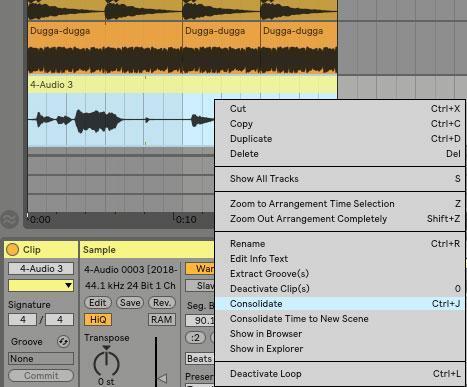
Once you’ve chosen the take you like, right-click on the audio track and choose Consolidate (fig. 4). This retains what you selected and discards the rest.
Consolidation normalizes the track, then automatically drops the level to return the peak level to where it was. To normalize the track, move the Sample Editor Volume slider back up to 0.00 (fig 5).

Compare the waveform in figure 5 with the one in figure 4, and you’ll see the level change due to normalization.
Next Steps
If Live is your main DAW, you know what to do from here. Proceed in the Arrangement View, and/or switch back and forth between Session View and Arrangement View, to work on more pieces of the song — whatever is more comfortable.
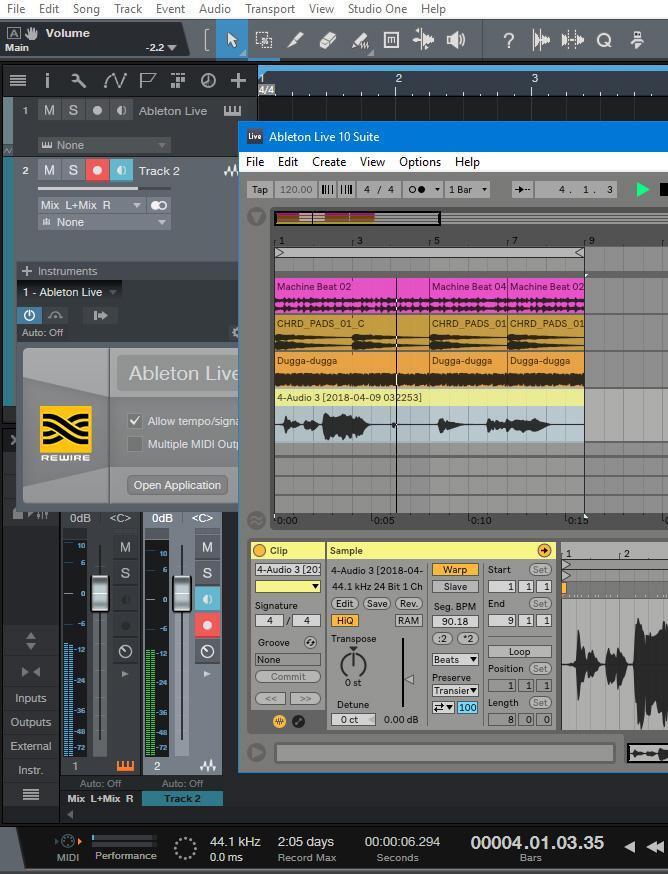
If you’re more familiar with a different program and are using Live for its songwriting sketchpad talents, you can export the backing track, import it into another program, and carry on. Or open a ReWire-compatible host, ReWire Live into it, and record your backing track and vocal into the host program (fig. 6).
Now you can create additional song sections in Live, and record them into your host program as you progress — you’re basically using Live as a creative scratchpad, and the host to assemble the various pieces.
I hope this helps you understand the power of using Ableton Live as a composition aid. Now go write that hit song!