If the world of Eurorack modular synthesis seems mysterious to you, that may be due to how open-ended the possibilities really are. To help set the stage, here are just a few things you can do with Eurorack:
- Design your own dream synthesizer with as much functionality as you wish
- Re-create the architecture of iconic but hard to find synths
- Create a custom multi-effects processing center
- Use as an educational playground to learn more about various synthesis methods
The Eurorack format is an open specification of electronic and mechanical details codified by Dieter Doepfer in the early ’90s. This means any manufacturer following the Eurorack specification can make modules, giving you an amazing range to choose from as you’re creating your Eurorack system. Different components of synthesizers, sound effects, and other processors are parceled out into application-specific modules like oscillators, filters, envelope generators, voltage controlled amplifiers, LFOs and even spring reverbs, ring modulators, bucket brigade delays, and myriads of other elements.
The Doepfer A-100 rack system conforms to the 19″ standard where each section is 3U high, and you’ll find the vast majority of Eurorack cases are built to this standard. Module front panels are all 3U high. Width is measured in HP (horizontal pitch) where 1HP = 5.08mm. A 19″ rack has a usable width of 84HP. The smallest modules are 2HP, which is just barely wider than the jack holes. Modules are connected to one another via tip-sleeve (TS) 3.5mm patch cables. These modules are manipulated with control voltage (CV) and gate/trigger signals generated by other modules, or by external controllers like keyboards. Control voltage usually ranges +/-5V, 0–5V, or 0–10V.
The important things to know are that Eurorack modules are created to a standard, are designed to play well with each other, and encourage you to explore all the different ways you can combine them with other modules. Half the fun of Eurorack is choosing which modules you use, and the other half is discovering all the ways you can patch them together — more on that later.
The Fun Stuff — Designing Your Eurorack Rig
It’s important to consider what the intention of this system is. A bank of analog and digital effects that will live as a sidecar to a mix console will be laid out differently than a customized synthesizer instrument or even an algorithmic or generative sound module. Regardless of the focus, it’s important to spend some time contemplating key modules and how those will interface with other more utilitarian modules in the system. Do you want lots of oscillators for polyphonic options? A complex sequencer than can manipulate many modules simultaneously? The ability to split many signals for parallel processing? Finding a starting point is arguably the most fun and the easiest part of the whole process.
Once your wish list of key modules is set, it’s good to look at how big the modules are, and that width will be listed in HP. Add up all the HP, and it will give you a good idea how big your case should be. Make sure to leave room in the case for more modules than you need! There are utility and interfacing modules that you’ll need for technical reasons, so leave yourself lots of space to grow. It may feel extravagant or unnecessary to get a larger case, but you’ll probably kick yourself if you have to invest in another case because you’re just a few HP shy of that last module.
Case, rails, bus boards, power supply
Eurorack cases include a frame or chassis that houses the components, rails for mounting modules, and bus boards that modules connect to for power. Some cases have their power supply built in and others have external power supplies. For the explorer building his Eurorack case from scratch, all these components are also available individually.

External Power Supply

Power Input Module

Flying Bus Boards


The electrical components consist of the bus boards and power supply. Bus boards contain 16-pin headers that your Eurorack modules connect to. Left to right, the pins are tied together, and looking at the header will reveal that the first five (or 10) pins are (bottom to top) -12V, three grounds, and +12V. These are the minimum requirements to power modules. The other three (or six) pins are +5V, CV, and Gate. The power supplies may be internal. In the Doepfer Low Cost series, the PSU3 is an internal, switching power supply.

The connection of modules to the bus board is with a ribbon cable with 10 or 16 pins. Both sides of the ribbon cable have a female connector. The bus board side always has a 16-pin connector even if the ribbon cable is a 10-conductor cable. The module side of the ribbon connector may use a 10- or 16-pin connector. One of the wires is colored, usually red, and indicates the -12V leg and is to always be oriented toward the bottom of the bus board, which is silk-screened to indicate -12V. The Doepfer bus boards are not keyed or shrouded, so there is the opportunity to incorrectly connect the ribbon cable. Careful attention is required — red stripe down! Some manufacturers like Pittsburgh Modular have a keyed or shrouded header that virtually eliminates an opportunity for error.
Always power off the system before exchanging modules or unplugging anything inside the case. When installing modules, it’s best to plug all the ribbon cables into the bus boards before you start turning screws — do that last to leave yourself more room to work. Otherwise, your hand gets caught in the proverbial cookie jar trying to plug in the last ribbon connector through a small space.
While we’re talking power supplies, how do you know if yours is big enough? Is bigger always better? Manufacturers detail how much power each module draws on the +/-12V and even the 5V draw — pay attention to these as you’re designing your Eurorack rig. Add these up, and make sure the three numbers are all well below the power supply’s stated rating. Lots of modular users find that Modulargrid.net is awesome for this.
Power Supplies: Linear vs. Switching
Generally speaking, linear supplies are quieter in terms of audio noise and use fewer parts, while switching power supplies can cause EMI and aliasing, even though it’s in the megahertz range. Practically, switching power supplies are commonly used because of their lower cost, higher wattage, and comparative immunity to sag. The potential noise issues are mostly minimized and of only small concern. Some audiophiles will spec out linear power supplies, multiple internal supplies, or even substantial external ones to maximize fidelity. They may have their oscillators and filters, their audio path, grouped together on one power supply, while clocking modules would be on a completely separate power supply, and digital modules or 5V-heavy modules on their own supply. It’s power isolation at its finest!
Gates and Triggers
Gates and triggers are very similar — they both basically send signal to make something happen. They can be used interchangeably in many instances, i.e., clock, tempo, or causing envelopes to start. A gate or trigger signal is either in a high or low state, on or off. The main difference is that triggers’ high states are measured in durations of a few milliseconds (3ms–15ms) where a gate’s high state is indefinite — depending on how long a key is pressed, for example. A trigger, on the other hand, may be started with a key press, but only has a transient signal — a quick burst.
Gates and triggers are used to control things like envelopes, clocks and clock dividers, and sequencers (diagram two). It’s likely you’ll be using them in almost every patch you make. Clocks usually use the repetition of the leading edge of each positive rise in voltage to determine the tempo. Envelopes’ attack and release stages respond the same with gates and triggers. The leading edge begins the attack stage, and the falling edge begins the release stage. The gate adds a sustained component that is missing from a trigger.
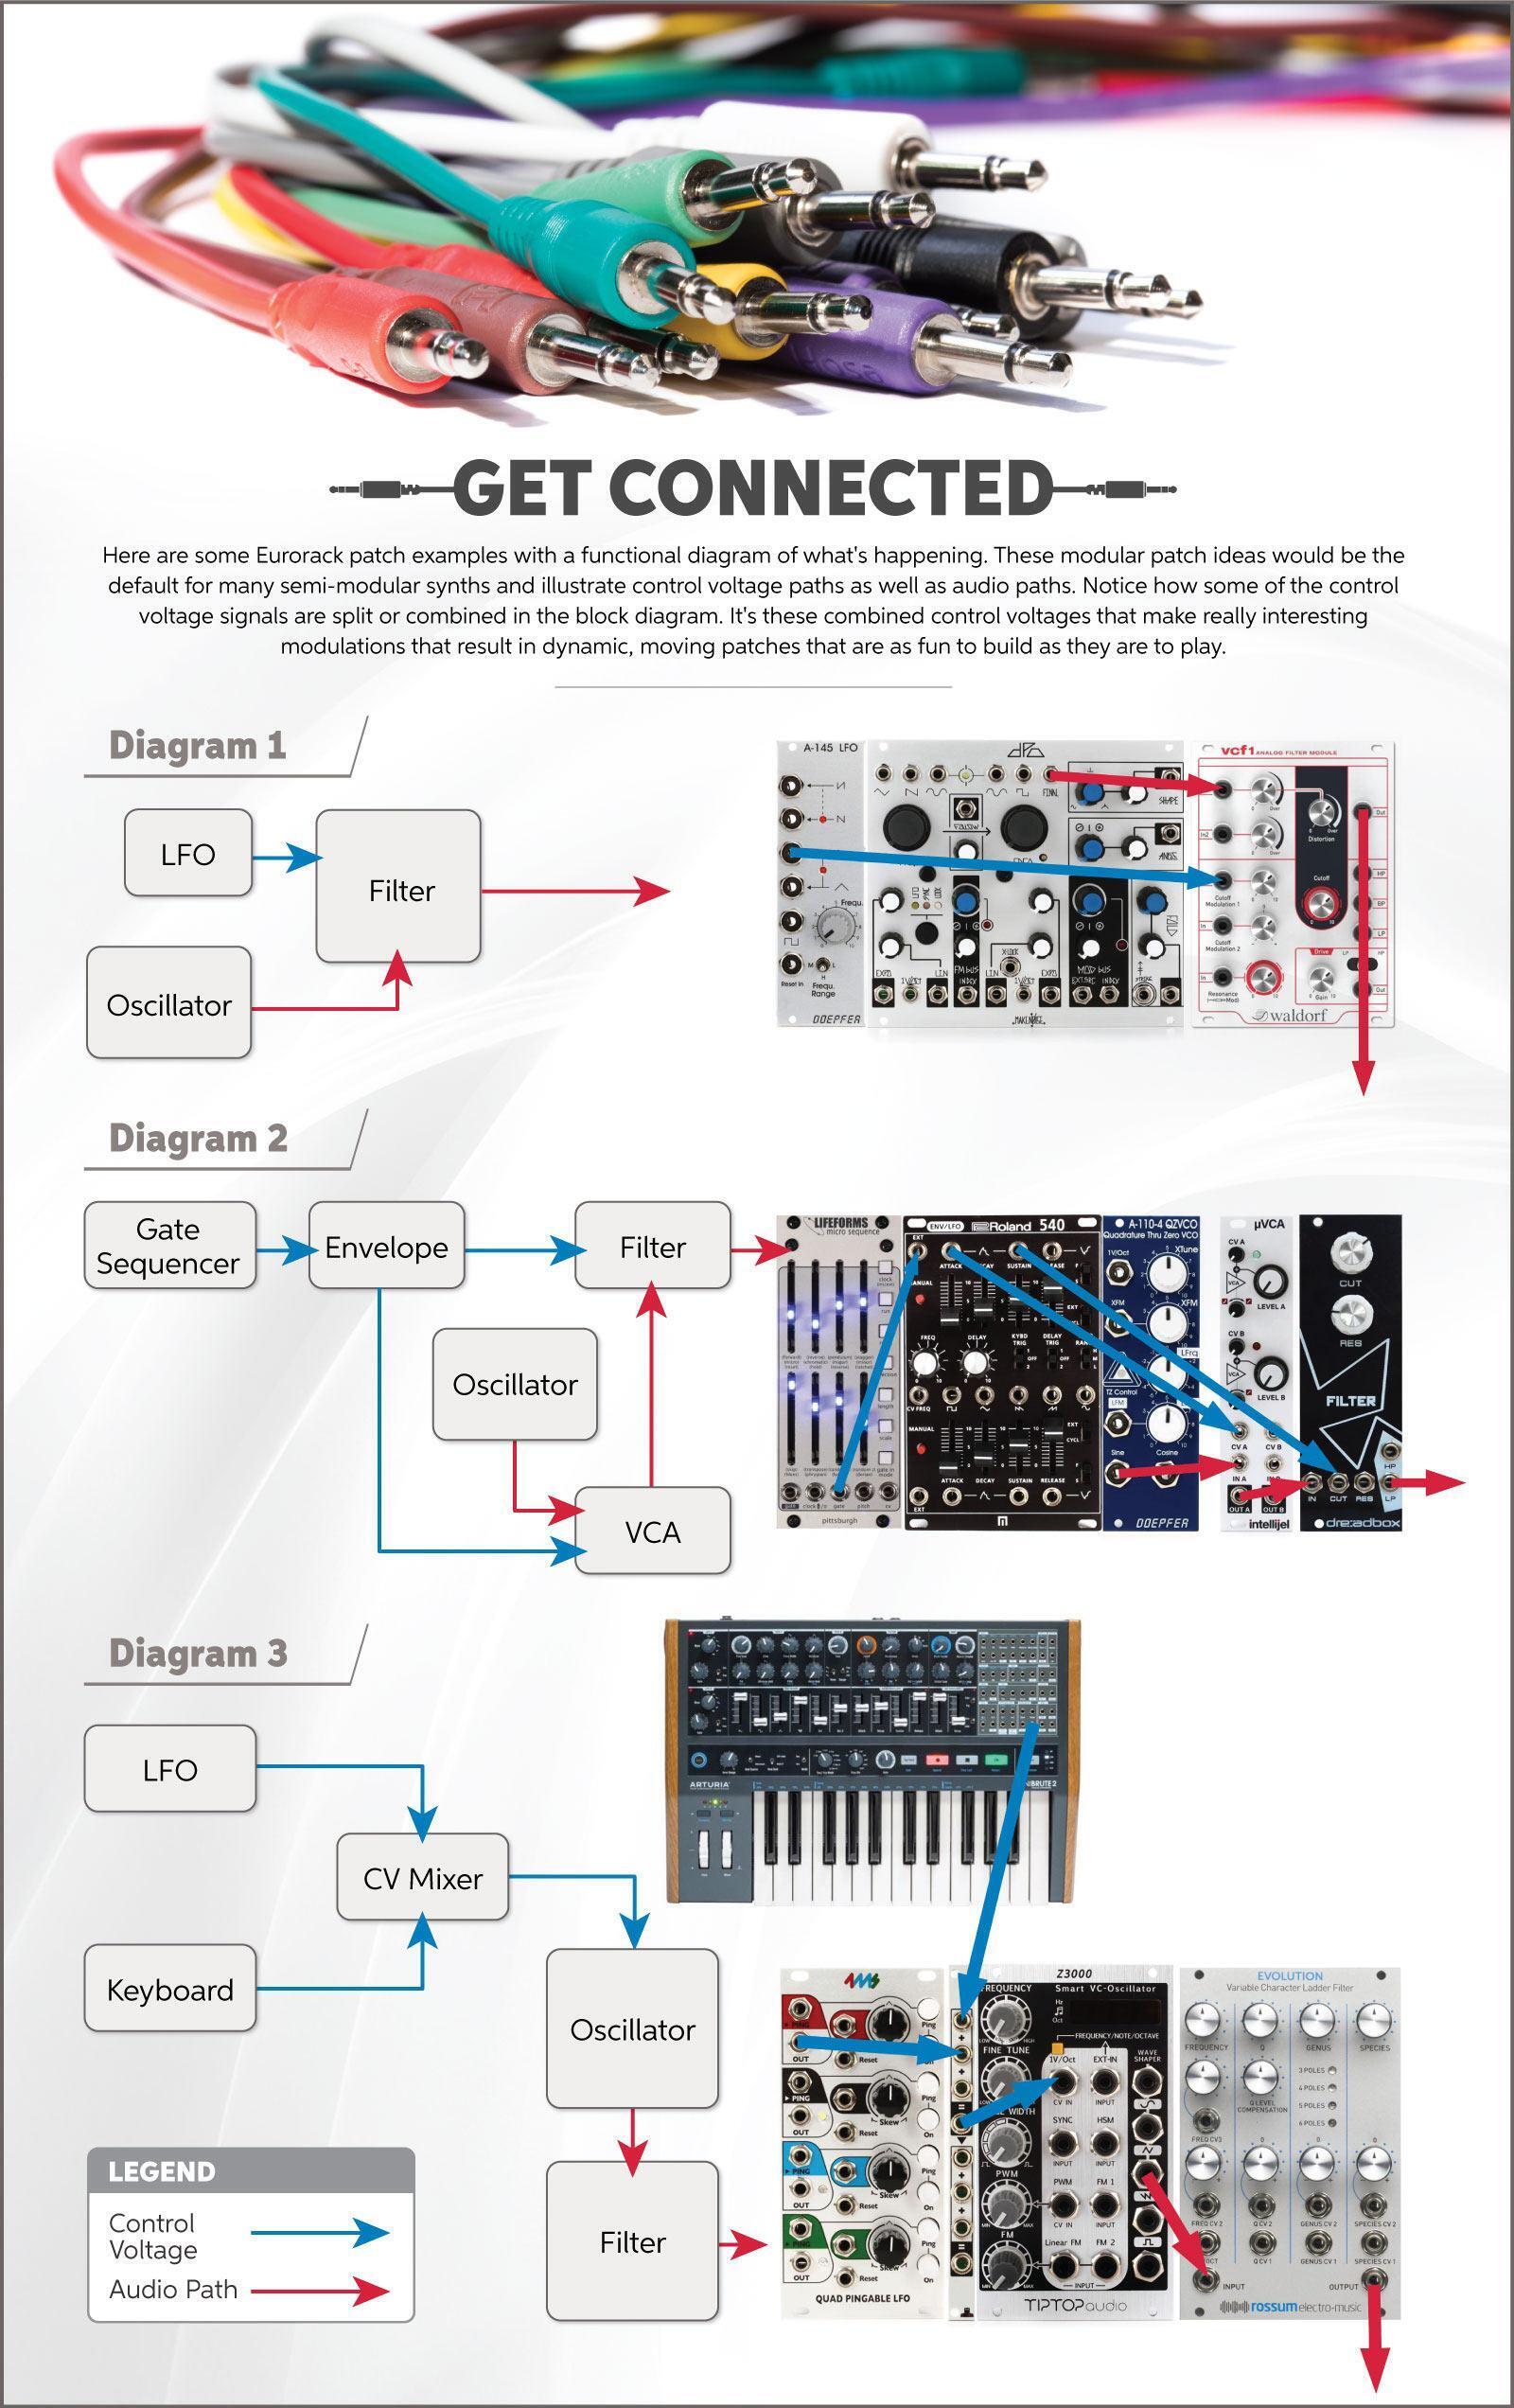
Control Voltage (CV)
Eurorack modules such as envelopes, LFOs, and MIDI to CV/Gate converters generate control voltage signals used to manipulate other modules (diagram one). An LFO might control a filter’s cutoff or an oscillator’s pitch (diagram 3). They may change other modulators, like using an envelope to change an LFO rate over time. Exploring creative ways to patch CV throughout your Eurorack rig is key when it comes to creating interesting Eurorack patches that are sonically intriguing.
So What About the Modules?
The possibilities are endless with Eurorack, and there is almost no wrong way to get started. Below are some links to popular modules and Eurorack components. While some are very focused on doing one specific thing well, others pack so many features they’re like a synthesizer in their own right, but they can all be patched together to create something greater than the sum of their parts.