
So you just upgraded your studio with a shiny new Universal Audio Apollo interface, and it’s time to get rolling on your first recording session. But what’s the best way to set up headphone cue mixes for the players and singers? Let’s step through how an Apollo can make your headphone (also known as “cue”) mix life much easier.
Two things to note: first, the beauty of the Apollo family is that they have built-in DSP processing power for running mixes and for handling low-latency monitoring. This takes a tremendous load off of your host computer and makes an Apollo a great solution for any studio situation.
Second, recording sessions fall into three basic categories: tracking, single overdubs, and multiple players doing overdubs at the same time. Each of these situations has slightly different requirements, and we’ll look at how to handle each one individually.
How Many Mixes?
Although a rackmount Apollo defaults to two headphone mixes, it can actually drive four independent stereo mixes at the same time. (Technically, it can do five total stereo mixes counting the monitor mix.) To change the number of cue/headphone mixes, go into Settings for Console, which is under the Hardware tab, and increase the Cue Bus Count.

A rack Apollo has two independent headphone output jacks on the front panel. If you’ve set things up for additional cue mixes, then you could feed them to stereo line outputs on the interface’s back panel and into an external headphone amplifier. To route where the cue mixes go, click on the Cue Outputs button on the far right of the Console application. A pop-up window will allow you to choose where each of the cue sends is routed.

If you have more than one Apollo, the system sees all the Apollo units hooked up as one large system. So in the example above, we see the HP1 and HP2 outs on the rackmount Apollo providing the output for Cue 1 and Cue 2. The Apollo Twin that is also connected is supplying its headphone output for Cue 3. The Cue 4 output is going to line-outs 7 and 8 on the rackmount Apollo, and into an external headphone amplifier. You could send all the Cues to the line-outs if you prefer, or choose to route in other ways. This gives you lots of flexibility for how you set your headphone mixes up.
Tracking
For most tracking sessions, you’re generally not playing along with previously recorded tracks (aside from maybe a click or a guide track), so it’s easiest to do all your low-latency cue mixing within the Console application that comes with your Apollo, rather than dealing with latency (delay) issues inside your DAW software and loading down your computer.
Setting Up Mixes
In the Console software overview tab, you’ll see six small faders on each channel strip, above the main channel fader.
If you click on the small fader box, it will break out a larger fader panel. For a view that is easy to see and use, click the fourth tab (labeled Sends) in the upper left-hand corner of the Console app, where you’ll see a second mixer above the channel faders. By selecting one of the four cues in the Show section just below it, you can create up to four separate stereo headphone mixes — and of course you have a fifth mix on the main monitor bus, using the channel faders. A great starting point here is to right-click on the main channel fader, which will give you a pop-up menu that allows you to instantly copy your entire main fader mix to any of the sends.
Remember that nine times out of ten, musicians and vocalists want to hear themselves loudest in the mix. (They don’t call them “more me” mixers for nothing!) To accommodate this, you may want to start with the faders pulled down 6dB or more so you have somewhere to go to give them more level.
Comfort Reverb
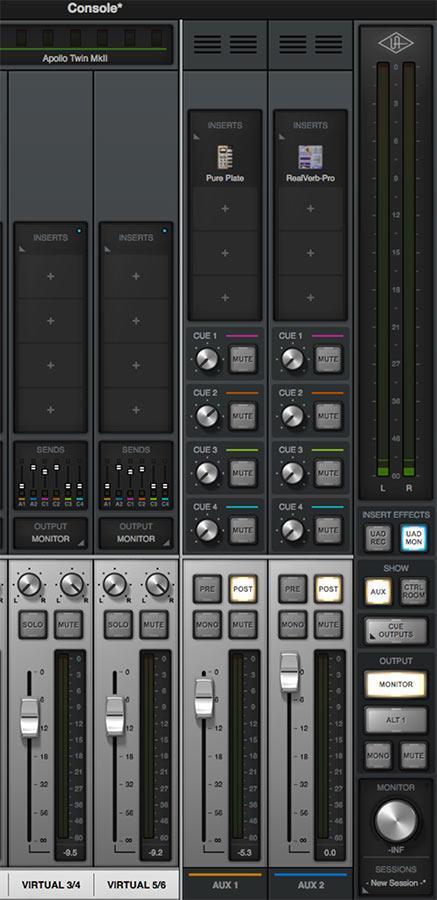 Many times, players and vocalists ask for “comfort reverb” to make the recording experience easier. Even after you set up cue mixes, an Apollo still has two internal aux sends available within the Console that you can use for reverb, delay, or other effects. In the Show section just below the main output meters in the Console, push the Aux button, and you’ll see two faders with inserts are available. Use these inserts to load a reverb or other “comfort” UAD plug-in. You might, for example, set up a small room reverb on one Aux to give the musicians the feel that they are all playing together, and then add a longer reverb or a delay for the singer. The Cue knobs below the plug-ins on the Aux strips allow you to send as much of each effect to the different cue mixes as you desire.
One thing to keep in mind: within the Console, you can choose whether effects are being recorded or if they’re just being monitored without recording them. If you record the effects, you can’t change them later or remove them, so be sure you choose which way you want to work before you begin. You set this using the UAD MON button under the main meters. Select this button to hear the effects without recording them. De-select this button if you do want to record the effects along with your tracks.
Overdubs
 To overdub using your Apollo cue mixes, we need to use one more Console feature: virtual inputs. This is where the magic begins to happen. Virtual input channels allow you to bring signals into the Console from other apps that are running on your computer, such as previously recorded tracks in your DAW or the output of a virtual instrument. You could even bring in the output from iTunes or Spotify if you want to compare your mixes to a reference track. If you’re using a click track in your DAW, it can also be fed into a virtual input in the Console.
A rackmount Apollo supports up to eight virtual inputs, while an Apollo Twin supports four. If you have multiple Apollos in a system, all of their virtual inputs will be available. So a rack Apollo and an Apollo Twin would give you a total of 12 virtual inputs.
For a single overdub, begin by routing the stereo output of your DAW to a pair of virtual inputs on the Apollo Console. Whatever mix you have set up in your DAW then shows up on that virtual input fader, so you can balance your overdub input level and the backing track from the DAW using their respective faders in the Console app. Since these inputs also feed the Cue mixes, you can do this balancing on the main faders as well as on any of the cue mixes.

Overdubs with Multiple Headphone Mixes
Managing multiple headphone mixes while overdubbing is best handled by a combination of mixing within your DAW and routing those mixes with the Apollo software’s virtual inputs. There are two methods, each of which has advantages.
The first approach starts with creating a send on each channel in your DAW software and routing its output to a virtual input in the Console software. This allows you to build up to four stereo mixes that can be routed to multiple musicians just like in the tracking section above. Each of the players can have a completely independent mix of the tracks, built in the DAW, and then set the overall level of their own signal’s balance within the Console app. This approach gives you maximum flexibility but does require that you switch back and forth between the Console and your DAW to access all the mix balances.
A second approach would be to create sub-mixes of signals within your DAW and route those to the virtual inputs of the Console app. A stereo submix of drums, a mono bass, a mono guitar, stereo keys, and mono lead vocal and mono background vocals would exactly fill up eight virtual inputs and allow all the musicians to balance signals as they please in their headphone mixes. The limitation to this approach is that everyone gets the same submix. So the bass player can only get the same drum mix as everyone else; if he wants more kick drum, he will have to discuss it with the drummer to find an agreeable compromise. Of course, if you have more than one Apollo, this increases your total virtual inputs, making this approach much more flexible.
Templates
The UA Console allows you to save the configuration of the mixer(s) as files that can be instantly loaded for later sessions. This makes getting to work much easier and faster. You could also set up templates in your DAW that already have whatever routing you want for the virtual inputs and/or submixes built in so that you don’t have to re-create all these settings from scratch every time you want to track or overdub.
Cue It Up
The Universal Audio family of Apollo audio interfaces gives you tremendous power for tracking and overdubbing in your recording sessions. With the Console, you have plenty of flexibility and routing capability for any situation you might encounter — and you can expand on this by simply adding another Apollo to your rig. The result is that you can quickly create great-sounding, low-latency headphone mixes with or without UAD effects for your sessions, making it a breeze to lay down your music.
If you have any questions about Universal Audio Apollo products, don’t hesitate to reach out to your Sweetwater Sales Engineer at (800) 222-4700.