Who doesn’t want more cool tips about anything, let alone Ableton Live? Although these tips apply to Live 10, they also work with previous versions — so while you’re waiting to update, they’ll help hold you over.
Free Wireless Remote Control
While not as fancy as dedicated products, the TeamViewer remote desktop control app is free for noncommercial use and works with pretty much any mobile device.
Go to Teamviewer.com, download the computer app, and then go to the App Store or Google Play to download the mobile app. Open TeamViewer on your computer to show a partner code and password. Open TeamViewer on your mobile device, enter the partner code and password, and you’ll see the computer screen on your tablet or smartphone — yes, even with a cheap Android (fig. 1).

This isn’t a full-function touchscreen; instead, you’ll see a cursor that you move to the parameter you want to control, and then tap. For example, with transport control, move the cursor over the Play button and tap. Faders are a little clunkier. Move the cursor to the fader, tap, then move the cursor where you want the fader to end up and tap — the fader will jump to that position.
If the main reason you need a wireless remote is to adjust levels while recording in a vocal booth, control the transport, or trigger scenes, then you really don’t need much else. And did I mention it’s free?
Keep Your Windows Awake
When you’re doing a live performance, you don’t want your Windows computer to go to sleep. So choose Settings > System > Power & Sleep, then select Never from the drop-down menus for Screen and Sleep. But we’re not done yet — if you use a USB interface, you don’t want its ports turning off either.
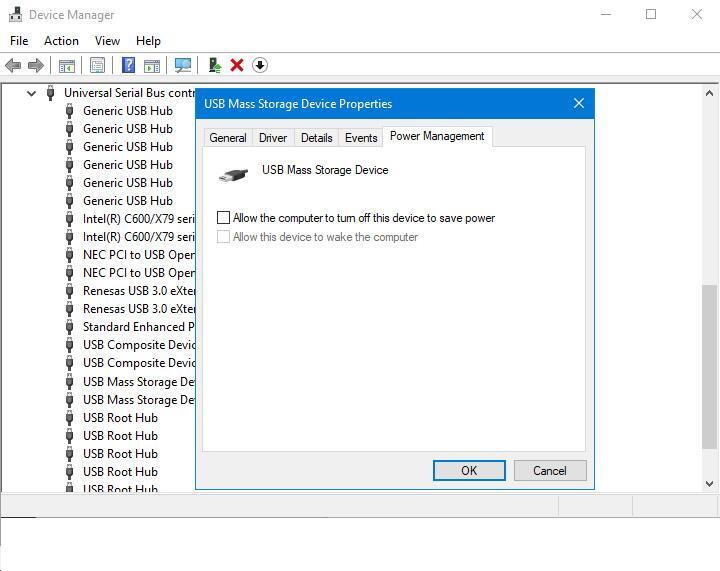
Type Device Manager in the search box, then open the Device Manager. Unfold the Universal Serial Bus Controllers category, then right-click on each entry and select Properties (fig. 2). If there’s a Power Management tab, uncheck “Allow the computer to turn off this device to save power.” It’s a little tedious to turn off power management for your USB ports, but you only need to do this once.
Run Your Projects from a USB Stick
It’s an age-old dilemma: “Do I put my clips in RAM and use up my laptop’s system RAM, or do I stream a zillion loops from my poor 5400 rpm laptop hard drive?” The solution is to store your Live projects on USB memory sticks, because you can fool Live into thinking they’re streaming from disk, but they have the advantages of being stored in RAM. Forget seek times, a hard disk’s mechanical limitations, or wearing out your SSD — here’s how to convert your project to one that works with USB RAM sticks.
- Plug your USB memory stick into your computer’s USB port.
- Call up the Live project you want to save on your RAM stick.
- Select Save Live Set As, navigate to your USB memory stick, then select Save.
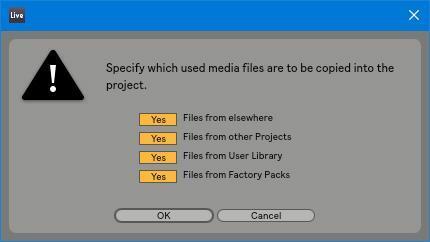
- Choose File > Collect All and Save. When you’re asked to specify which media files are to be copied to the project, say Yes to all of them, then click OK (fig. 3). If you’re using many instruments with multi-samples, this can require a lot of memory. But if you’re mostly using audio loops, the average project will fit comfortably in a couple hundred megabytes.
- In Live, open the just-saved .ALS project file from the project folder on the USB RAM stick.
- Select all audio clips by drawing a rectangle around them or typing Ctrl-A.
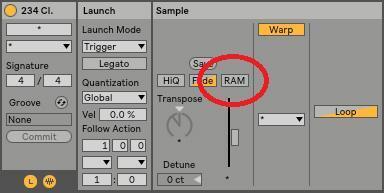
- Select Live’s Clip View, and under Sample, uncheck RAM (fig. 4). This converts all the audio clips to disk clips that stream from your USB stick.
- Choose File > Save Live Set to re-save the project.
Now when you play your Live project, all your clips will play out of the USB stick’s RAM, and your laptop’s hard disk and RAM can take a vacation.
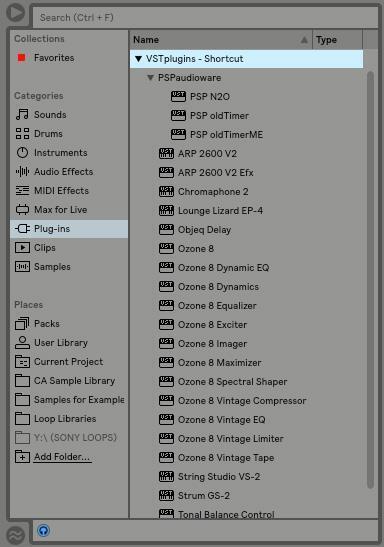
Add VST Plug-in Folders
Live allows one custom VST plug-in folder, but if you’re like me, you probably have several folders for VST plug-ins where plug-ins have been installed over the years. No problem: create shortcuts for them, and drop the shortcuts into Ableton’s VST plug-in folder. You can have as many shortcuts as you want and nest folders within the VST folders (fig. 5).
Comping
Maybe Live doesn’t do comping the way you’d expect — but it does do comping. Loop record a section in the Arrangement view, and it will appear that only the looped section contains audio. But drag that clip into Clip View, and you’ll see all the takes laid out, end to end. Move the loop brackets to audition different sections.

Once you’ve committed to a take (fig. 6), right-click on it and then choose Crop Clip to get rid of the unwanted takes.
Multiband Processing
Live makes 3-band multiband processing easy. Drag a blank Audio Effect Rack into a track, and let’s get started.
- Insert the Multiband Dynamics processor. We want it to serve as a crossover, not a compressor, so click on the A button and, while holding Shift, click and drag one of the Above blocks all the way to the right so all Above thresholds are at 0, with a ratio of 1:1.00. Similarly, click and drag the Below blocks so the Below thresholds are at -80dB.
- With the source audio playing, solo each of the bands and adjust the Split Freq parameter for the best spectral distribution among the highs, mids, and lows. Solo the High band.
- Right-click on the Chain’s label and select Duplicate. In the new Chain’s multiband, solo the Mid band.
- Right-click on either Chain’s label and select Duplicate. In the new Chain’s multiband, solo the Low band (fig. 7).
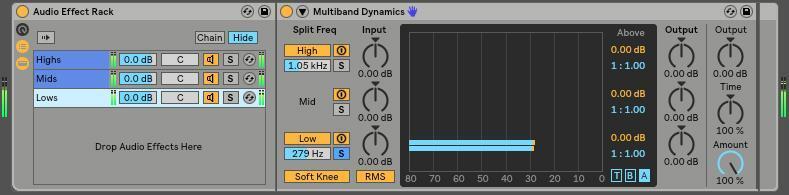
Now you can go nuts and do things like add reverb to only the highs, add delay to only the mids, create macros, or my personal favorite, place an amp sim after each band so each amp needs to handle only a narrow range of frequencies, thus reducing intermodulation distortion and giving a more focused sound.
Metronome Makeover
You don’t have to put up with that generic metronome sound — use any metronome sound you want, because they’re just standard audio files. But Ableton doesn’t make them easy to find. For Windows, go to C:ProgramDataAbletonLive 10 SuiteResourcesMiscMetronomeSamples (on the Mac, look inside Live’s Resources folder). Metronome.wav is the main file, MetronomeUp.wav is the downbeat (no, I don’t have any idea why it wasn’t called MetronomeDown). Put the original samples in a folder within Samples in case you want to return to them later, and rename your new metronome sounds so Live recognizes them.
The Sparkler
This is an exciter-type effects rack that can add sparkle to a sound. Getting the settings right is tricky and varies considerably for different program material. But if you have some tracks that need just a little more brightness, this will help. Also note that it can work well as a bus effect if you have several tracks where you want to add a bit of sparkle, but in that case, you’ll want to solo the chain with the effect so there’s no dry sound.
The main chain is fairly simple (fig. 8).
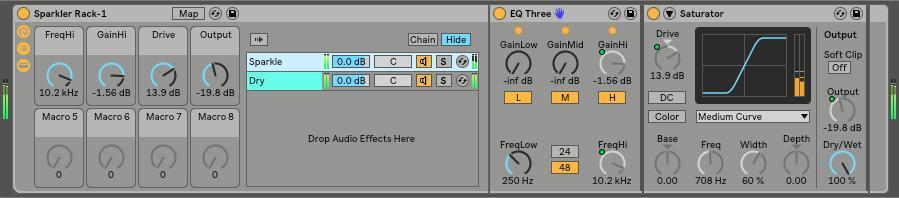
EQ Three (by the blue handprint) sends only the highs into the Saturator, set for the Medium saturation curve (feel free to try other curves, but this sounded by far the best to my ears). The key here is subtle settings. Solo the chain with the saturation, and pick off only the very highest frequencies, with the Drive set short of being “ugly.” The output should also be low. The object is to add just the slightest touch of high-frequency distortion; otherwise, the treble will be just plain annoying instead of a welcome sparkle. But if you want to bring out drum attacks or make the strings on an acoustic guitar really zing, this will do the job.
MIDI Remote Mappings
So you’re new to Ableton Live and can’t figure out how to map your controller knobs and buttons to Live. Here’s why. Because of the large number of control surfaces available for Live, Ableton supports multiple controllers with what the company calls Instant Mappings. If you have a supported controller and select it in Preferences, it’s kind of magical how everything just works. If you don’t have a supported controller, though, you need to override the instant mappings (fig. 9).
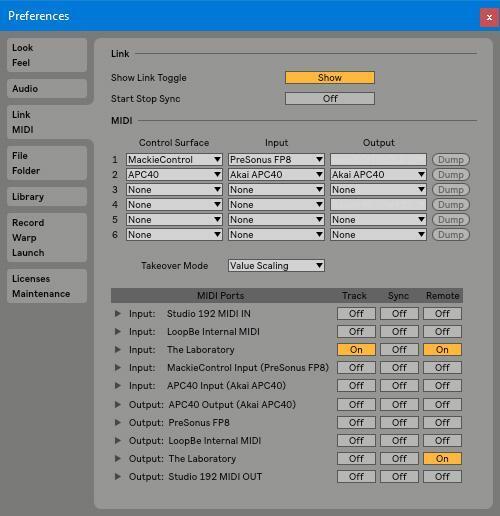
To do this, go to Preferences and make sure Remote is On for your controller under MIDI Ports (if you’ll also be using this controller to enter notes, enable On for Track as well). One more fine point: if the controller provides physical feedback, like moving faders, or visual feedback, like cool blinky lights, you’ll need to enable the Remote Out as well.
Ableton Live Sounds Cool
(But I Sure Wish I Didn’t Have to Switch from My Current DAW)
Actually, you don’t — because Ableton Live is one of the rare DAWs that is a ReWire client as well as a ReWire host. So as long as your host supports ReWire, you can add Live’s capabilities. Live will stream audio into your host’s mixer, accept MIDI, sync with the transport and loop controls, and use the same audio interface. For example, with Studio One, Live becomes another instrument you can drag into your song (fig. 10).
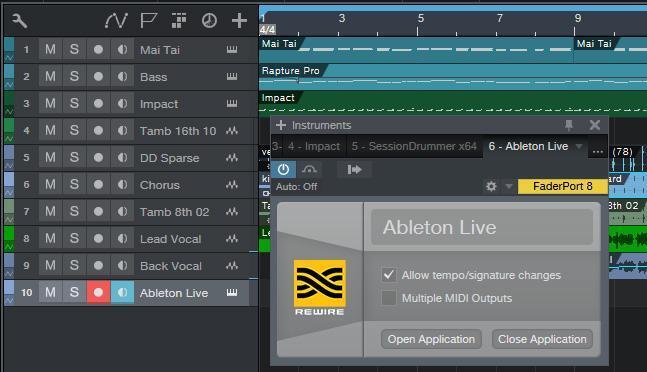
Some people haven’t explored ReWire, because they’ve heard it requires a powerful computer, but that’s only partially true. ReWire itself is just an interconnection protocol, so it doesn’t use much CPU power. However, if you gorge your host and Live with virtual instruments, a bunch of convolution reverbs, and other CPU-hogging goodies, then you’re asking your computer to have enough power to run two powerful programs, and that could be problematic. When ReWire first appeared, there weren’t many computers that were up to the task, but with today’s modern marvels, you should be okay when you want to double down on DAWs.
Hopefully these 10 tips will help you get more out of Live!
If you have any questions about Ableton Live, don’t hesitate to reach out to your Sweetwater Sales Engineer at (800) 222-4700.