
Loop-based music is for much more than dancing and DJs. I’ve used loops for three movie soundtracks, dozens of industrial video soundtracks, a radio commercial, and several remixes. For most of my rock tunes, I use acoustic drum loops (and using these tips I’m about to share, I’ve convinced several actual drummers that I used a “real” drummer). Using loops is also a friendly way to get into music, because the process is more like collage — you don’t need great technical chops, just a solid musical sense of how to arrange disparate elements into a musical experience.
One thing you do need is good source material, starting with sample and loop libraries. Some of these are expansion packs for existing instruments, like the many packs for IK Multimedia’s SampleTank and Native Instruments’ Kontakt. Several companies make expansion packs for Kontakt, like Best Service and Big Fish (for example, their RiG is an urban workstation Kontakt expansion pack for hip-hop). But most importantly, you also need to move beyond the constraints associated with this method of making music. The tips presented in this article, coupled with a little editing time, will help you add a more creative, humanized element to loop-based music.
1. Slicing and Dicing
This is the key to making loops interesting. Loops need to walk a fine line between being consistent enough to create a groove and offering sufficient variation to keep the listener from tuning out. The most effective way to do this is to chop the loops into pieces, and then rearrange them to add variety. In the audio examples below, the Unedited Loop (clip 1) is a 4-bar loop repeated twice. The Edited Loop (clip 2) plays the same 4-bar loop, but in the second repeat it chops up the last two measures and rearranges the elements within it to add variety.
Slicing and dicing can also help on an arrangement level.
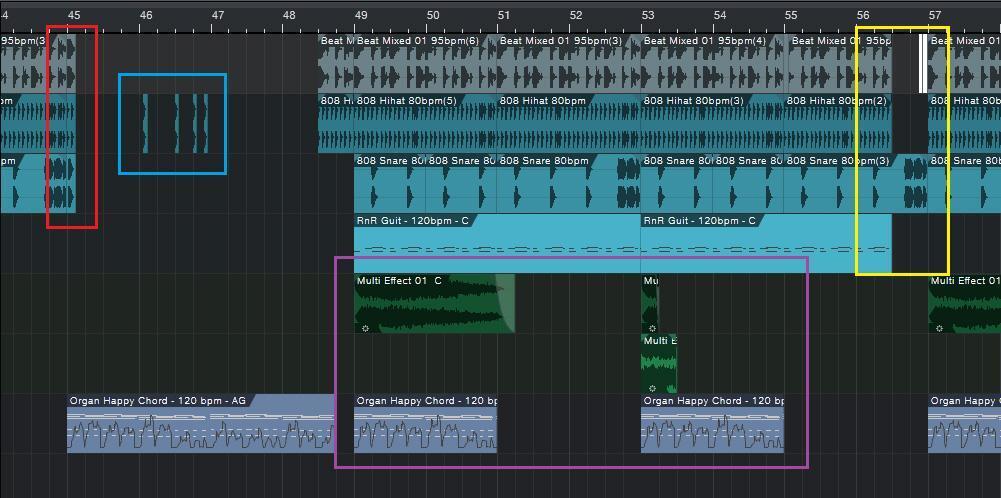
Figure 1: This screen shot from PreSonus Studio One illustrates several arrangement tricks that add interest to a loop-based composition.
In figure 1, the section outlined in red shows how three loops have been extended an eighth note to add an extra downbeat to start off a break. The section outlined in blue highlights a hi-hat loop chopped into individual hits, almost like one-shots, to add accents.
The section outlined in yellow shows that the loops in tracks 1, 2, and 4 have been pulled back for two beats, giving a breakbeat that’s carried by the snare loop in track 3. The loop starting at measure 57 in track 1 has had the first 1/16th note cut, copied twice, then placed as two successive 16th notes leading into measure 57 (colored white for clarity).
Tracks 5, 6, and 7 use only selected sections of the original loops (outlined in purple); in track 5, one of the loops is cut into a section that’s only one beat long.
2. Don’t Overlook the One-shots
Many loop libraries, particularly for drums, include one-shot samples of the sounds used in the loops. Use these to add off-beat hits and accents, and in general to supplement loops with additional drum sounds to prevent boredom from setting in. Even better, you can use them to create new loops and fills with the same sound as the loops from which they came, so you know they’ll all fit together properly. You can either drag these one-shots into audio tracks or load up a sampler or drum module with them (e.g., Ableton Live Simpler, Native Instruments Battery, Studio One Presence XT, Reason NN-XT, etc.) and trigger the 1-shots with MIDI notes.
3. Detuning
Here’s another useful anti-boredom tool for audio drum loops. Suppose a drum loop plays during the intro to a verse and during the verse itself. Detune the portion behind the verse by a quarter to a half step or so; this timbral difference supports the change in the song from intro to verse. You may be able to detune without changing the loop length; if not, use the host program’s DSP to stretch the loop back to the original length while retaining the altered pitch.
Detuning is also great with cymbals, because you can use it to turn one cymbal into a family of cymbals. If you define the cymbal as a one-shot instead of a loop, changing tuning also changes duration. You can even obtain a gong-like effect by layering two cymbal sounds. Detune one by about a half-dozen semitones; detune the other by a much greater amount, like 20 or more semitones.
4. Add Tempo Variations
MIDI loops inherently follow te mpo changes. With audio, Acidized and REX files can both follow tempo changes; some programs have the option to stretch audio automatically (fig. 2)
Figure 2: In Studio One, calling up the Inspector for an audio event lets you choose automatic time stretching, where a loop with a known tempo (either with tempo information encoded in the file or that you specify) stretches as needed to fit the project tempo.
Even small tempo tweaks can be very effective — speeding up adds tension, and slowing down adds release. If you haven’t worked with tempo changes, you’re in for a treat, because these changes can add life to your music. One of my favorite techniques is to pull back just a little on the tempo before a big chorus (and if the chorus isn’t big, the slight tempo shift will make it seem bigger, because it builds anticipation).
5. Key Changes
Changing keys (modulation) was a technique used in many pop songs of days gone by to make something that repeated sound different, and maybe it’s time for a revival. This is super easy to do with MIDI loops — either use an edit function that does transposition (figure 3), or just drag the MIDI notes up or down in piano roll view. With audio, Acidized files can respond to pitch changes automatically if the host (e.g., Magix Acid Pro 7 ) has a way to enter pitch markers. Otherwise, transpose manually using a host’s DSP-based transposition (fig. 3).
![]()
Figure 3: Right-clicking on a MIDI event in Studio One brings up a menu where transposition is prioritized — it’s one click away. The audio events prioritize transpositions similarly.
Final Thoughts
Given that loops are supposed to make our lives easier, it may seem like this article advocates spending a lot of time on editing. Well…it does. But bear in mind that loops aren’t designed to bemusic; they’re designed to be components of music. How you put those components together is what creates the actual music — and in that respect, what you get out of loop-based music depends on what you put into it.