
Steven Slate Drums Quickstart Guide
How to use this guide
In this guide, we will get you up and running with Steven Slate Drums 5. That means we’ll show you how to navigate each section of the plug-in, how to build your own drum set, create songs, and how to record. Follow the sections below to get started.
Getting Started with Steven Slate Drums 5
Steven Slate Drums is virtual drum software which you can use within your DAW. After it’s registered and installed, launch your DAW and add it as a stereo instrument plug-in.
Setting up external hardware
If you’re using an electronic drum kit to trigger the Steven Slate Drum samples, now is a great time to set it up. Make sure that the audio and MIDI settings within your DAW are set up properly. First, you’ll need to connect it to your computer then configure it within SSD 5. Follow these steps to select, create, and save custom settings with your MIDI controller.
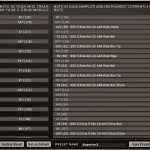
Preset MIDI maps
1. Enable the electronic drum kit within your DAW as a MIDI controller.
2. Navigate to the Mapping button, select Input Conversion, then click Load Preset.
3. Locate the brand of your electronic drum kit within the list, then click Open. Click Set as Default so the mapping preset will load each time you launch SSD 5.
Custom MIDI Mapping
If your electronic drum kit isn’t showing up in the preset list, or if you want to have a custom MIDI map, click and drag the MIDI note and drum sample listed on the right section, then drag it to the MIDI note in which you’d like to trigger it on.
Navigating the plug-in
There are six tabs on the main window of Steven Slate Drums; Construct, Edit, Mixer, Mapping, Grooves, and Settings. If you want to load a loop, change levels to individual drums, or build a drum kit, you’ll need to use the tabs to get to the correct spot.
-
- Construct Kit
-
- Edit Instrument
-
- Grooves
-
- Mapping
-
- Mixer
-
- Settings
Construct Kit
This is the window where you will load, preview, and build drum kits. Use the Inst button to load individual drum samples and the Kit button to load any preset drum kit; including ones you create.
Edit Instrument
The Edit Instrument window is where you will fine-tune individual samples to your liking. You can adjust settings such as the samples master volume, microphone output routing, dynamics, and curve shape.
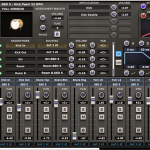
Mixer
In the Mixer window, you can adjust the levels and panning of each drum, work with dynamics and velocity curves, and also route outputs of each channel (multichannel) to an audio or aux track within your DAW so you can print them as audio or use additional plug-ins.
Mapping
The Mapping window is for editing specific MIDI notes and MIDI CC’s (control changes). When you click the Mapping button, you will see two buttons appear; Kit Mapping and Input Converter.
- Kit Mapping allows you to change samples to a specific MIDI note. Just click and drag the sample listed on the right to the desired MIDI note on the left.
- While in Input Converter mode, you can trigger a specific MIDI note in the DAW without having to change the MIDI note within SSD.
Grooves
The Grooves tab is where you can preview and add MIDI loops to your songs. The grooves are particularly useful when you just need a basic drum beat when recording ideas.
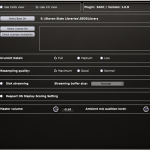
Settings
While in the Settings window, you can change global settings to the plug-in such as where it scans the sample libraries, how the kit and instrument windows are laid out, as well as performance options.
Building Kits & Songs
You can either load a preset kit and change individual samples or create your own from scratch. You can also load and use MIDI grooves to help build your songs by importing them into your DAW.
Samples
SSD5 has preset samples which you can load in order to build or modify a preset kit. You can also import your own .WAV files to make a custom drum kit. Follow the steps below to add samples.
Preset samples
1. Click the Construct Kit button, and make sure that the Instruments tab is selected.
2. To load an individual drum, click Inst, then select the Library, Drum Type, and Drum Name in which you’d like the sample. Click the Audition button to preview the sound.
3. Click and drag the sample to the drum you want to replace. You can also drag it to one of the sidebars if you want to use it as an “auxiliary” sample which is useful if you want to layer drum sounds.
User samples
1. Click the Construct Kit button, then click the Samples button.
2. Navigate to the Folder section, click Add, then select the folder where your samples reside.
3. Once the files appear in the Sample Browser window, click and drag the sample into one of the empty cells. Click Save Kit once you’ve completed building it.
Snare Mode
Clicking the Snare Mode button switches the snare sample between Classic which triggers normal snare hits, and Rimshot which triggers rimshot sounds no matter what velocity the MIDI note is.
Drum kits
There are a few ways you can load a drum kit within SSD 5. You can either load factory preset kits which are pre-mixed, or you can load a custom drum kit that you saved. Follow these steps to load a drum kit.
Preset kits
1. Click the Construct Kit button and select Kits in the Library section.
2. Load a kit by selecting a Library, Category, and Kit. Double-click the kit to load it.
User kits
1. In the Kit Library section, navigate to User, select User, then double-click the saved drum kit you created.
Using MIDI Grooves
If you’re just looking to add a simple drum groove to a demo or need some inspiration when creating a song, just load a MIDI groove into your song. You can manually edit the grooves as well to get the best track possible. Follow these steps to load and edit a MIDI groove.
1. Navigate to the Grooves tab and select the Library, Category, and Groove which you want to add.
2. Preview the groove by pressing the Play button. Alternatively, click the Autoplay button to automatically preview the groove as soon as you click it.
3. Click and drag the groove into the MIDI instrument track where the virtual instrument is.
4. Edit the groove by opening the Piano Roll in your DAW then add, remove, or change the drums you need to.
Why is the tempo different?
Although there is a tempo listed on the grooves within SSD, they are automatically synced to the tempo that your DAW’s project is set at.
Related Content
Getting Started with SSD5
Using Multi-out in Pro Tools
Overview
Using Multi-out in Cubase
When you need help, Sweetwater has the answers!
Our knowledge base contains over 28,000 expertly written tech articles that will give you answers and help you get the most out of your gear. Our pro musicians and gear experts update content daily to keep you informed and on your way. Best of all, it’s totally FREE, and it’s just another reason that you get more at Sweetwater.com.


Offer applies only to single-receipt qualifying purchases. Select manufacturers may require that only the manufacturer’s products qualify towards the minimum purchase amount needed to be eligible for promotional financing. Otherwise, an invoice that meets the minimum purchase amount and contains at least one qualifying manufacturer product is eligible for promotional financing. No interest will be charged on promo purchase balance, and equal monthly payments are required on promo purchase until it is paid in full. The payments equal the amount financed divided by the number of months in the promo period, rounded up to the next whole dollar. These payments may be higher than the payments that would be required if this purchase was a non-promo purchase. During the last month(s) of the promo period the required monthly payment may be reduced due to the prior months’ rounding. Regular account terms apply to non-promo purchases. New Accounts as of 07/31/2025: Purchase APR is 34.99%. Penalty APR is 39.99%. Min Interest Charge is $2. Existing cardholders: See your credit card agreement terms. Subject to credit approval.
Offer applies only to single-receipt qualifying purchases. No interest will be charged on the promo balance if you pay it off, in full, within the promo period. If you do not, interest will be charged on the promo balance from the purchase date. The required minimum monthly payments may or may not pay off the promo balance before the end of the promo period, depending on purchase amount, promo length and payment allocation. Regular account terms apply to non-promo purchases and, after promo period ends, to the promo balance. New Accounts as of 07/31/2025: Purchase APR is 34.99%. Penalty APR is 39.99%. Min Interest Charge is $2. Existing cardholders: See your credit card agreement terms. Subject to credit approval.
The estimated required monthly payment shown which excludes taxes and delivery equals the amount financed divided by the number of months in the promo period, rounded up to the next cent. During the last month(s) of the promo period the required monthly payment may be reduced due to this rounding. These payments apply only with the financing offer shown. If you make these payments by the due date each month, you should pay off this amount financed within the promo period, if it is the only balance you are paying off. If you have other balances on your account, this payment will be added to any other minimum monthly payments.
Applies only to select items from this manufacturer. Ask your Sweetwater Sales Engineer for more details.