
PreSonus Studio Live RM series firmware update procedure
NOTE: It is highly suggested that when doing firmware updates or the Firmware Recovery process that you complete this process with a Sandisk drive as mentioned on the below knowledge base article. Not all flash drives will be able to complete this process correctly, and the suggested drives have been tested well to complete this process. SanDisk Cruzer USB Flash Drive Compatibility with StudioLive AI
- Download the lastest firmware files for you mixer and please review all instructions before updating your mixer.
The Firmware files can be found on the “See Details” link on your StudioLive RM mixer when you log into your Presonus User Account.
- Open your downloads folder and locate the StudioLive firmware folder. The folder will be named with your mixer’s model number and the new firmware version (e.g., RM32AI_v5550).

- Depending on your system preferences, the firmware folder may not automatically uncompressed from the .zip file. To expand it, simply double-click it.

- Open the firmware folder; you will find five files inside:
– Initvars.scr
– Recovery.scr
– Rootfs.img
– uImage
– upgrade.binYou will need all five files to upgrade your mixer. 
- Connect a FAT32-formatted USB thumb drive to your computer.
Power User Tip: Most small USB drives (16 GB or less) are already formatted correctly, so no formatting is required. If your mixer does not detect your thumb drive, verify that it is formatted correctly. Also, it is important that you use a drive no smaller than 1 GB and no larger than 32 GB in size.
- Select all five firmware files and either copy/paste or drag them to the root of your thumb drive. Eject your drive and disconnect it from your computer.

- Remove your WiFi LAN adapter (if inserted) and insert the thumb drive into the USB slot on the front of your RM Series mixer and make sure to power the mixer “Off.”
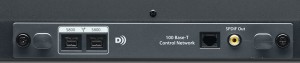
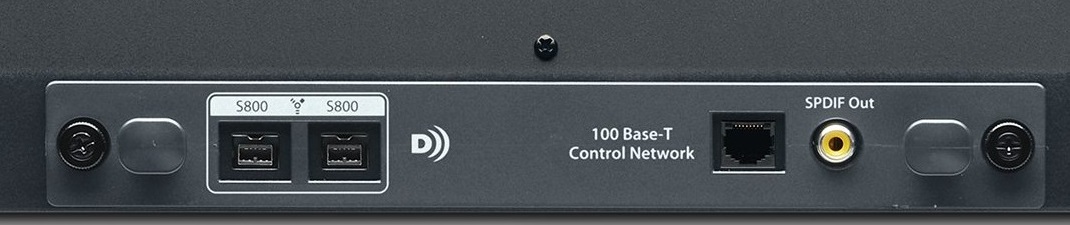
- Remove the Option card on the back of the mixer. A screwdriver might be necessary to remove the spring-loaded thumb screws on the back of the unit. Then, power the mixer on.
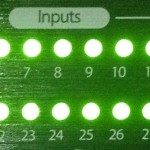
 Note: A progress bar will be shown on the front LED bars while your mixer’s firmware is being loaded. Once it is complete, the LED bars will become green and you will want to power off the mixer.
-
- Once you have powered the mixer off when the firmware Recovery is complete, make sure to put the option card back into the mixer and secure the thumb screws on the unit. And remove the USB thumb drive, inserting the USB wireless dongle back into your mixer.Note: The mixer may or may not need to finish some final components of the firmware update. If this is the case, you will see the channel LEDs on the front of the mixer illuminate amber from left to right as this is done. Once the final portion of the update is complete, all channel LEDs will illuminate green. When you see this, power cycle the mixer once more. If your mixer does not do this, do not be alarmed as it may not be necessary for this particular update.
- Restart UC Surface and revisit the Device Settings Tab in the Settings Menu and observe the firmware version reported. The last 4 digits of the firmware version reported here should match the version of the files you downloaded for your mixer.

When you need help, Sweetwater has the answers!
Our knowledge base contains over 28,000 expertly written tech articles that will give you answers and help you get the most out of your gear. Our pro musicians and gear experts update content daily to keep you informed and on your way. Best of all, it’s totally FREE, and it’s just another reason that you get more at Sweetwater.com.

