
Midas M32: Sounds, Routing, and Recording
In this guide, we will how you how to get started using some of the Midas M32’s features. We’ll show you how to get sound out, create a monitor mix, record on a computer, and much more. If you are setting up for the first time, follow our Midas M32: Setup and Connections guide first and come back when you are finished.
Follow the sections below to get started.
- A Word About Midas and Behringer
- Midas M32 Channel Controls
- Create a Mix Bus for Stage Monitors
- Monitor, Talkback, and Oscillator Generator
- M32 Onboard Recording and USB Recording
A Word About Midas and Behringer
If you want to learn about using your Midas M32 mixer, you can look online for tutorials on the Behringer X32 mixer.
The Midas M32 line of mixers, with their superior audio components and sound quality, share their design with the less-expensive Behringer X32 line of mixers. Midas and Behringer are two brands from the same company, Music Tribe.
Behringer X32 tutorials apply equally to the Midas M32 because the two products are laid out and are operated in the same fashion, though certain buttons and knobs may be in different locations.
From time to time, Behringer and Midas release a new version of the M32 and X32 operating system through a firmware update. As of this writing, the M32 and X32 use Version 4.0x, first released in late 2019.
TIP: Many X32 and M32 tutorial videos you find online were made years before late 2019. The mixers in those videos are running earlier versions of the operating system. Their display screens may have menus and controls laid out in a different order, with a different color scheme. However, the information these videos provide is still useful.
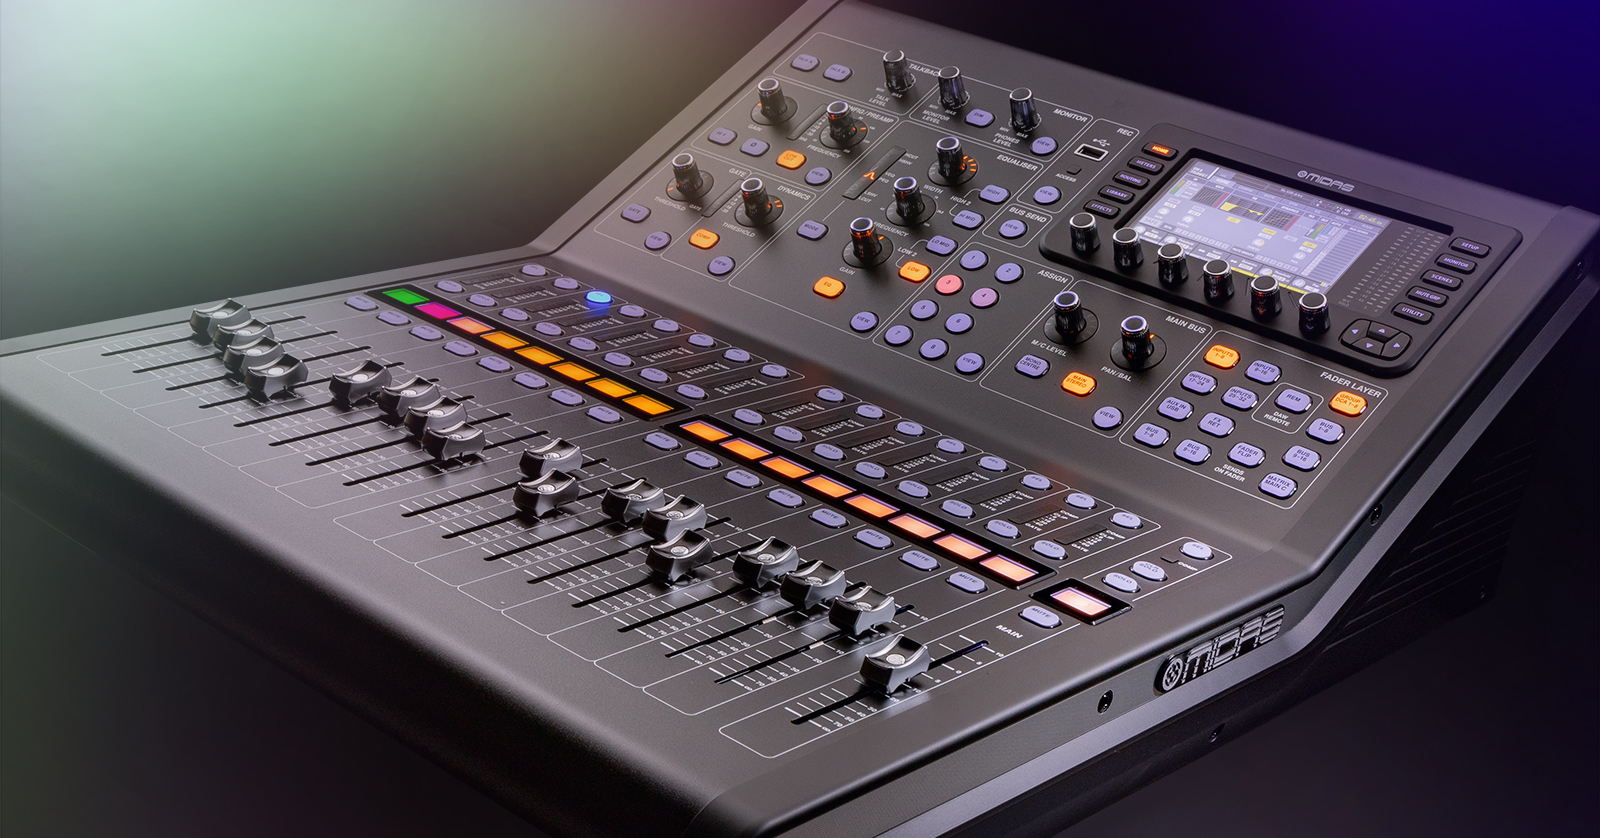
Midas M32 Channel Controls
Using the M32 involves understanding signal routing and signal processing. Each channel may have its own routing and processing, so a lot of things can happen at once.
Let’s connect a single mic and process the signal with the M32’s channel strip. Then we’ll route the signal to the main speakers or a stage monitor.
Input Signal and Channel Strip Settings
On the Midas M32 Live and M32R Live, you can connect a microphone directly to the XLR connector for In 1 on the back.
On the Midas M32C, as discussed in the Midas M32: Setup and Connections guide, you must connect a stage box, then connect the microphone to In 1 on the stage box. Settings can be configured using an app on a handheld device over Wi-Fi or using the M32 Edit app on your computer.
On the Midas M32 Live and M32R Live, the local (built-in) inputs will be selected by default. You can select additional inputs from a stage box using the Routing menu.
Our first task is to connect a mic to In 1 and set the mic’s input gain using the Preamp in the Channel Strip section.
The Channel Strip section on the M32 is the area with buttons, encoders, and meters for Config/Preamp, Gate, Dynamics, Equaliser, and Bus Sends. By selecting one channel at a time, you can create separate settings for each channel.
- Connect a microphone to In 1. Press the Select button on channel 1.
- Press the Home button. The display will show the settings for the Channel Strip starting with the Config/Preamp page.
- Use the encoders to adjust the channel settings. Press the Layer buttons to change which settings the encoders control.
- Pull up the submenus for specific Channel Strip functions by pressing the respective View buttons or browsing with the Page Select buttons.
- Speak into the microphone and turn up Gain or Encoder 1.
- Increase the gain so that the signal is as loud as possible without having the LED meter go into the red (Clip).
- If you are using a condenser microphone or an active DI box, you will need first to enable phantom power by pressing the 48V button.
- Press the Layer buttons to change which settings the encoders control.
Gate
A noise gate is used to silence a signal when its level is below a certain threshold. This helps control extraneous noise.
- Press Gate or Encoder 1 to turn on the Gate.
- Rotate Encoder 2 to change between Expander and Ducker modes.
- Use Encoder 5 to enable optional insert effects. See the Effects menu.
- Press the Layer buttons to change which settings the encoders control.
Dynamics
A compressor reduces a signal’s dynamic range. This helps you control the signal from being too soft or too loud, ensuring it works well in the mix. Adjust the Ratio and Threshold settings to change the response. Set a high ratio, like 10:1, to use the compressor as a limiter.
- Press Comp or Encoder 1 to engage Dynamics.
- Press Encoder 2 to change between compressor and expander modes.
- Press the Layer buttons to change which settings the encoders control.
Equaliser
The American English spelling is “equalizer,” and it’s often abbreviated “EQ.” This circuit is used to boost or cut specific bands within the frequency spectrum of a signal: treble, midrange, and bass, but with greater specificity.
Bus Sends
A bus is a point in a circuit where multiple signals are combined and sent to a destination. Bus Sends control the level of the signal from the selected channel that is sent to the respective busses.
Press one of the Bus buttons, which select busses in groups of four, and use the encoder next to each to set the send level.
You can also use Encoder 1 to browse banks of four at a time and use Encoders 3–6 to control their respective send levels.
Main Bus
Control settings, including Pan, Solo, Mute, and Mono mix levels. View the channel’s output-level meter on the display.
You will usually want to control Solo, Mute, and the Fader level directly with each channel’s dedicated buttons and fader, rather than on the display using the menu encoders. Pull the channel fader up to send its output to the Main mix.
Getting to know the X32: EQ Section
Getting To Know The X32: Channel Strip
Getting To Know The X32: Dynamics Section
HOW Live! Webinar: Signal Flow of a Mixing Console
Route Signal to an Output
Connect your powered speakers to the last two XLR outputs (15–16 or 7–8). Turn up the Main fader, and your speakers will receive the signal. With the Main fader at unity (zero), go to your amplifier and speakers and turn up the level.
The M32 is configured for these outputs by default, but you can customize the routing to suit your needs. Each analog output can be assigned to receive a different sound source. By default, the other XLR outputs are assigned to the corresponding mix bus (e.g., Mix Bus 1 to Out 1 and 2), and each TRS aux output goes to its respective insert.
Follow these steps to change signal output assignments.
Get sound from the mains
By default, the main mix level is controlled by the Main fader and outputs signal from Out 15–16 or Out 7–8.
Set the master fader level to unity (0). On the amplifier and speakers, set the volume to the optimal level.
A microphone with sufficient input gain on the M32 is sufficient for setting speaker levels, but you can also connect a phone or tablet to an Aux input to play back line-level audio. Just make sure the device’s and the music app’s output volumes are turned all the way up.
Use each channel fader to create the mix and the Main fader to control the mix level.
Get sound from other outputs
To get output from Aux Out 1–6, Out 1–14, or Out 1–6, you must assign the input or mix bus which will go to each XLR or TRS output.
- Press the Routing button and use the Page select buttons to view the Out 1–16 menu.
- Assign a sound source to each XLR or TRS output.
- Rotate and press Encoder 1 to select the Analog Output.
- Rotate and press Encoder 3 to select the Category and Encoder 4 to select the specific sound source (main or bus mix, direct out, etc.) and Tap point. Continue below to learn how to create a mix bus.
Getting to Know the X32: Routing Overview
Quick Tip: Card Output Routing
Create a Mix Bus for Stage Monitors
The M32 excels at creating aux or stage monitor mixes.
On an analog mixer, you would use each channel’s Aux Send to send the signal to another output. On the M32, they are called Bus Sends. You can create a mix bus after selecting it for an output’s signal source within the Routing menu. Use each channel’s Bus Sends encoders to adjust its level sent to the respective mix bus. You can also press the M32’s Fader Flip button to engage the Sends on Fader feature to control the send levels with channel faders.
After assigning a sound source to an output, you also have the option to select the point along the signal path at which the signal is sent. This is called the tap point. You can choose to send a signal before (pre) or after (post) its level fader and mute controls. Usually, stage monitor sends are pre, and effects sends are post. Different situations call for different configurations; keep this in mind when setting up your mix.
Use the Channel Strip Bus Sends
- Press the channel’s Select button.
- Turn up the Bus Sends encoder for a given mix bus and use the 1–4, 5–6, etc. buttons to select which group of four sends to control.
- You can also control a selected channel’s send settings from its Sends page. From there you can use the menu encoders to adjust the level and select the tap point (pre, post, etc.).
Use the Channel Faders to Control Send Level
- Press the Bus 1–8 button. Press your mix bus’s Select button, then turn up its level fader.
- Press the Sends on Fader button. Each channel’s fader will now control its send level to the selected mix bus.
- Use the channel faders to create the mix. Use the bus level fader to adjust the mix level, then press Sends On Fader to exit the mix bus.
Use the Mix Bus Faders to Control Send Level
- Press your channel’s Select button.
- Press the Bus 1–8 button, then Sends on Fader.
- Use each mix bus fader to adjust the selected channel’s send level to each respective bus. Press Sends on Fader to finish adjusting the sends.
- For more information, consult the Midas M32 User Manual on page 22, section 1.13, Fader Layer, under Fader Flip – Sends on Fader Button.
Getting to Know the X32: Routing Overview
Getting to know the X32: Bus Section
X32 Quick Tip: Card Output Routing
X32 Quick Tip: Setup Monitor Mixes
Monitor, Talkback, and Oscillator Generator
In a live or studio environment, the M32’s monitor, talkback, and oscillator generator features are essential engineering tools. They can improve communication and efficiency during setup and soundcheck.
Getting To Know The X32: Monitor And Talkback Section
What Is the Monitor Mix?
The monitor mix is used by the engineer to listen to one or more channels at a time without affecting the main or the stage monitor mixes. Connect to the M32’s headphone or Monitor / Control Room Out to listen to the monitor mix. You will hear either the Main L/R mix or each channel or bus when the Solo button is engaged.
In the Monitor menu on the display, under Solo Options, turn on Solo follows Select to quickly monitor individual channels and simultaneously adjust each channel strip. Use the Solo button to solo a channel, then use the Select button to choose which channel to monitor and control.
- Click the View button and view the Monitor page.
- Use the encoder on the right to select the sound source you want to monitor. Adjust the monitor’s input level with Source Trim.
- Control the monitor’s mix level with the Monitor level control. Use the Headphone or Monitor / Control Room knobs to adjust their output levels.
M32 Talkback Configuration
Talkback is used when the engineer needs to talk to the performers in the studio or live on stage. Connect an external microphone to the Talkback XLR jack.
The Talk A and Talk B buttons can each have a different Talk level, Button mode, and Talk destination. For example, you can assign Talk A to the monitor engineer’s mix bus and Talk B to the performers’ stage monitor mix.
The Talkback microphone input has 48V phantom power enabled by default. This is for use with condenser and active dynamic microphones.
- Engage the Talk A or Talk B button, speak into the talkback mic and adjust the gain with the Talk Level knob.
- On the display, select the destinations and adjust the level with Encoder 3.
Oscillator Generator for Testing
The Oscillator generates a test signal. This is useful for soundchecks, when you need to verify your routing and speaker connections. You can also use it to test the acoustics of a room or venue. The oscillator’s signal can be routed like the talkback feature.
Try the Sine wave and sweep through the Frequency to identify resonant frequencies. This will help you identify what type of EQ or dynamic corrections could be applied to clean up the mix.
- Select the output Destination (Encoder 6).
- Select the Oscillator Type.
- Press Generate (Encoder 1) and adjust the signal type or level as needed. When you do, all other signal sent to that destination is muted until the oscillator is turned off.
M32 Onboard Recording and USB Recording
The M32 series provides several options for recording.
You can record a stereo mix to a USB thumb drive using the USB port on the front panel of the M32 Live, the M32R Live, or the M32C.
The M32 Live and M32R Live come standard with the Klark Teknik DN-32 Live expansion module installed in the expansion slot on the back. You can use this to output 32-channel multitrack USB audio to your computer or host. The module also permits recording 32-channel multitrack audio to SD cards using two card slots.
The M32C rackmount unit, on the other hand, comes standard with the Klark Teknik DN32-USB module, which provides for 32-channel multitrack USB audio to your host but does not include SD card slots.
It’s good to know that you can customize all the M32 models by purchasing one of the range of Klark Teknik DN32 expansion modules, which provide interfacing options including Dante, ADAT, and MADI.
Recording the Midas M32 to a USB Drive
The front-panel USB port permits attaching a USB thumb drive and recording a stereo mix in 16-bit WAV format at the sample rate you have set for the M32. Format the USB drive in FAT32 on a Mac or a Windows PC first. Test your drive thoroughly before a live performance to make sure it works.
- Below the display, press the Page button to view the Configuration tab and select the recording source. The main stereo mix is selected by default.
- Insert the formatted USB drive into the Recorder port. Press the View button.
- Use the encoders to start recording and to play back the recording to verify it’s working correctly.
How to Record with your X32
Getting To Know The X32: How To Use The 2-Track USB Recorder
Recording the Midas M32 to a Computer
You can transmit 32 channels of audio to and from the M32 digitally over the USB port in the Klark Teknik expansion module.
No driver is needed for macOS. For Windows, you will need to download and install the newest version of the Midas M32 Live DN32-USB audio driver. Go to the Midas M32 Series product page. In the Product Library pane on the right, click on Software and download the file.
- Connect a USB cable to the USB-B port on the Klark Teknik expansion module and connect the other end to your Mac or your Windows PC.
- Launch your DAW and select the M32 as the audio interface.
- Create tracks in your DAW and assign inputs to your tracks.
You can assign different inputs, outputs, and routing configurations to the 32 channels of USB digital audio. This can involve channels, mix busses, and effects. Open the Routing menu, select the Card Out tab, and set up your routing assignments.
X32 Live! Webinar: X32 with Pro Tools!
X32 Quick Tip: Card Output Routing
Apart from the audio interface, you can also configure your M32 Live or M32R Live as a DAW controller using MIDI over USB. In this mode, you can control your DAW’s mixing functions using the M32’s faders and knobs.
Related Articles
When you need help, Sweetwater has the answers!
Our knowledge base contains over 28,000 expertly written tech articles that will give you answers and help you get the most out of your gear. Our pro musicians and gear experts update content daily to keep you informed and on your way. Best of all, it’s totally FREE, and it’s just another reason that you get more at Sweetwater.com.

