
Line 6 POD Express Guitar and POD Express Bass Quickstart Guide
The Line 6 POD Express Guitar and POD Express Bass feature sounds from the Line 6 HX line. They’re simple to use; you can plug them in, make selections from the handy dials on the front panel, and rock out. We’ve written this guide to acquaint you with some of their deeper features. Let’s get started.
- POD Express Guitar and POD Express Bass Compared
- Register Your Purchase with Line 6
- Update the Firmware
- Inside the Box
- Powering the POD Express
- Line 6 POD Express Setup, Connections, and Controls
- Basic Operation; Editing and Saving Presets
- Line 6 POD Express Setup Scenarios
- Line 6 POD Express Overview Videos
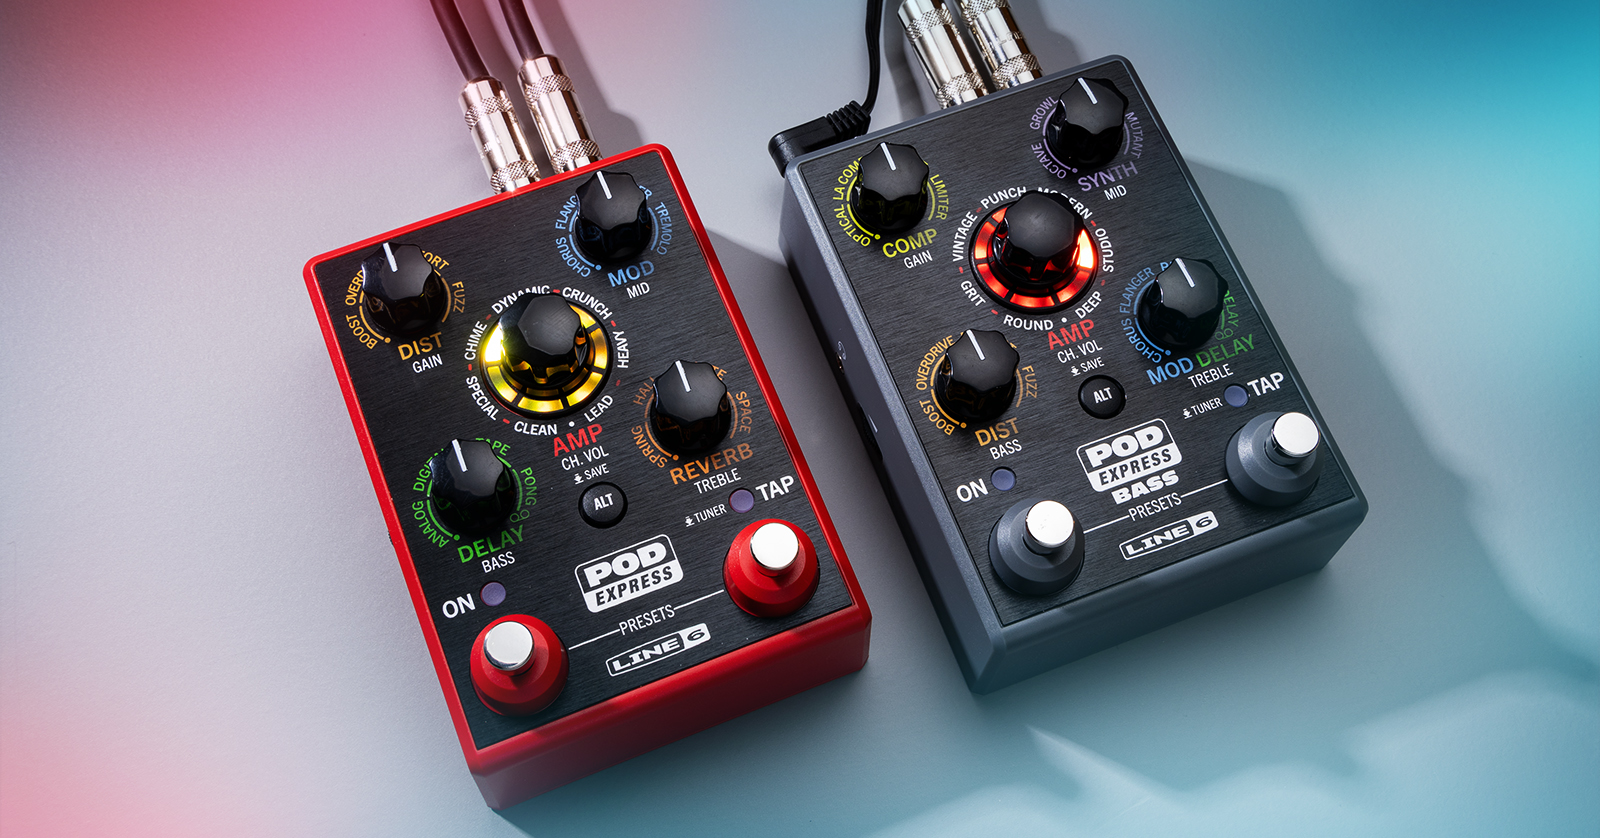
POD Express Guitar and POD Express Bass Compared
The two units are of the same hardware design; what is different is the amp models and effects for either guitar or bass.
We’ve written one guide for both since they operate virtually the same.
Register Your Purchase with Line 6
Take the time to register your purchase. Go to Line6.com, then click on the Person icon. Create a new account with a username and a password or log in to your existing account.
On your My Account page, in the pane on the left, under Hardware & Software, click on the Registered Gear link. Fill out the product registration information with your unit’s serial number and date of purchase. Upload a PDF of your sales receipt. Click Register Gear.
Download the Owner’s Manual
From the Line 6 POD Express product page, you’ll want to download the POD Express owner’s manuals:
- POD Express Owner’s Manual (for both Guitar and Bass)
The manual not only explains how to set up and use all the features on the POD Express, but it also contains charts of all the amp and cab models and the effects and their parameters.
Update the Firmware
If you are using your POD Express Guitar or POD Express Bass for the first time, you need to connect it to your Mac or Windows PC and use the Line 6 Central app to see if there’s a firmware update. From time to time Line 6 releases new firmware which fixes bugs and may add new features. Here’s our SweetCare Firmware Update guide.
Inside the Box
Find the Cheat Sheet
There’s a plastic bag inside with lots of printed product and warranty info. Find the single sheet in English labeled “Cheat Sheet.” Keep it handy! It explains a lot.
Install the Adhesive Rubber Feet
In the plastic bag, don’t overlook the small bag with a black square. This contains four rubber feet with adhesive backing. Install these on the underside of the pedal. Follow the instructions in the Line 6 POD Express Owner’s Manual > Quick Start > Installing the Adhesive Rubber Feet (page 9).
Powering the POD Express
You have two options:
Battery Power
In the box are three AA batteries. You can install them in the panel on the underside of the pedal. Disconnect all cables from your POD Express beforehand.
9V Power
Rather than use batteries, you can power the POD Express by connecting an external power supply such as the Line 6 DC-1g (sold separately). You can use any power supply with 9VDC output voltage, center-negative (2.1mm center diameter), 500mA minimum current, and 4.5W minimum power.
Line 6 POD Express Setup, Connections, and Controls
Inputs and Outputs
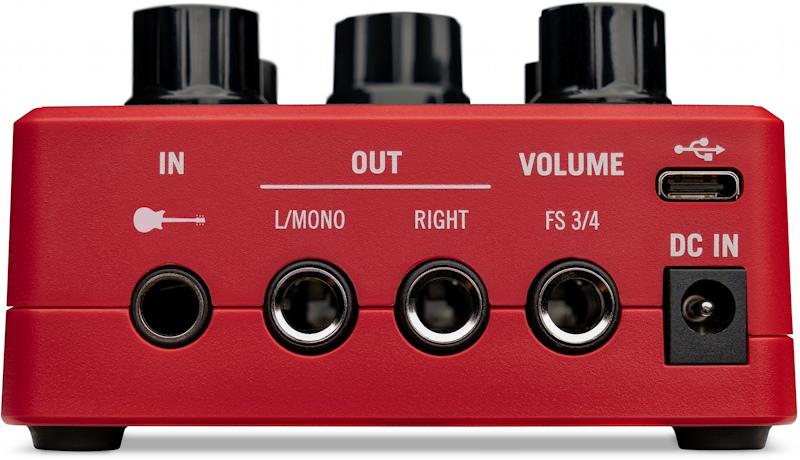
The POD Express rear panel connections
In. Connect a standard 1/4-inch TS instrument cable to your guitar or bass or in the signal chain from other effects pedals that you place before the POD Express. If you are using batteries, the POD Express powers on when a cable is connected and powers off when it is removed; do this to save batteries.
Out L/Mono, Right. Connect unbalanced 1/4-inch TS instrument cables for a stereo audio connection to an external amplifier, full-range powered speakers, a mixer, or other effects pedals. For mono output, connect one cable to the L/Mono jack.
Volume / FS 3/4. Through this 1/4-inch TRS jack, the POD Express can accept an external expression pedal, two external footswitches, or one expression pedal and one external footswitch (not included). The types of cables you need depend on the devices you are connecting. There are Global Settings you need to configure to assign functions to the pedal or footswitches. Learn more in the Line 6 POD Express Owner’s Manual > Features > Setting up an Expression Pedal and Footswitches (page 13).
USB-C. Connect a USB-C cable (not included) directly to your Mac, your Windows PC, or your iOS, iPadOS, or Android device. Going through a USB hub is not supported. You may need appropriate adapters depending on your device’s ports. The USB connection serves several functions:
- Digital audio auxiliary input (aux in) for tracks played back from your macOS or Windows computer or your iOS, iPadOS, or Android device. Listen to the external audio through the headphone connection on the POD Express as you play along.
- Audio interface to record stereo digital audio to a DAW on your computer or device. The POD Express has a fixed rate of 24-bit/48kHz; set your DAW to match. The POD Express is class-compliant on macOS and does not require a driver; likewise it is class-compliant on iOS, iPadOS and Android. On Windows, you must first go to the Line 6 website and download and install the Line 6 POD Express ASIO driver. Learn more in the Line 6 POD Express Owner’s Manual > USB Audio (page 32).
- Re-amping: You can send a dry guitar or bass track from your DAW on your computer or device to the POD Express for amp and effects processing, then return the stereo signal to record on additional tracks in your DAW. Learn more in the Line 6 POD Express Owner’s Manual > USB Audio > DI Recording and Re-Amping (page 33).
- Connecting to your computer to update the firmware using the Line 6 Central app.
DC In. Connect a 9V power supply as described above.
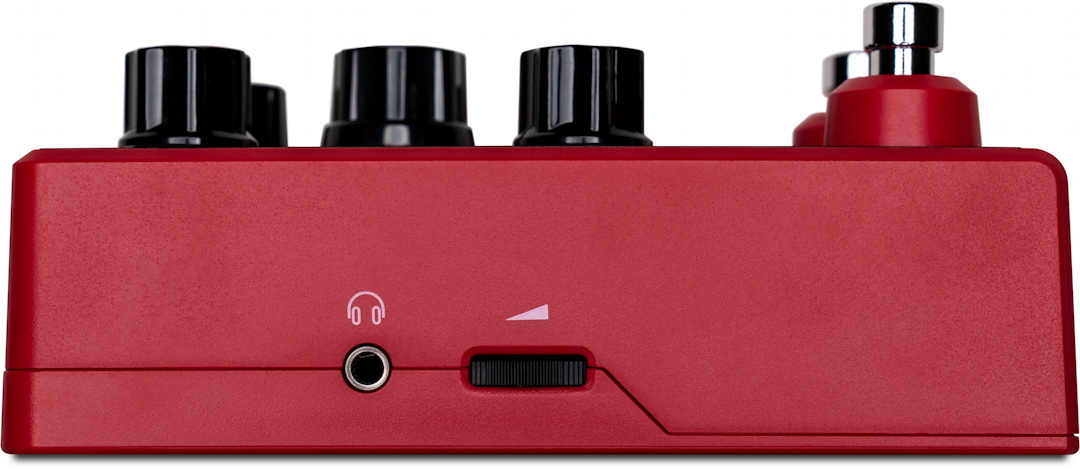
The POD Express headphone jack
On the left side of the unit is the headphone jack.
Headphone. Connect a 1/8-inch TRS cable to your headphones.
Output Volume Thumbwheel. Turn this thumbwheel clockwise, all the way down, before you connect headphones. Then turn the thumbwheel up slowly. Protect your hearing.
Front Panel Controls
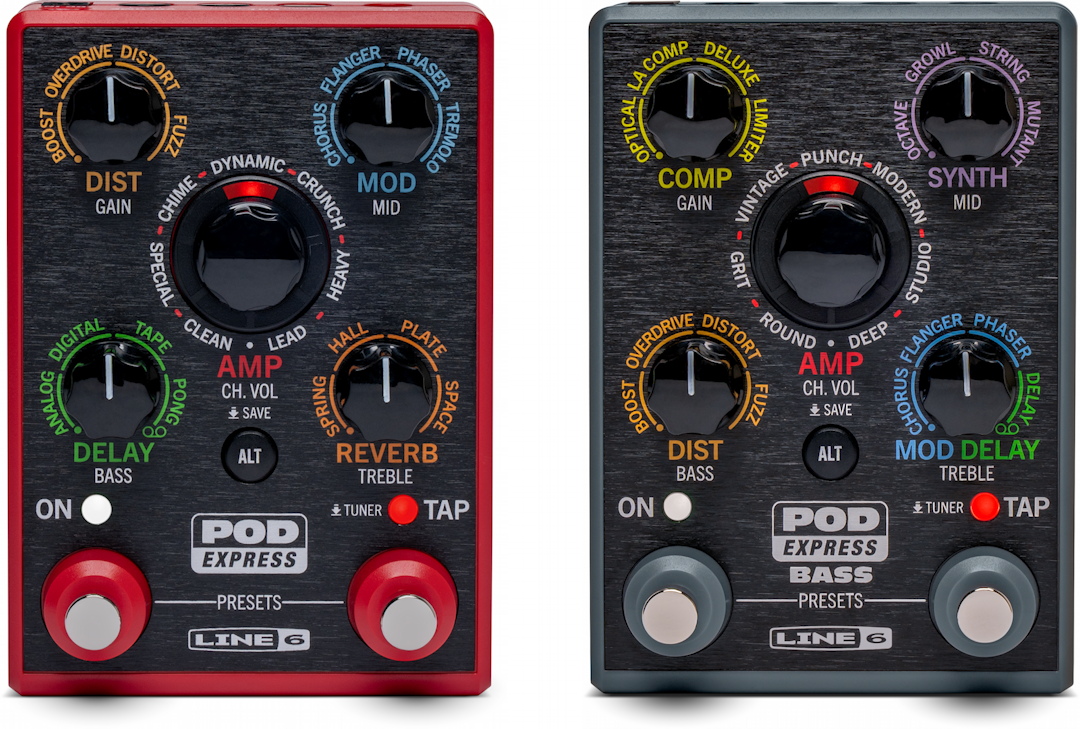
Line 6 POD Express Guitar and POD Express Bass controls
The POD Express Guitar and POD Express Bass have the same knobs and footswitches, but they are assigned to different models and effects, according to the labels printed on each unit’s front panel.
Amp rotary encoder knob and LED ring. Turn to select from the seven different amp- and speaker cabinet models on each unit. A segment on the LED ring lights up to show your selection. You can also turn the knob to six o’clock to bypass amp and speaker simulation altogether; this is called the “no amp” setting.
By using the Alt button and the footswitches, you put the POD Express into different modes, which we will explain as we go along.
Alt button. Press to access alternate features with the knobs or switches. Learn more in the Line 6 POD Express Owner’s Manual > Amp & Cab Models > Editing Amp Parameters (page 19).
On footswitch. Press to enable or bypass the unit.
Tap footswitch. Press two or more times to set the tempo of time-based effects. The LED flashes red to indicate the current tempo. Press and hold the switch to display the instrument tuner.
Effects knobs.
- Turn to select the desired effect model within each of the four categories printed on your Guitar- or Bass unit. Learn more in the Line 6 POD Express Owner’s Manual > Effects Models > Selecting and Adjusting an Effect Model (page 23).
- Hold the Alt button to make each knob changes its function to that printed in silver: Gain, Bass, Treble, Mid,and Channel Volume.
Basic Operation; Editing and Saving Presets
Check Out the POD Express Presets
Press and hold the On and Tap footswitches together to enter Preset Select Mode. The seven LEDs around the Amp encoder knob indicate which preset you are on. Page through presents by turning the Amp encoder clockwise or by pressing the Tap footswitch to page forward.
POD Express Guitar
You will see the seven LEDs light up one at a time in white to indicate presets 1–7. Keep turning or tapping, and the lights will turn yellow to indicate 8–14, and purple to indicate 15–21.
POD Express Bass
Preset numbers work the same way, but the colors are different: white for 1–7, aqua for 8–14, and orange for 15–21.
Turning the encoder past preset 21 will bring you back to preset 1.
The POD Express comes with the first seven presets loaded; the next 14 are empty.
Create and Save Your Own Preset
- Press and hold On and Tap to enter Preset mode.
- Turn the Amp encoder knob to one of the 21 preset locations to find a slot to store your new preset.
- Press and hold On and Tap again to exit Preset mode.
- Select your Amp model. Hold down the Alt button to select your amp settings.
- Make your selections from the four Effects knobs. Each Effect knob can be turned all the way counterclockwise to disable that effect section.
- To save the preset, press and hold the Amp encoder knob. Both LEDs will turn off and the current preset’s LED around the Amp encoder knob will flash.
Learn more in the Line 6 POD Express Owner’s Manual > Features > Working with Presets (page 15).
Amp-, Cab-, and Effects Models
The Owner’s Manual contains charts that describe each of the amp models, speaker cabinet models, and effects models and explains how to adjust their parameters.
Learn more in the Line 6 POD Express Owner’s Manual > Amp & Cab Models (page 18) and in Effects Models (page 22).
Looper
The POD Express has a looper that you access by turning the effects knob in the lower-right corner fully clockwise. Learn more in the Line 6 POD Express Owner’s Manual > Effects Models > Using the Looper (page 25).
Line 6 POD Express Setup Scenarios
You can set up the POD Express in several ways.
With Powered Speakers
Use the POD Express as your entire processing rig connected to a full-range speaker system such as the Line 6 Powercab series. You can also connect other effects pedals before the POD Express input.
With a Guitar- or Bass Amp
To use the POD Express with a conventional guitar- or bass amp, you can bypass the POD Express’s amp and speaker cabinet simulations and only use the POD Express as a multi-effects unit, sending its output to your amp.
With a Mixer or a PA System
To use the POD Express with a mixer or a PA, you must first go to Global Settings and set the Out jacks to Line Level. Learn more in the Line 6 POD Express Owner’s Manual > Global Settings (page 27).
In the Studio
Use the USB-C connection to connect your POD Express directly to your computer or device to record to a DAW. You can monitor the output of the POD Express through headphones or by connecting the outputs to powered speakers.
Learn more in the Line 6 POD Express Owner’s Manual > Features > Hooking It All Up (page 12).
Line 6 POD Express Overview Videos
Related Articles
When you need help, Sweetwater has the answers!
Our knowledge base contains over 28,000 expertly written tech articles that will give you answers and help you get the most out of your gear. Our pro musicians and gear experts update content daily to keep you informed and on your way. Best of all, it’s totally FREE, and it’s just another reason that you get more at Sweetwater.com.

