When you’re browsing the amazing selection of microphones available from Sweetwater, you’ll notice that some are classified as “tube microphones.” Tube microphones differ from other mics because they use a vacuum tube (or “valve,” as the Brits say) as part of their internal circuitry. Tube mics are generally used for recording voice and instruments in the studio, and many musicians and engineers favor them for their sonic characteristics. Tube mics are a bit more complex than other microphones, so they can be more expensive; but there are plenty of excellent tube mics available at reasonable prices.
What Is a Tube Microphone?
Condenser microphones are well known for their wide frequency response, sensitivity to low sound levels, ability to capture detail, and fast transient response. The audio output from a condenser microphone capsule is very low, so all condenser microphones (and even some ribbon mics) use internal amplification (head amp) to raise the level of the signal coming from the capsule before it makes the trip through a cable to the mic preamp. Without amplification, this fragile signal would become very noisy and would be subject to interference.
These internal “head amps” used for amplification can be constructed using tube or solid-state circuitry, each of which has a distinct sonic personality. Tubes tend to sound “warm” and can add a euphonic color to the audio, while solid-state amplification tends to be more neutral. Solid-state circuitry can have a lower noise floor than that of tube circuitry, but — unless you are recording extremely quiet sources — noise is not likely to be an issue. And a well-designed tube circuit can have a lower noise floor than a poorly designed solid-state circuit.
It’s important to recognize that this first amplification stage happens inside the microphone, and you still need a microphone preamp to raise the output level of a condenser mic up to line level for recording purposes.
How Does a Tube Microphone Work?
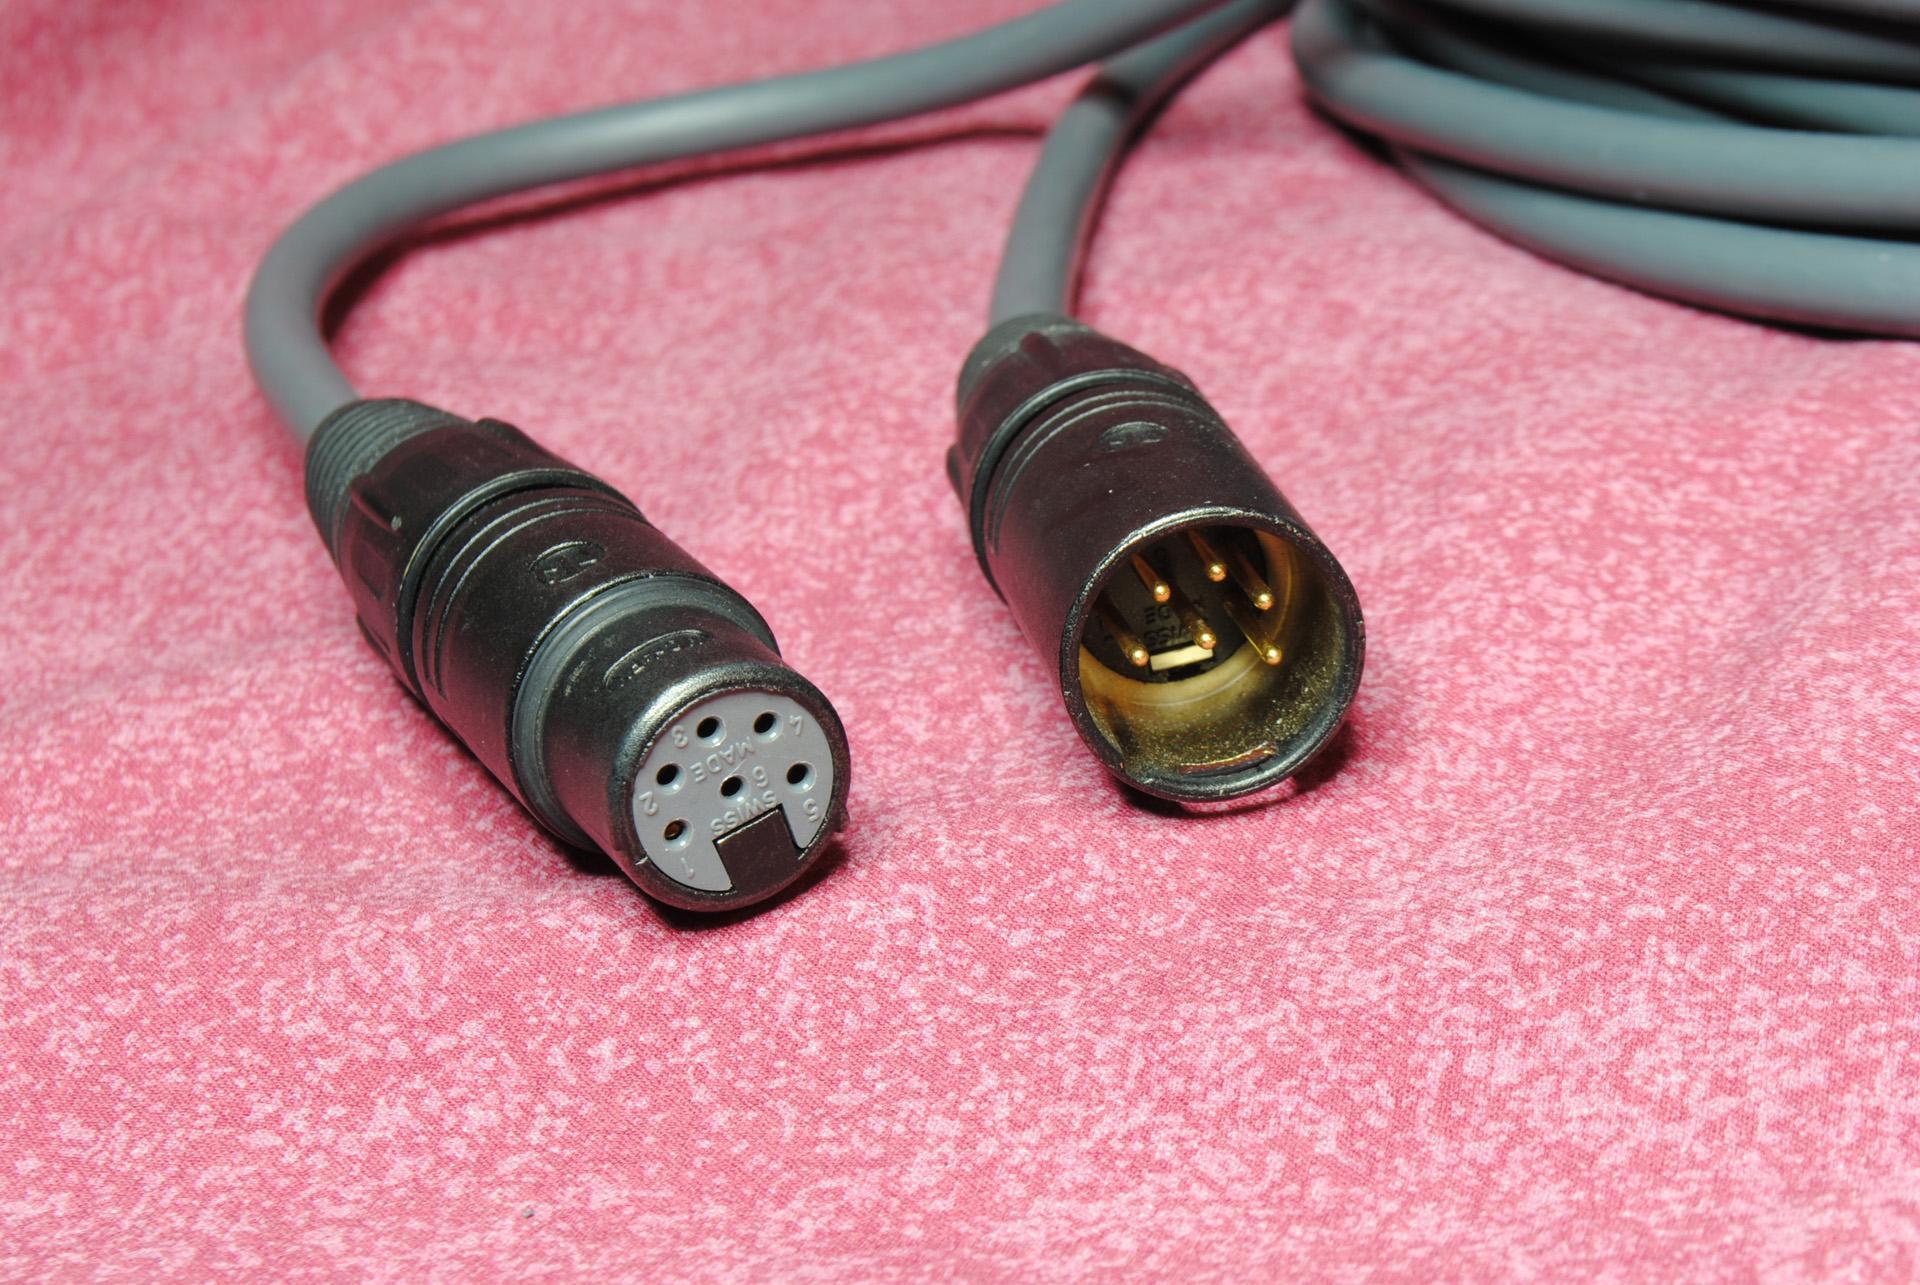
Any tube microphone has very specific power requirements (higher voltage, for one) and will be packaged with a dedicated power supply as well as a cable that’s different from a typical XLR mic cable (more on that in a minute). The power supply will have two audio connectors: one unique multipin connector that connects to the microphone and another that uses a standard 3-pin XLR for the audio output.
Setting up a tube mic for a recording session requires a bit more attention than using other types of mics. Here is the suggested setup procedure:
- Mount the microphone securely on a mic stand (Sweetwater offers a variety of high-quality microphone stands).
- Connect the cable from the mic to the power supply. If the cable has a locking collar, don’t overtighten it.
- Connect the audio output from the power supply to the input of the mic preamp.
- Plug in the power supply’s AC cable.
- Turn on the power supply. Beware that some power supplies can be damaged if they are turned on without being connected to a microphone or if the mic is “hot plugged” (connected or disconnected while the power supply is on).
- Allow the mic to warm up for 15 to 30 minutes before use so that the tube reaches a stable operating temperature. This ensures low noise and consistent audio performance.
When the session is over, tear down as follows:
- Turn off the power supply.
- Unplug the power supply from the AC outlet.
- Disconnect the microphone cable and the audio output cable.
- Allow the mic at least 15 minutes to cool down before moving it or storing it. This helps protect the tube from damage due to being jarred when it’s hot and extends tube life.
- Enclose the mic in a clean plastic bag with a silica gel pack to absorb moisture and put it in its storage case.
Why Use a Tube Microphone?
Choosing a microphone for a particular application is like choosing a color from a paint palette. There’s really no right or wrong choice, it’s more a matter of what you are trying to create. Many engineers and musicians feel that tube mics provide a warm, smooth sound with a rich low midrange that can be flattering to vocals — and, indeed, many are designed that way — but there are plenty of examples of tube mics that are clean and neutral sounding.
One characteristic of vacuum tubes is that they distort in a pleasant manner and emphasize different harmonics than solid-state amplification devices (think of the tube vs. solid-state sound of a guitar amp). Also, tubes can soften transients and naturally compress a signal during the amplification process, all of which can make for a musical sound. Keep in mind that the sonic behavior of a tube will also depend upon how the circuit designer works their “voodoo.”
The most popular application for tube microphones is for recording lead vocals, but there are plenty of applications where a tube mic is a good choice, such as for acoustic guitar or piano, drum overheads (keep them well away from the drummer’s stick path!), room mics, strings, woodwinds, and chamber ensembles. In fact, there’s no reason not to try a tube microphone on just about any sound source (though, we don’t recommend attempting to record the sound of a 24-valve, V8 automobile engine using a tube mic!).
The Five Parts of a Tube Mic
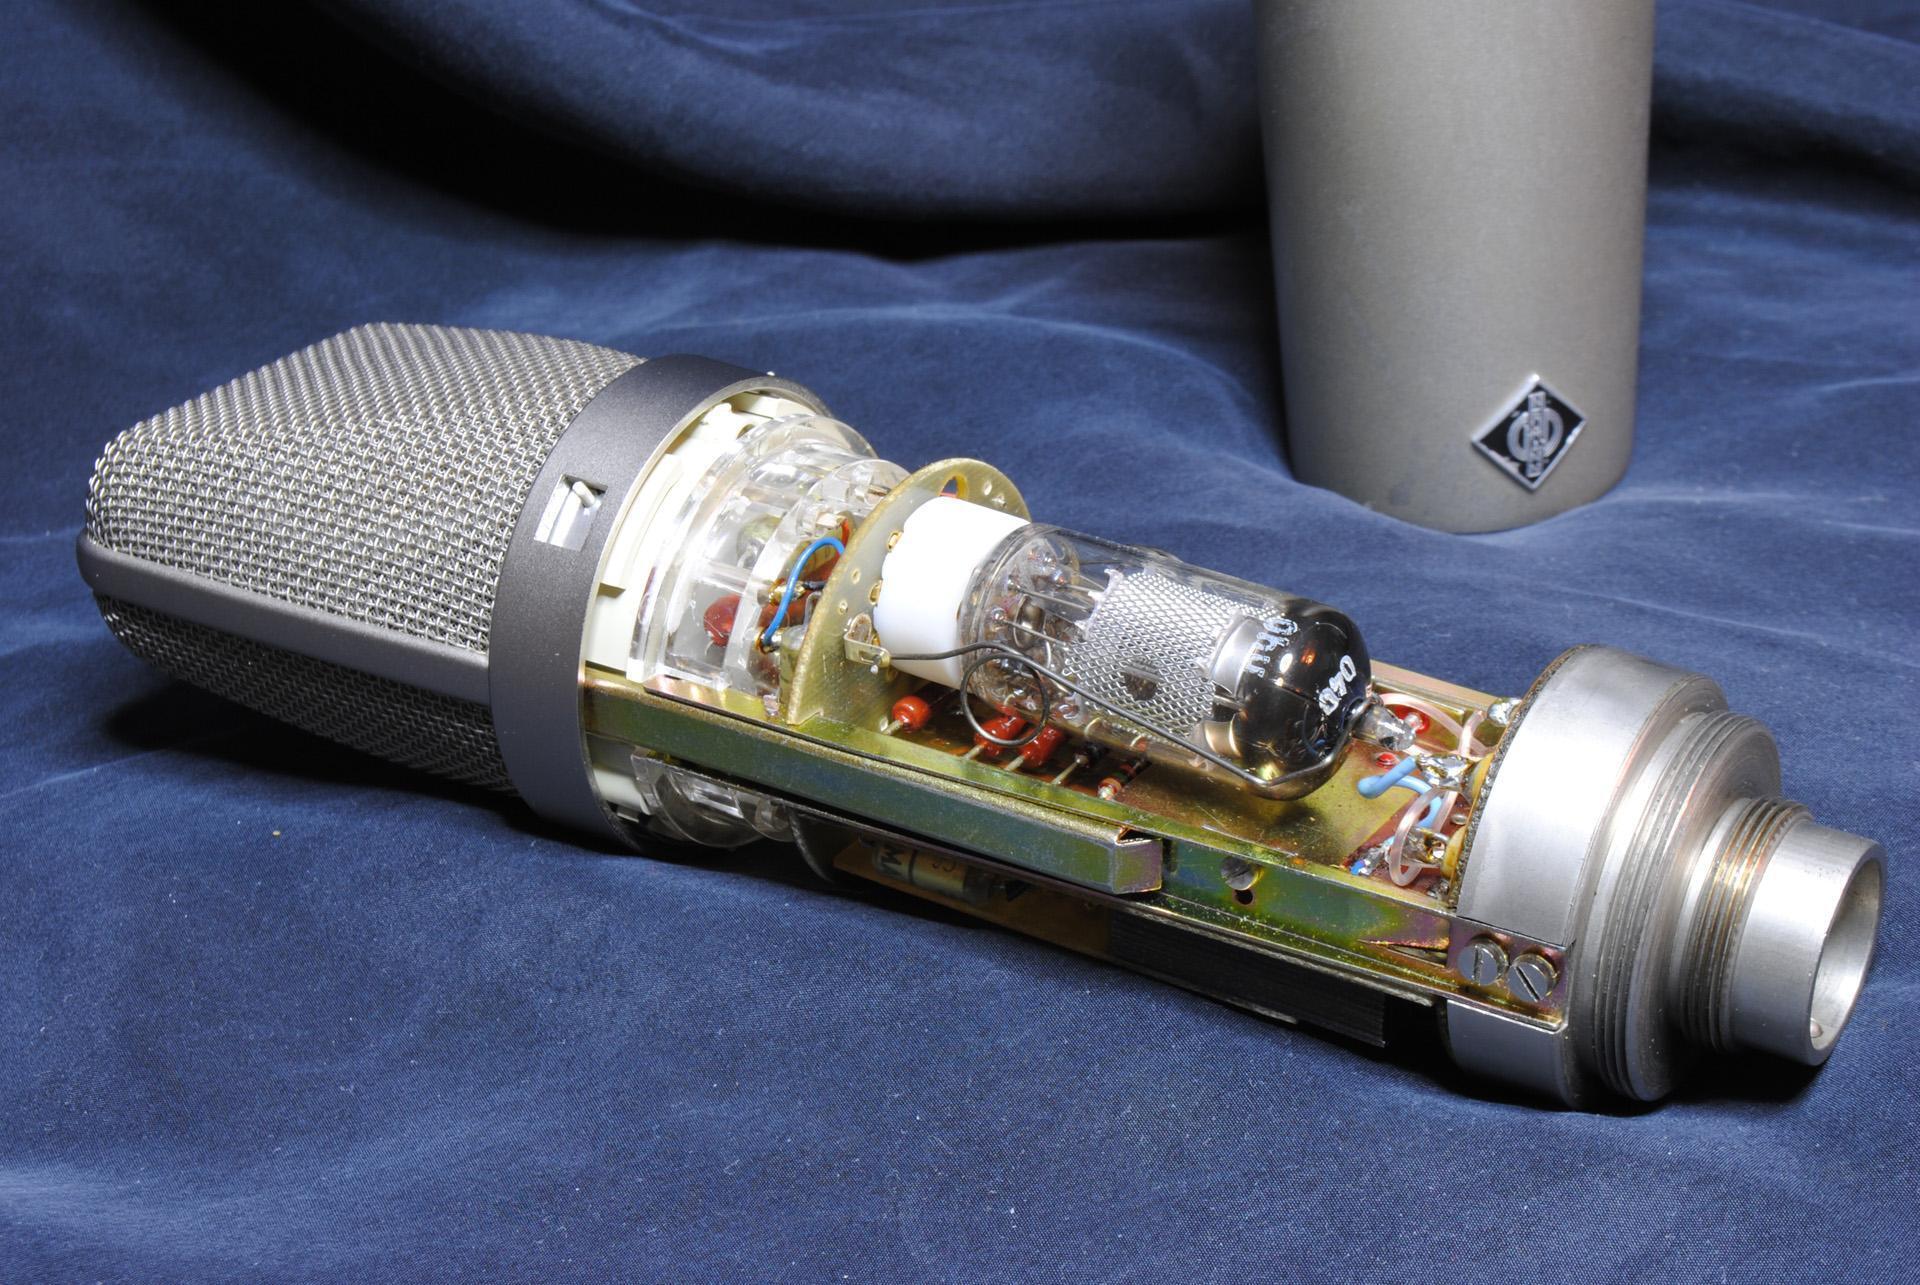
All tube microphones employ five essential components: a condenser capsule*, the vacuum tube, a power supply, internal circuitry, and an output transformer. Each of these sections serves a specific purpose and contributes to the microphone’s overall sound. The components are designed to operate as a complete “system” and are generally not intended to be mixed and matched with components from other mics. Vintage tube mics of the same brand and model should generally be used only with the power supply that has been specifically adjusted for use with the tube in that one particular microphone.
While most tube mics have condenser capsules, there are ribbon mics such as the Royer R-122V and Royer SF-24V that use ribbon elements coupled with internal tube amplification.
Condenser Capsule
The capsule of a condenser microphone is a transducer — it changes sound waves into electricity and is largely responsible for the mic’s sonic signature. A condenser capsule has two metal plates placed thousandths of an inch apart. One plate is called the backplate and is stiff and stationary. The other “plate” is a thin membrane made of plastic such as PVC or Mylar and is coated with a microscopic layer of gold to make it conductive. This plate is movable and acts as the diaphragm. Together, these two plates form a capacitor, also known as a condenser — an electronic component that has the ability to hold an electrical charge. A voltage determined by the manufacturer must be applied to charge or bias the capacitor, or the capsule won’t work.
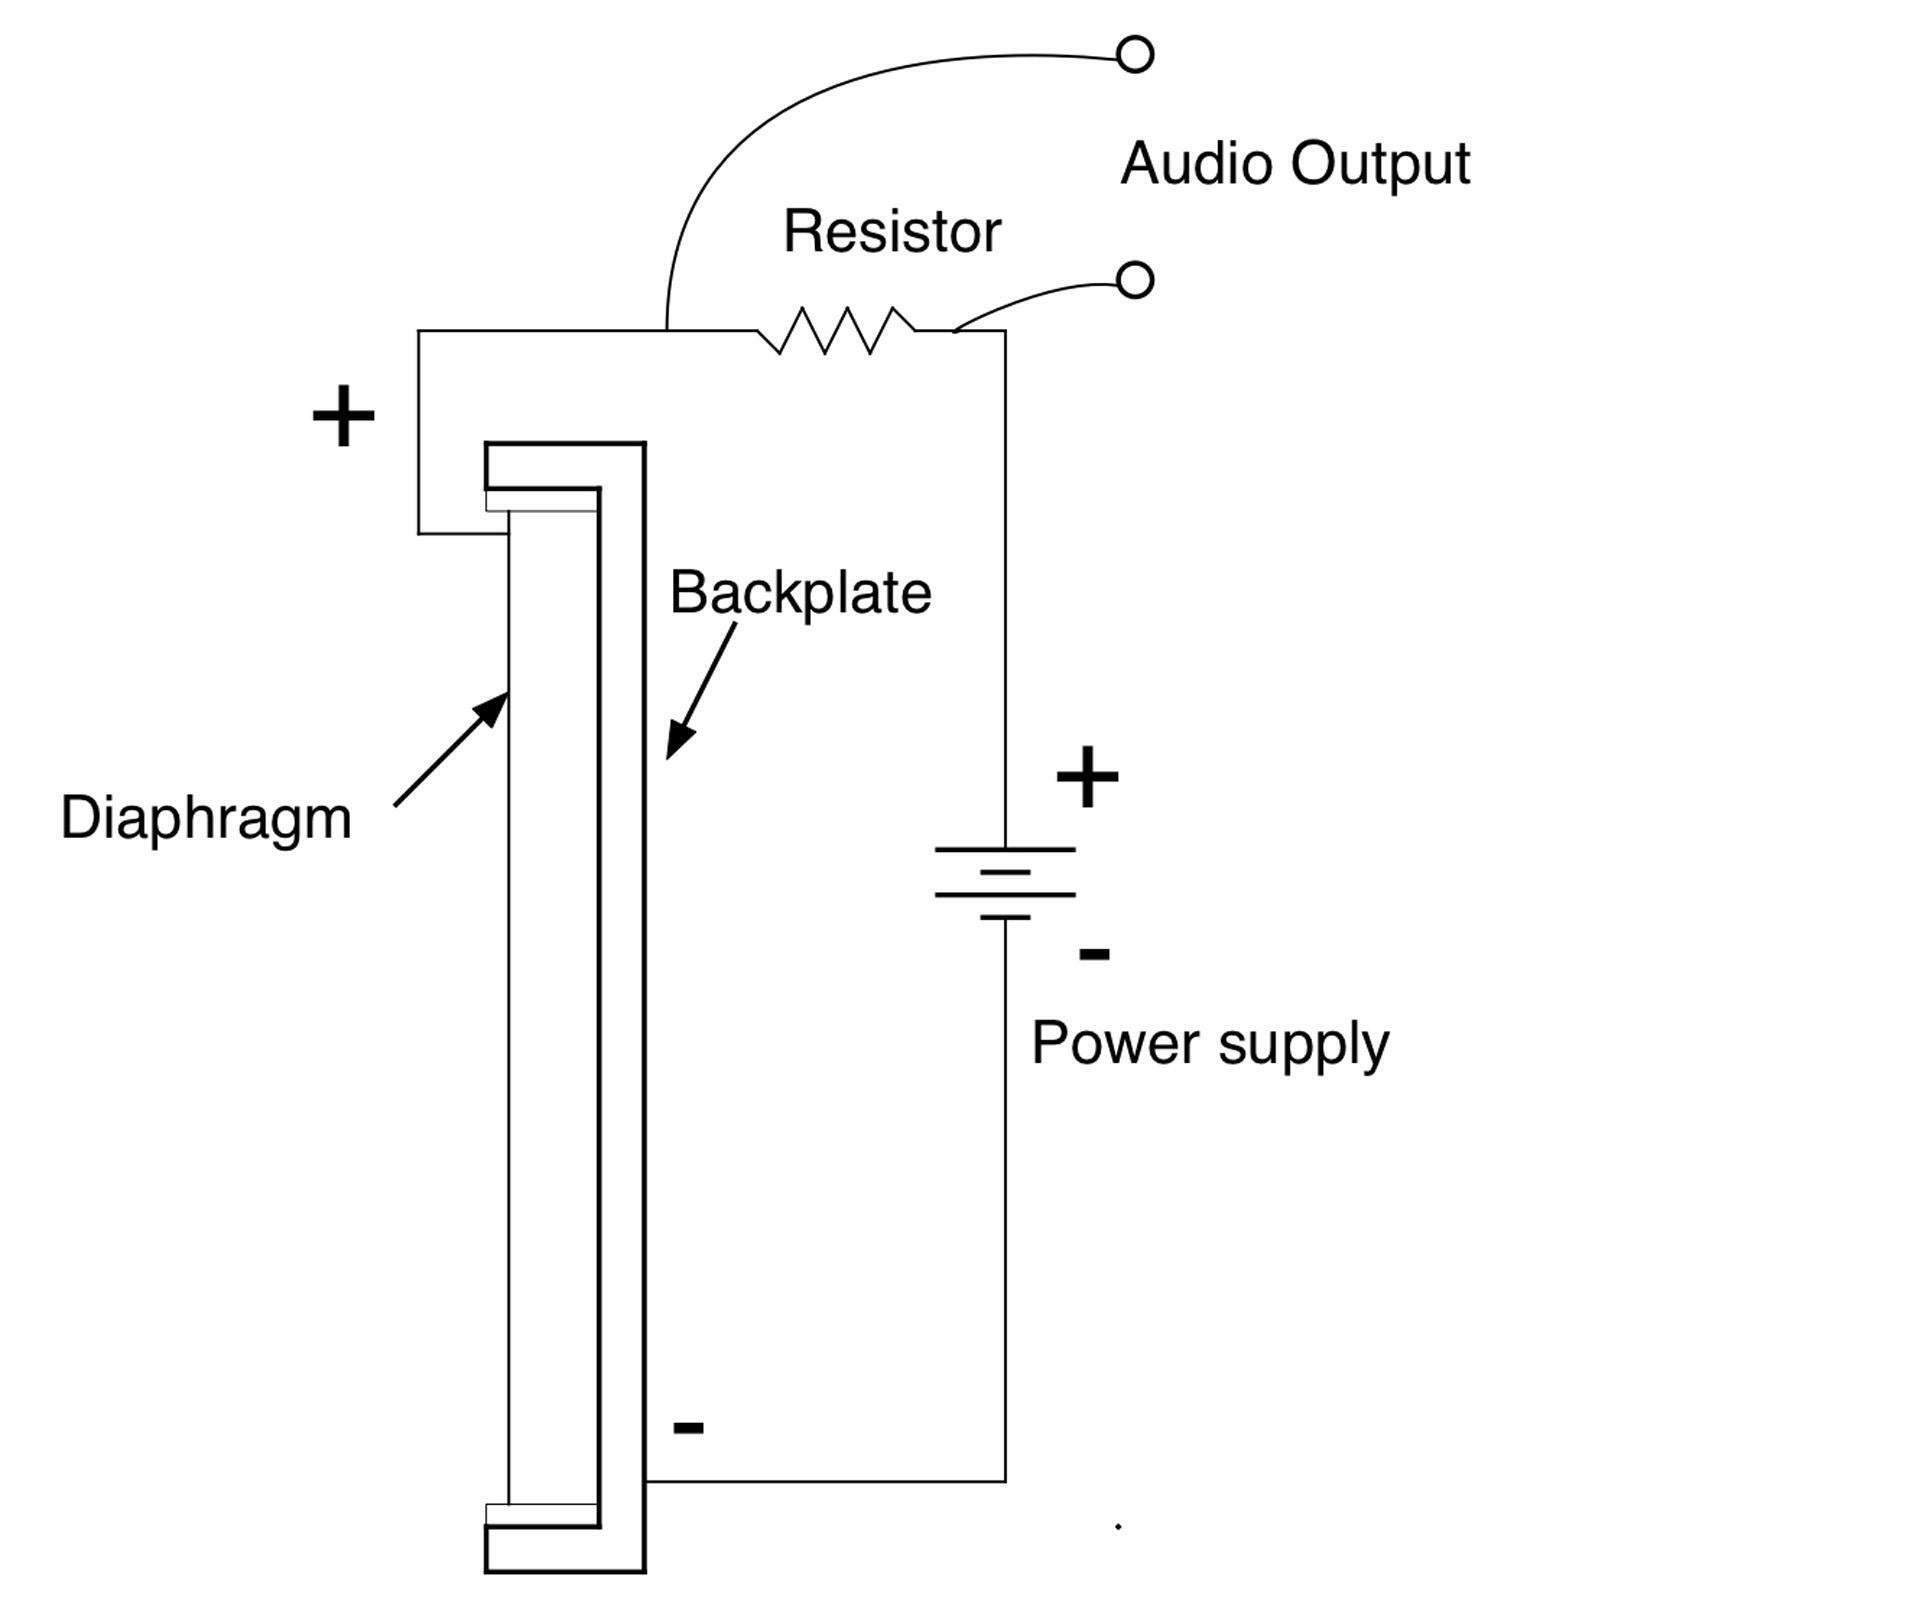
When the diaphragm is at rest, the capacitor holds a certain charge. As the diaphragm responds to changes in air pressure, it moves closer to or farther from the backplate, changing the amount of charge that it can hold. This change in voltage is the audio signal. In order for the output of the microphone to correspond to the movement of the diaphragm, the audio output is taken across a resistor as shown in the above illustration.
A condenser mic capsule is a complex device. Diaphragm tension and thickness (measured in microns) as well as size (diameter) affect frequency response, transient response, and sensitivity. Design of the backplate — which is usually brass — can require dozens of holes to be drilled all the way or partially through the plate in order to tune the frequency response and to create the desired pickup pattern. It’s no wonder that manufacturers take pride in a carefully engineered and well-made condenser capsule.
Condenser capsules can produce a fixed pickup pattern (typically cardioid) or several different pickup patterns such as omnidirectional, cardioid, and figure-8. This is often accomplished by placing two capsules back-to-back and then electrically combining their outputs with varying voltage and phase.
The voltage between the plates of the capacitor produces very little current and has an extremely high output impedance, making it almost impossible to connect the capsule directly to a microphone preamp. That’s where the mic’s internal circuitry — specifically the tube — comes into the picture.
Vacuum Tube
Vacuum tubes control and amplify the flow of current in an electronic circuit. When used in a microphone, a tube generally performs two distinct functions: (1) it acts as an impedance converter, reducing the output impedance of the capsule to an impedance that’s more manageable for the remainder of the mic’s circuitry, and (2) it amplifies the audio signal. Since the audio signal coming from the capsule is so small, it’s critical that amplification takes place as close to the capsule as possible. That’s why the tube is located inside the microphone body as opposed to placing it inside the power supply.
The tubes used in microphones can range from the common 12AX7 to the elusive VF14 used in the original Neumann U 47. Tubes chosen for microphone use need to be tested for low noise levels and low microphonics; so, when you’re in need of a replacement, the manufacturer is probably the best source. They’ll be able to supply a tube that’s appropriate for use in your microphone, and they can also advise on whether or not it may be necessary to adjust the power supply for the new tube.
Tubes have a limited lifespan and can be replaced in the event of failure. They can be socketed or soldered in place, and there’s a tradeoff between the two approaches. Socketed tubes are easier to replace but can work loose or develop noise due to oxidation on the contacts. Soldering offers a more reliable connection, but replacement will likely mean a trip to the manufacturer or to a microphone tech. This is usually not a huge issue because the tube in a microphone should last for at least several years depending upon frequency of use. Some engineers like to experiment with swapping different brands of new or New Old Stock (NOS) tubes to change the sound and/or the noise floor of the mic, and this isn’t practical when tubes are soldered in place.
Power Supply
Vacuum tubes generally require separate low-voltage (6V to 12V) and high-voltage (100V to 250V) power supplies. The low-voltage supply is for the tube’s heater, which literally heats the tube to a temperature at which electrons will flow. High voltage is applied to the plate or anode, which attracts that flow of electrons. These voltages can’t be generated from the 48-volt phantom power in a mixer or mic preamp, so an external power supply is needed.
Power-supply voltages are delivered to the microphone on the same cable that carries the audio. As a result, a tube-microphone cable has more conductors than a generic three-conductor (two-conductor-plus-shield) mic cable. A variety of multi-pin connectors are used for tube mics, but 6- and 7-pin XLR connectors have become popular of late. Since the pins in these connectors are smaller in diameter and more fragile than those on a 3-pin XLR, care should be taken to line up the connectors correctly before inserting them into the mic or the power supply (this is a good idea regardless of what type of connector is being used). Also, don’t assume that you can swap cables between tube mics, even if they have the same connectors. It’s possible that one manufacturer may use a different wiring scheme than another manufacturer.
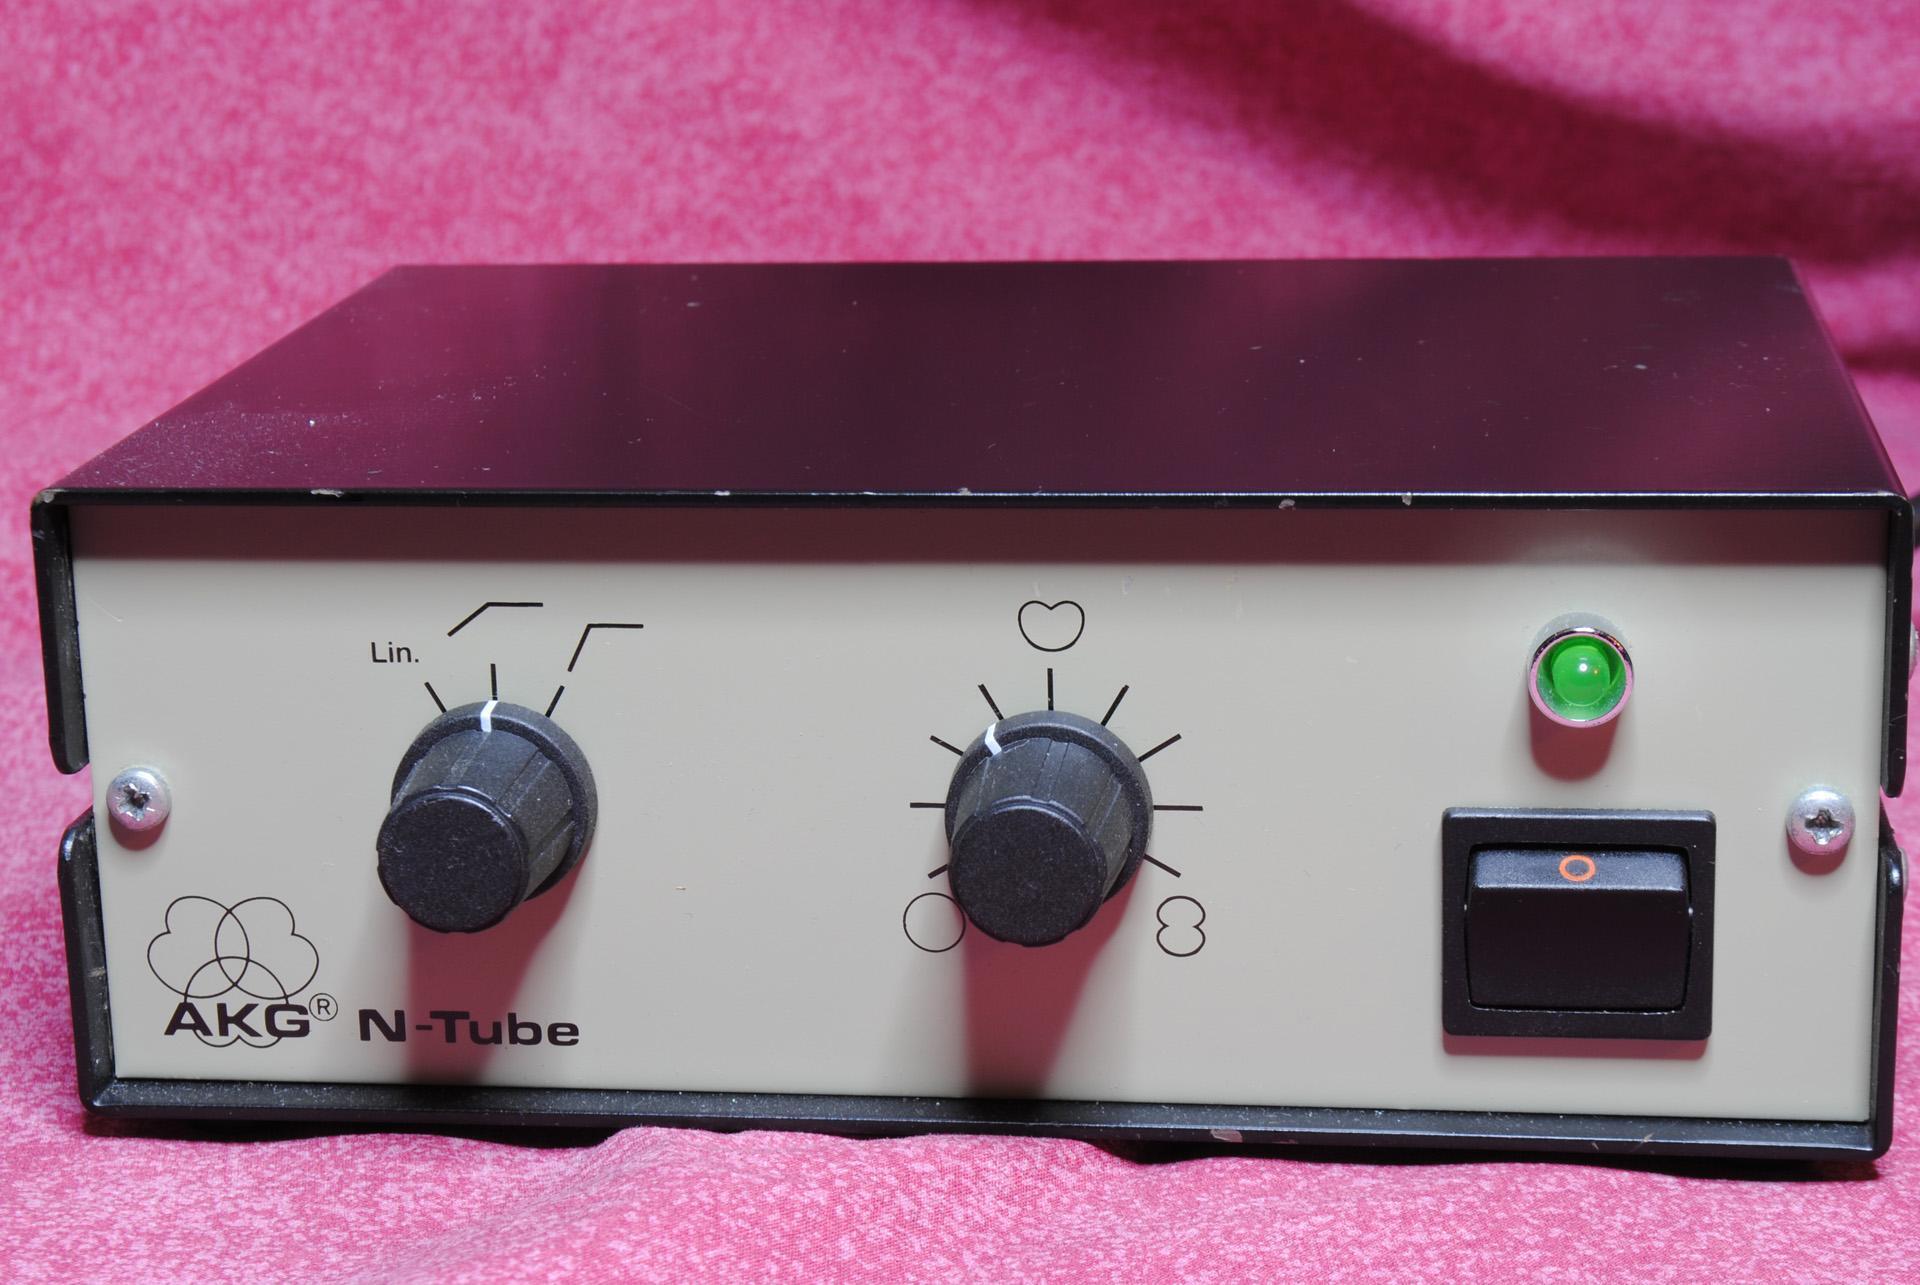
Multi-pattern tube mics can have the pattern-select switch on the mic itself or on the power supply (see photo below), which simplifies the mic’s internal circuitry and presents an interesting option at a recording session: If you place the power supply in the control room, then you’ll be able to change the pattern while hearing the result over the control-room monitors. Obviously, changing the pickup pattern will change the amount of room sound that the mic captures, but you’ll also notice that the timbre of some multi-pattern mics changes subtly when the pickup pattern is changed. Your ability to have the power supply in the control room will, of course, depend upon the length of the mic cable and whether or not you can sneak the cable through the doorway without damaging it!
The power supply may also have switches for a highpass filter or a pad, but we’ve seen tube mics where the pattern-control switch is on the power supply and the pad switch is on the microphone.
Internal Circuitry
The tube is only one part of a microphone’s internal circuitry, which may contain additional stages of amplification, highpass filtering, or a pad to prevent distortion within the microphone (at the head amp) or to prevent the output from overloading the mic preamp when capturing loud sounds. In a multi-pattern mic, the circuitry may be used to switch the rear diaphragm on or off or to adjust the voltages necessary to create a change in the pickup pattern. Sometimes, the internal circuit is engineered to compensate for a resonance or a bump in the capsule’s frequency response.
Output Transformer
A transformer is a passive device that allows an audio input to be transferred to the output without physical contact. The output transformer in a tube mic is the last stage before audio is passed to the microphone preamp. It serves two main purposes. First is to balance the audio signal, enabling it to travel down long lengths of cable without picking up noise from sources of interference such as radio stations or cell phones. The other purpose is to act as an impedance-matching device between the tube and the microphone preamp. We mentioned earlier that the tube itself acts as an impedance-matching device, which is true, but the output impedance of the tube is still too high to connect it to a mic preamp without creating problems such as noise or unwanted variations in frequency response.
Transformers not only solve the issues mentioned above, but they also can be used to favorably color the sound and are as important to a microphone’s sonic personality as are the capsule and the tube. Transformers can produce a pleasant type of distortion when “saturated” (overloaded), and that’s one of the reasons they are used in audio circuits.
Popular Tube Microphones
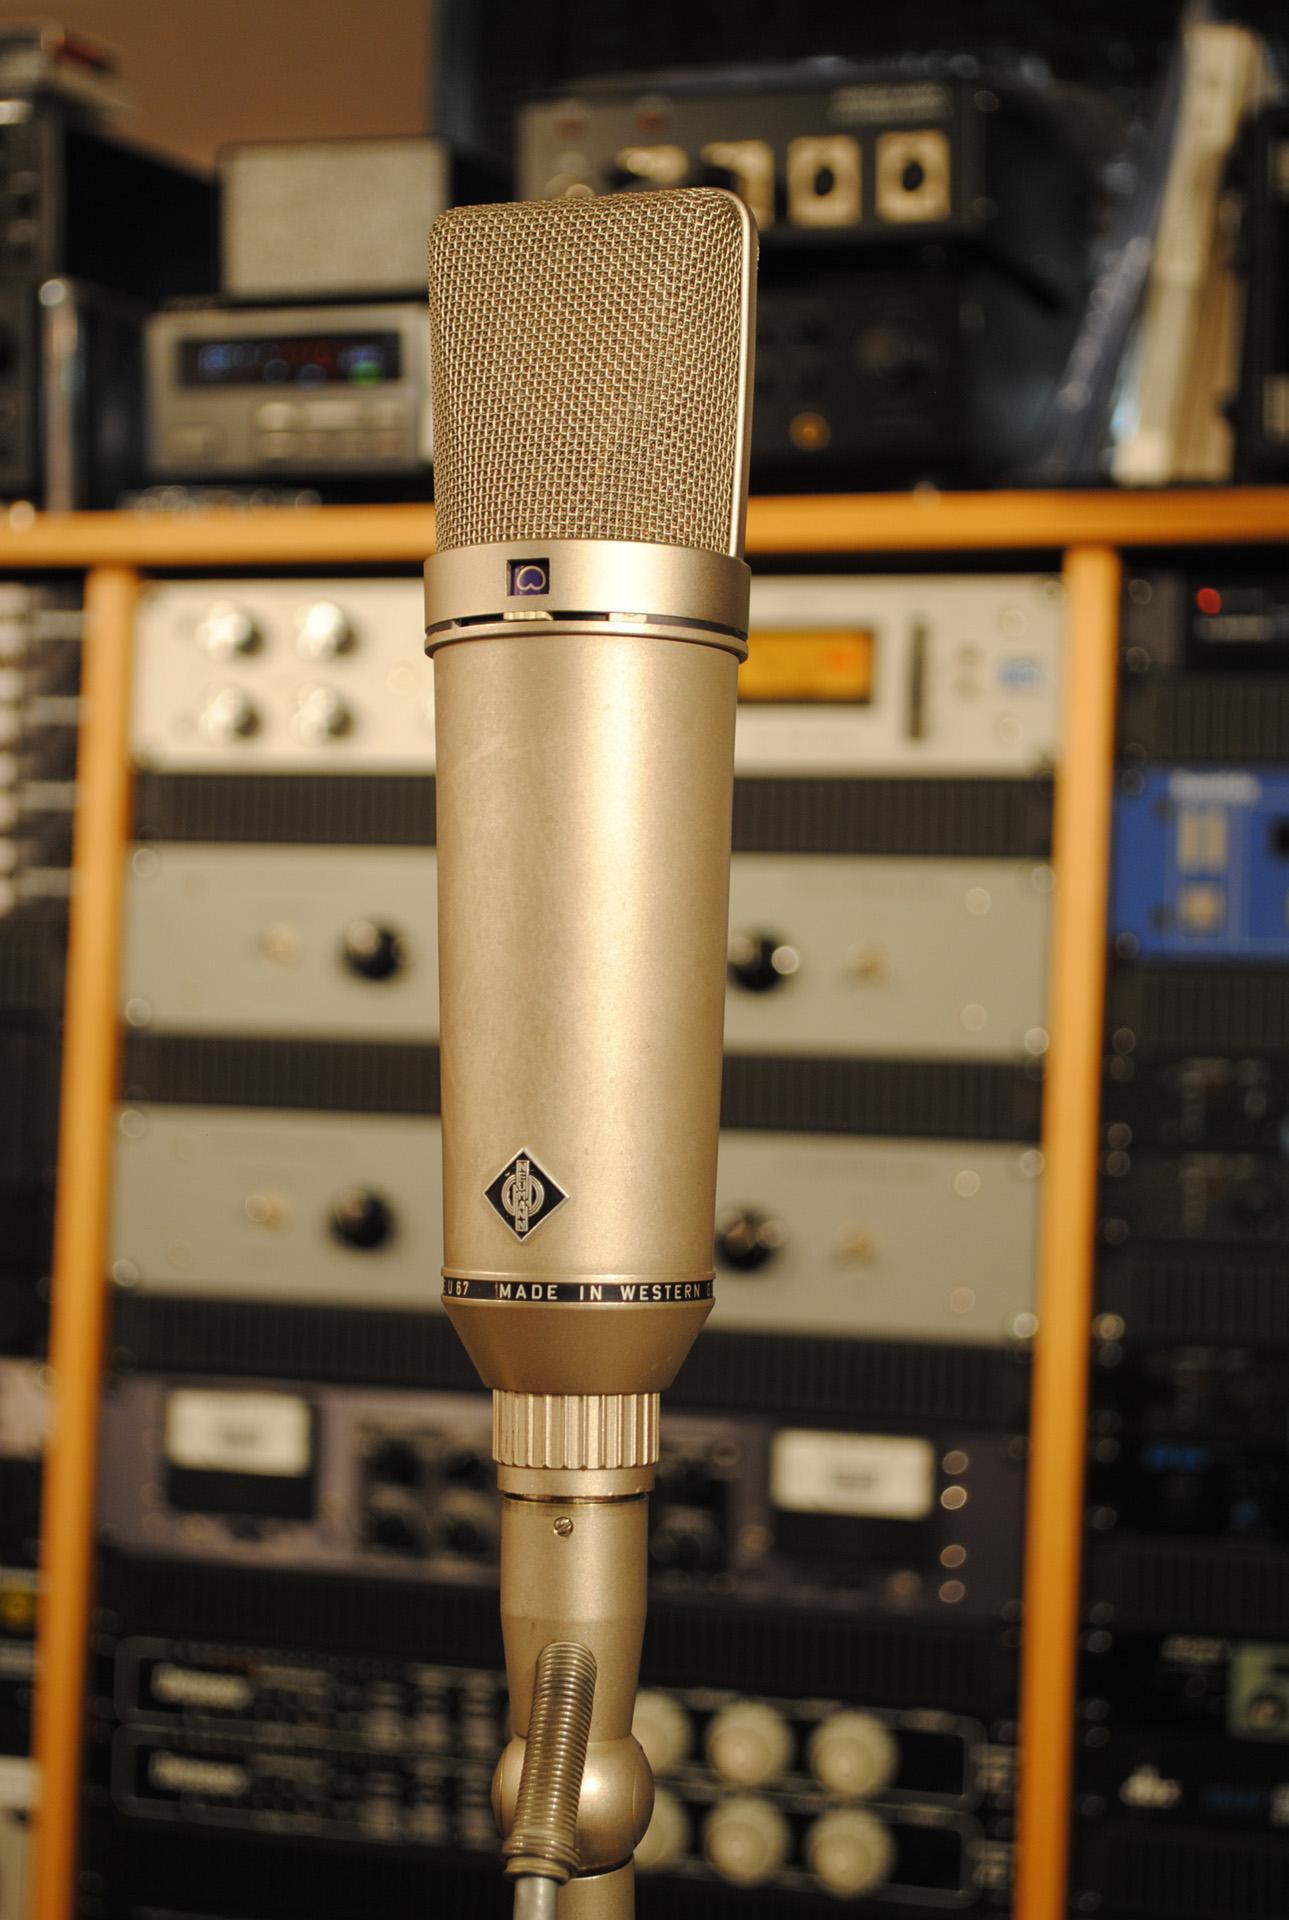
One could argue that some of the best microphones ever manufactured are classic tube mics such as the Neumann U 47, M 49, and U 67; the AKG C12; and the Telefunken ELA M 251 (a.k.a. “the big five”). Some of these mics are still in (or have resumed) production — Sweetwater offers the Telefunken ELA M 251E, the Neumann U 67, and the AKG C12 VR (a variation of the AKG C12).
Other popular tube microphones (including clones of some vintage favorites) are available from Sweetwater at a wide variety of price points, including the Avantone Pro CV-12, RODE NTK, Warm Audio WA-47, Universal Audio Bock 251, Manley Reference Cardioid, Sony C-800G, and Neumann M 149 Tube — any of which would be a welcome addition to a studio microphone closet.
Closing Thoughts
A tube microphone is a great option for a studio or musician who wants to expand the tonal palette of their microphone collection. The operation and maintenance of tube mics are a bit more involved than those of solid-state microphones, but they open a world of sonic options.
If you need help choosing a tube microphone, call your Sweetwater Sales Engineer at (800) 222-4700, and they can provide knowledgeable answers to your questions so that you get the gear you need. Whether you’re an experienced pro or just starting out, Sweetwater has a tube microphone that’s right for you.