
TC Helicon VoiceLive Play and Play Acoustic Quickstart Guide
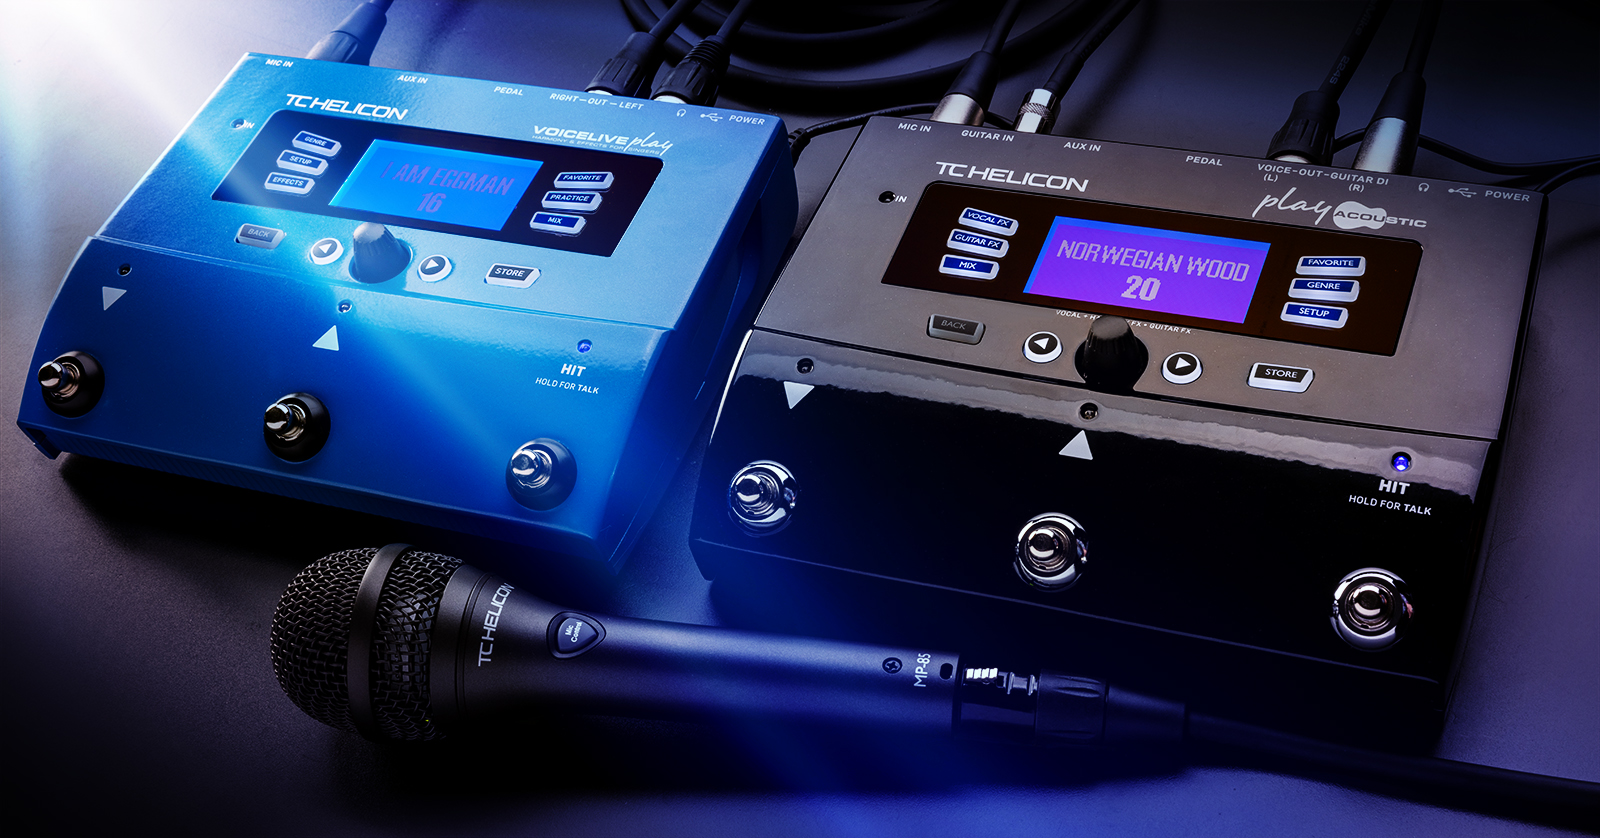
TC Helicon’s VoiceLive Play vocal harmony and effects processor and Play Acoustic guitar and vocal effects processor are powerful, multifaceted stage performance devices with features so deep you probably don’t know half of what they can do. We wrote this guide to help you get started.
Once you get your gear cabled up, our friends at TC Helicon have created tons of helpful content to explain all the features. Follow the sections below.
- Register Your Product
- How Do I Use This Thing?
- Cheat Sheets Underneath
- VoiceLive Play and Play Acoustic Setup and Connections
- Configuring the Microphone Input
- Read the Full Manual
- TC Helicon VoiceLive Play Video Manual
- TC Helicon Play Acoustic Video Tutorial
- TC Helicon VoiceSupport Librarian App
Register Your Product
IMPORTANT: You must register your TC Helicon unit within the first 90 days of purchase to receive the three-year extended warranty.
You will need to upload a PDF copy of your Sweetwater invoice as proof of purchase.
Download the user manual and quick start guide for your product.
Go to the Products page on the TC Electronic website and search for your product.
Open your product’s page, and click Downloads.
How Do I Use This Thing?
VoiceLive Play
You bought the VoiceLive Play because you are a singer who wants to sing to a pre-recorded accompaniment or work with a live band. You want the VoiceLive Play unit to analyze the music from the audio inputs or through its built-in microphones (RoomSense) and create vocal harmonies that blend with the changing chords of the music. You also want to apply a wide array of signal-processing effects to your voice to enhance your sound.
To get started, all you need is a VoiceLive Play and headphones on the table in front of you.
- Attach the power adapter to power up the unit.
- Press Setup and navigate to the Input page.
- In the RoomSense menu, choose Voice.
- Press Back.
- Plug in your headphones and put them on.
- Sit close to the unit and sing. The built-in RoomSense microphones will pick up your voice.
- While singing, press Mix and adjust the Headphone Level until it’s as loud as you like.
- Press Back.
- Use the Control knob to navigate presets as you sing. They are named after classic rock songs you may or may not recognize. Don’t bore us; get to the chorus. Press the Hit footswitch to engage the vocal harmony effect.
Play Acoustic
You bought a Play Acoustic because you are a singing guitarist or a guitarist working with a singer, and you want to have the Play Acoustic unit analyze your guitar chords and create vocal harmonies to go along with your singing. You also want to apply effects to both your guitar and your voice.
You don’t need a guitar to get started and hear the vocal effects. All you need is the Play Acoustic on the table in front of you, a microphone and a cable, and headphones.
- Connect your microphone with the cable. Plug in your headphones and put them on.
- Attach the power adapter to power up the unit.
- Press Setup and navigate to the Input page. Choose your type of microphone, either Dynamic or Condenser.
- Press Back.
- Sing into the microphone and adjust the Mic Gain knob on the left side until your voice makes the front panel LED on the left light up green.
- While singing, press Mix and adjust the Headphone Level until it’s as loud as you like.
- Press Back.
- Use the Control knob to navigate through presets. Press the Hit footswitch to engage the vocal harmony effect.
Cheat Sheets Underneath
TC Helicon provides a handy “cheat sheet” of basic functions printed on the underside of each unit. Because it’s hard to sing and play guitar while you are holding a heavy pedal over your head and peering up at the small print, we’ve reproduced the chart here:
- Looping Mode: Press and hold the Up and Down arrows. Press Down to rec/loop/overdub. Press Up to stop. Hold to erase. Press Hit to exit.
- Tap Delay Mode: Press and hold Up + Hit. Tap Hit to set the tempo. To set the tempo, manually press Up or Down.
- Set Mic Gain: While singing, turn up the Mic Knob until you see green LED lights. If the LED turns yellow, that’s ok. Avoid red.
- Phantom Power: To enable +48V phantom power, press Setup and change the Mic Type to Condenser.
- Mic Control: To enable Mic Control, press Setup and change the Mic Type to MP-75.
VoiceLive Play and Play Acoustic Setup and Connections
VoiceLive Play
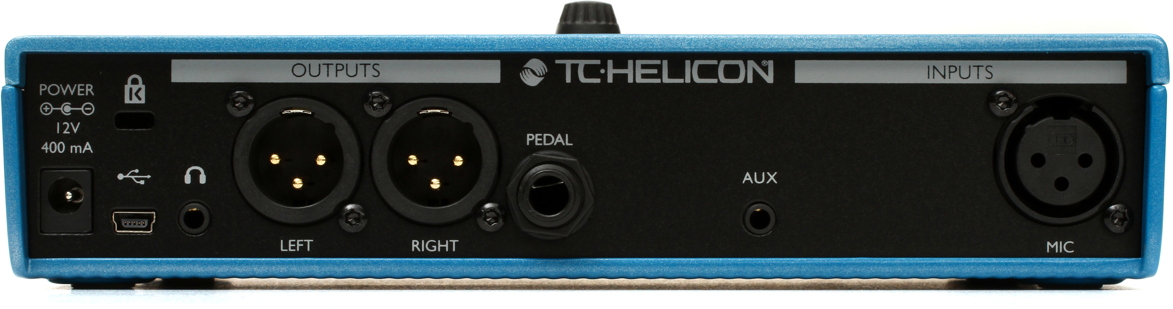
Back panel connections on the TC Helicon VoiceLive Play
- Mic: Insert an XLR cable connected to a microphone for singing. You will need to configure the settings on the unit depending on what kind of microphone you are using.
- Aux: Connect a 1/8-inch TRS stereo cable to provide analog audio input from a phone, a tablet, or another audio device. This enables sending a stereo track into the unit for effects processing (including the Vocal Cancel function, which attempts to remove the vocal from a recording), as well as passing the signal through to the USB audio output for recording in a DAW.
- Pedal: You have the option of connecting a TC Helicon Switch 3 three-button footswitch, sold separately, to which you can assign real-time control functions, such as looping.
- Outputs: Connect a stereo pair of left and right XLR cables to send your unit’s signal to speakers or a mixer and PA system.
- Headphones: Connect headphones to the 1/8-inch TRS jack.
- USB: Attach the included USB cable to the USB mini-B jack to connect to a Mac or a Windows PC. This provides both a connection to TC Helicon’s VoiceSuppport librarian software and, more importantly, a USB audio interface to send and receive digital audio to your DAW for recording.
- Power: Connect the included 12V center-negative power supply to power the unit.
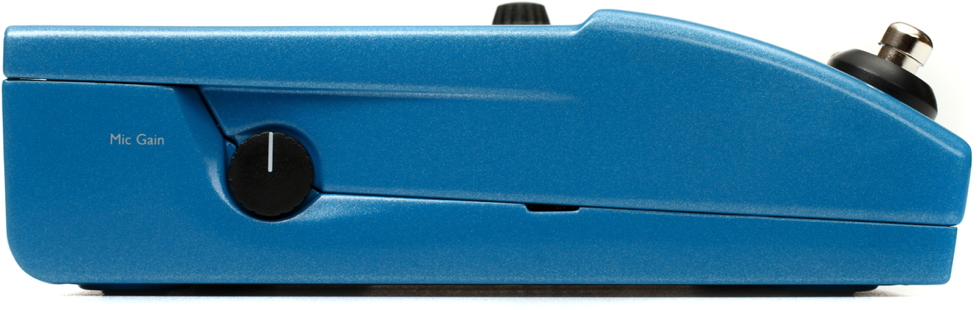
The microphone input volume is set using the Mic Gain on the left side of the unit
- Mic Gain: The microphone’s input volume is controlled by the all-important Mic Gain knob on the left side of the unit. If you don’t hear any vocal input, check the setting on this knob.
The pair of Outputs can be configured in different modes that you select from the Setup menu:
- Stereo: Outputs a stereo mix of all voices and other inputs.
- Mono: A monaural mix of all effected signals, including vocal harmonies, is sent out the Left channel. The “dry” vocal, which, if used, includes tone and pitch correction, is output on the Right channel.
- Dual Mono: A monaural effected voice signal, including harmonies, is sent out the Left channel. The Aux signal is output on the Right channel. This is useful to send to a mixer in a “karaoke” situation.
Play Acoustic
The Play Acoustic has a similar layout to the VoiceLive Play above, but there are differences.
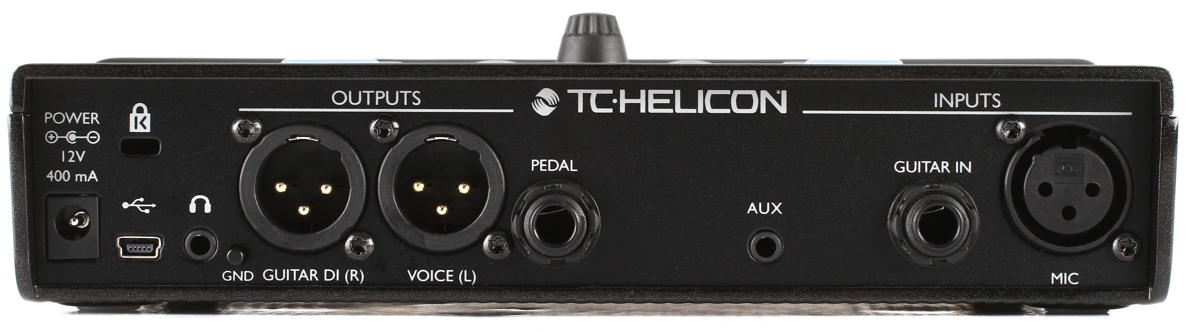
The Play Acoustic has similar connections to the VoiceLive Play, with important differences
- Guitar In: Insert a 1/4-inch TS guitar cable to connect your guitar.
- Outputs: Connect a pair of XLR cables to your speakers, mixer, and PA system.
- GND: The ground-lift switch. If you experience hum in the signal, try pressing the switch to reduce or remove the hum.
On this Play Acoustic, the pair of Outputs can be configured in these modes:
- Vocal/Guitar (DI): The monaural effected vocal signal and the signal from the Aux input, if used, are output on the left channel, and the monaural effected guitar signal is output on the right channel.
- Stereo: The effected vocal and guitar, together with the Aux input, if used, are mixed into a stereo output.
- Mono: The effected Vocal and Guitar signals are output through the left channel, and the dry vocals are output through the right channel.
Configuring the Microphone Input
To set your unit up with your microphone, go to the Setup menu and indicate the type. There are four relevant options:
- Dynamic Mic
- Condenser Mic (selecting this will provide phantom power)
- MP-75 Mic
- USB
NOTE: You can connect almost any make or model of dynamic or condenser microphone to the VoiceLive Play or the Play Acoustic.
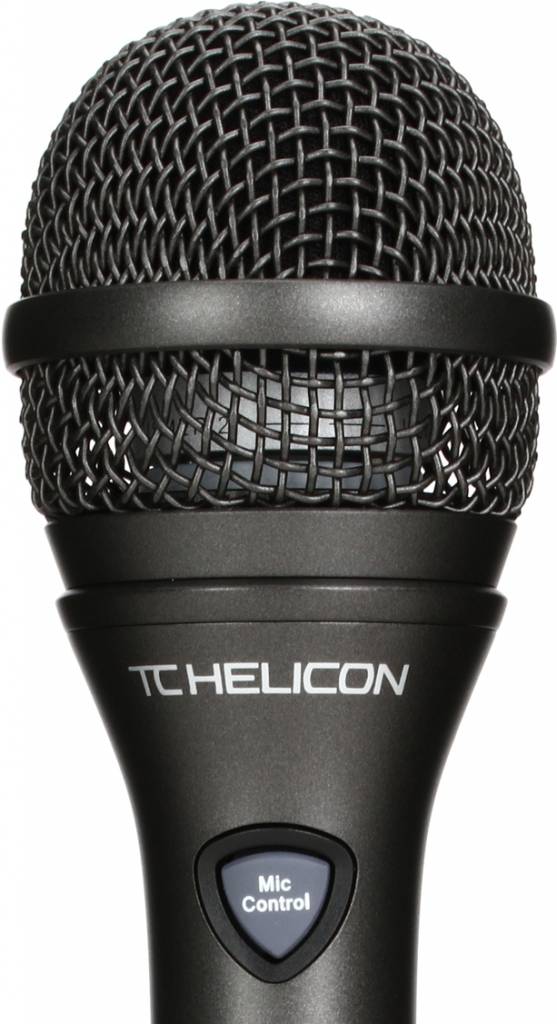
The TC Helicon MP-85 microphone has a Mic Control button for remotely triggering functions on the VoiceLive Play or Play Acoustic
For the third option, the owner’s manuals and the onboard settings on the units refer to the TC Helicon MP-75, a dynamic microphone with a proprietary Mic Control button that can be used to remotely turn effects on or off on the VoiceLive Play or Play Acoustic. The MP-75 is discontinued; the new model is the TC Helicon MP-85. You can connect an MP-85 and set the unit to the MP-75 setting and get the same result.
By default, the MP-85’s Mic Control button triggers the Hit function on the unit, but you can assign it to a different function.
With the fourth option, USB, you can send a mono vocal track from your computer’s DAW into the unit for audio processing.
Read the Full Manual
The VoiceLive Play and Play Acoustic units are easy to use at the top level, but there is much more under the hood than you might think. It’s time to get under that hood.
The good folks at TC Helicon emphasize that for these products, you really do need to read the owner’s manuals from start to finish, or you may miss important information. They also provide extensive video tutorials, and we provide links below, but there’s no substitute for these manuals.
The VoiceLive Play and Play Acoustic product pages are found on the TC Electronic website. On the product page, click Downloads, and you’ll see the Owner’s Manual and the Quick Start Guide for your product.
TC Helicon VoiceLive Play Video Manual
TC Helicon Play Acoustic Video Tutorial
TC Helicon VoiceSupport Librarian App
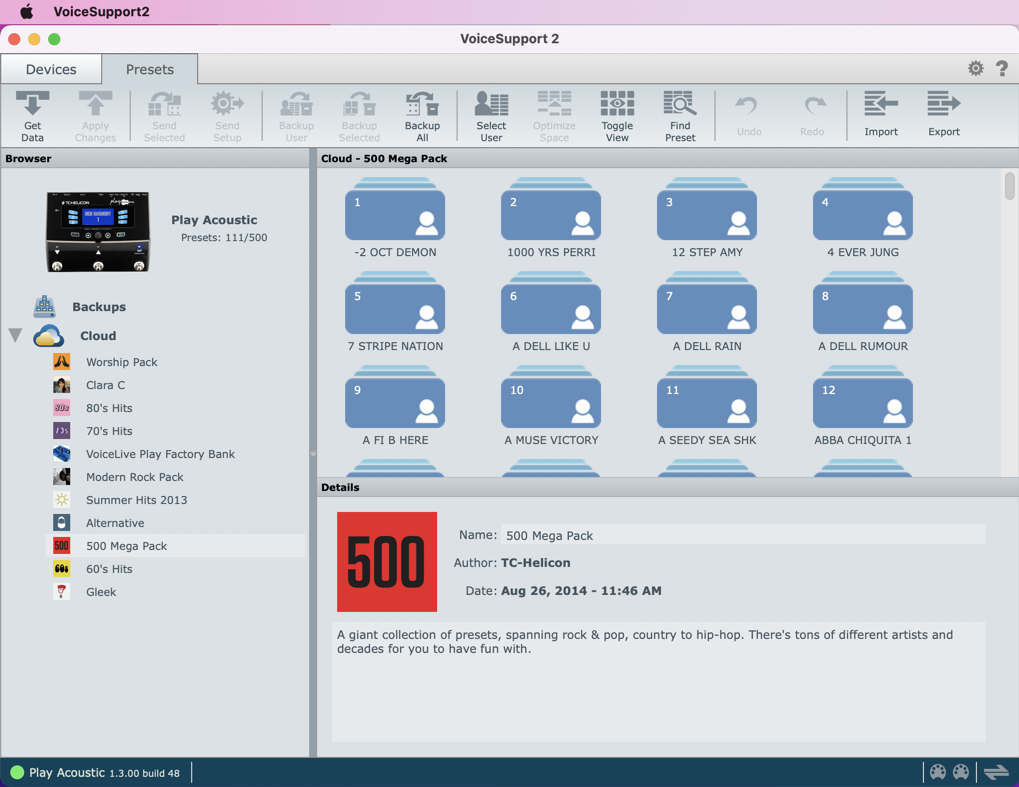
The TC Helicon VoiceSupport app gives you access to hundreds of downloadable effects presets
After you register your purchase with TC Helicon, download and install the VoiceSupport 2 app.
On the Products page on the TC Electronic website, search for “VoiceSupport.”
Open the VoiceSupport product page, and click Downloads. Download and install the newest version of the VoiceSupport app.
After you run the installer, connect your unit to your computer via the included USB data cable, and launch the app.
The app enables you to download hundreds of additional effects presets from TC Helicon, in addition to letting you manage and store your own library of presets for recording and live performance.
When you need help, Sweetwater has the answers!
Our knowledge base contains over 28,000 expertly written tech articles that will give you answers and help you get the most out of your gear. Our pro musicians and gear experts update content daily to keep you informed and on your way. Best of all, it’s totally FREE, and it’s just another reason that you get more at Sweetwater.com.


Offer applies only to single-receipt qualifying purchases. Select manufacturers may require that only the manufacturer’s products qualify towards the minimum purchase amount needed to be eligible for promotional financing. Otherwise, an invoice that meets the minimum purchase amount and contains at least one qualifying manufacturer product is eligible for promotional financing. No interest will be charged on promo purchase balance, and equal monthly payments are required on promo purchase until it is paid in full. The payments equal the amount financed divided by the number of months in the promo period, rounded up to the next whole dollar. These payments may be higher than the payments that would be required if this purchase was a non-promo purchase. During the last month(s) of the promo period the required monthly payment may be reduced due to the prior months’ rounding. Regular account terms apply to non-promo purchases. New Accounts as of 07/31/2025: Purchase APR is 34.99%. Penalty APR is 39.99%. Min Interest Charge is $2. Existing cardholders: See your credit card agreement terms. Subject to credit approval.
Offer applies only to single-receipt qualifying purchases. No interest will be charged on the promo balance if you pay it off, in full, within the promo period. If you do not, interest will be charged on the promo balance from the purchase date. The required minimum monthly payments may or may not pay off the promo balance before the end of the promo period, depending on purchase amount, promo length and payment allocation. Regular account terms apply to non-promo purchases and, after promo period ends, to the promo balance. New Accounts as of 07/31/2025: Purchase APR is 34.99%. Penalty APR is 39.99%. Min Interest Charge is $2. Existing cardholders: See your credit card agreement terms. Subject to credit approval.
The estimated required monthly payment shown which excludes taxes and delivery equals the amount financed divided by the number of months in the promo period, rounded up to the next cent. During the last month(s) of the promo period the required monthly payment may be reduced due to this rounding. These payments apply only with the financing offer shown. If you make these payments by the due date each month, you should pay off this amount financed within the promo period, if it is the only balance you are paying off. If you have other balances on your account, this payment will be added to any other minimum monthly payments.
Applies only to select items from this manufacturer. Ask your Sweetwater Sales Engineer for more details.