

If you bought a Creation Station lately, then it has Windows 10 installed — and part of the operating system is the Groove Music player. Although originally designed for Microsoft’s ill-fated streaming service, it’s actually a very capable music player with one glaring flaw: there’s no real documentation, so the net is filled with threads (mostly unanswered) like “Groove Music not updating library,” “don’t know how to update Groove Music in Windows 10,” “can’t figure out how to reset Groove Music,” “how to fix Unknown Album problem,” “how to add custom artwork,” and the like — the list goes on.
I too ran into these problems, so I checked out other music players and, unfortunately, found them lacking. iTunes doesn’t recognize nearly as many formats, and the other free players I tried were either more complicated than I wanted, or too simple. So, being stubborn, I kept experimenting with Groove Music until I found out that not only can it behave well, but it’s really quite cool. So whether you want music on your desktop while you work or a USB stick to load in your car’s audio system, hopefully the following will serve as the missing documentation on how to make Groove Music a productive member of your computer-based society (fig. 1).
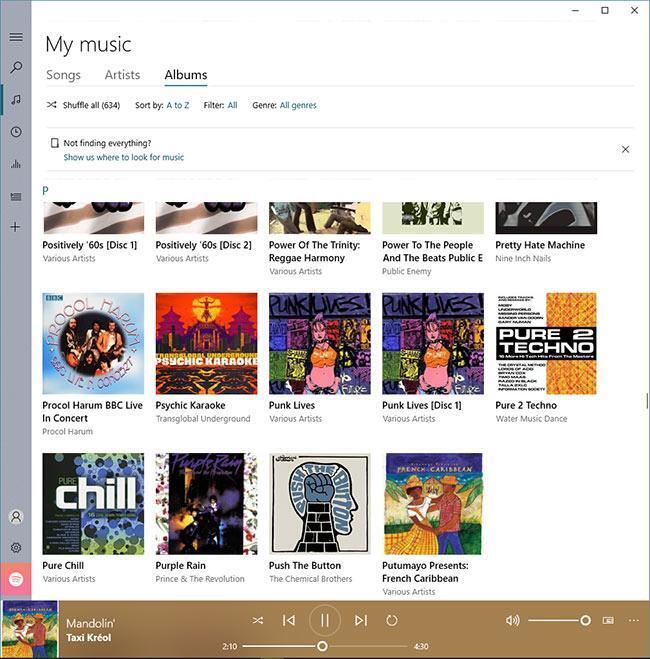
Figure 1: Groove Music with album art.
File Formats
Groove Music can read MP3, FLAC, AAC, M4A, WAV, WMA, AC3, 3GP, 3G2, and AMR files as well as some more esoteric ones (but not AIF). Neither Groove Music (nor iTunes) can read CDA files directly from a CD; they need to be ripped to one of the above formats first. For comparison, iTunes supports MP3, AAC, AIF, Apple Lossless, Audible AA, WAV, and iTunes-purchased M4A and M4P files. (At least for now, you’ll need to convert FLAC files to Apple Lossless format.)
Formatting Memory
I keep music files on a USB stick so the music doesn’t take up internal storage, and it’s transportable from computer to computer. Format the stick as NTFS, then right-click on it and choose “Allow files on this drive to have contents indexed in addition to file properties.” Asking Groove Music to organize files on a USB stick formatted as FAT32 (recognized by just about everything on the planet, including car stereo systems) is problematic. However, for car audio systems and other portable players, you can format a USB stick as FAT32 and copy over the files from your “master,” NTFS-formatted music library.
Fixing “Unknown Album” and “Unknown Artist”
This is one of the most frustrating aspects of Groove Music. Any music without an album tag will end up in an album called “Unknown Album.” Click on it to see a list of the music Groove Music can’t sort. Right-click on a title and choose Edit Info to see the music’s full name. However, I recommend not editing the info — if previously unknown, the music will disappear until you reset the library. I prefer to bring tagless music into a tagging program (like MP3Tag, Tigo Tago, or TagScanner). The VLC Media Player from videolan.org works great; drag the music you want to tag into it, and choose Tools > Media Information. Enter the album, artist info, and other metadata, then click on Save Metadata. The music will be removed from Groove Music’s Unknown Album and appear with your other songs and albums (with generally no reset required).
When to Use Edit Info
If an album is known and its data is part of the database, you can tweak titles, song order, artist, and artwork (see next) without having to reset the database. Any changes will be made immediately. One cool feature is that you can change the track order by changing the Track number, so if you’re into making a collection or want to try different track orders on your next album, it’s easy to do.
Adding Album Artwork
Groove Music can find album artwork if you right-click on the album, choose Edit Info, and then click on Find Album Info (make sure Show Advanced Options is on). If no artwork is available, check Amazon or other sites that sell CDs. Download the art, and save it (fig. 2).
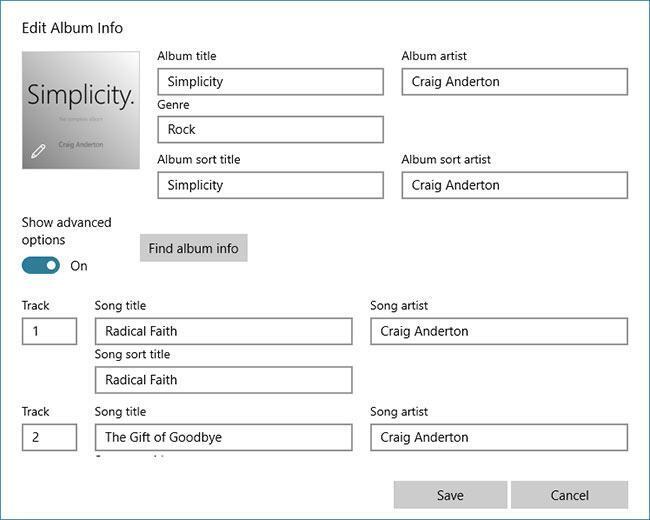
Figure 2: Custom album artwork has been added in the Edit Album Info.
In the album’s Edit Info window, click on the default circle-in-square art, which opens a path to navigate to the desired artwork. Click on Open. After the artwork appears, click on Save. Groove Music can scale art, but I haven’t tested its limits — I resize to 150 x 150 pixels.
Resetting the Database
If you make changes and they don’t show up in Groove Music, it may be time for a database reset. This is a noninvasive operation, so don’t be afraid to do it. To reset the database, close Groove Music. Then navigate to:
C:\Users\[your user name]\AppData\Local\Packages\Microsoft.ZuneMusic_16-digit combination of random letters and numbers\LocalState\Database\16-digit combination of random letters and numbers
Delete the file within the Database folder that’s named with the incomprehensible mess of letters and numbers, then open Groove Music. It will take a while to add all the music if you have a large collection, but your library will be up to date when the operation completes.
You can also reset by choosing Settings > Apps & Features > Groove Music > Advanced Options and then clicking on the Reset button, but this reinstalls the app and reverts to default settings, so you’ll lose the app data. Use this option if Groove Music becomes corrupted or is completely unresponsive (but make sure your audio subsystem is in working condition — for example, Groove Music won’t load if it’s assigned to an external audio interface that’s turned off).
Uninstalling Groove Music
After reading this, hopefully you realize that Groove Music can do what you want. But if you want to uninstall, you can do so with Windows Powershell. (The standard Programs & Features uninstall option can’t uninstall it.)
- Make sure Groove Music isn’t open.
- Type Powershell in the taskbar’s Search field. When Windows Powershell appears in the start menu, right-click on it and choose Run as Administrator.
- Click Yes when it asks about making changes.
- At the command prompt, type Get-AppxPackage | select name, PackageFullName
- You’ll see a listing of all packages. Locate the line that starts with Microsoft.ZuneMusic, and then copy the entire line (fig. 3) — it will look something like Microsoft.ZuneMusic_10.18081.11121.0_x64__16-digit combination of random letters and numbers.
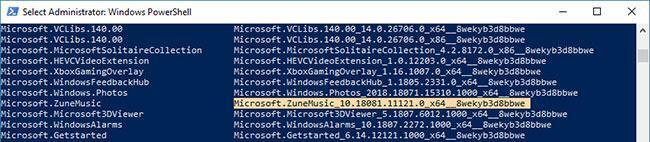
Figure 3: Copy the highlighted line prior to uninstalling.
- At the command prompt, type Get-AppxPackage PackageFullName | remove-AppxPackage. Note that PackageFullName should be what you copied in step 5.
- Hit enter, and Groove Music will vanish.